Figures & data
Figure 1. Finite element model meshes. This is an illustrative representation of both the (a) 2-D finite element model used for simulating a 3-cm single internally cooled electrode (red arrow) in a 4-cm tumor (yellow tumor, white arrow), and (b) the 3-D finite element model used to simulate a 2.5-cm cluster electrode (red arrow) in a 4-cm tumor (white arrow).

Figure 2. Measurement of temperatures at the tumor and ablative margin. In this example, a 3-cm single electrode is inserted into a 3-cm tumor (light green area). The times needed to achieve a 50°C isotherm at the margin of this tumor as well as at the ablative margin 5-mm (red zone) surrounding the tumor were calculated.
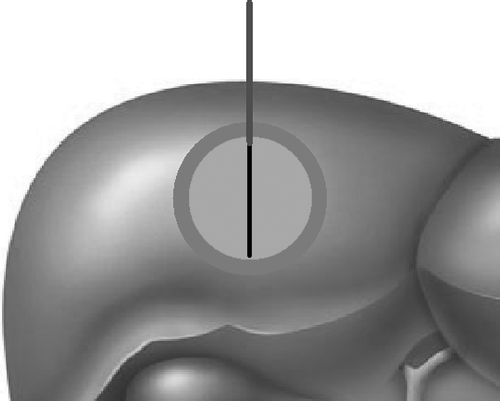
Figure 3. The effect of tissue perfusion on the size of the ablation zone, and the time required to reach thermal equilibrium. The effects of varied perfusion from 0 kg/m3-s to 10 kg/m3-s on tissue heating are displayed for (a) 3-cm single and (b) 2.5 cm cluster electrodes. Black arrowheads represent the time necessary to achieve 95% of the largest 50°C isotherm; while open arrows represent 90% of the largest 50°C isotherm. Increasing perfusion not only reduces the size of the heated zone, but also reduces the time necessary to achieve 90% or 95% of the 50°C isotherm. Additionally, cluster electrodes substantially increase the size of the 50°C isotherm.

Figure 4. Tissue perfusion vs. 50°C isotherm. In a single-compartment model, the size of the ablation zone decreases with increasing tissue perfusion. As tissue perfusion increases (0–10 kg/m3-s), the size of the ablation zone (demonstrated here as the 50°C isotherm) decreases. This is represented by negative exponential correlations between perfusion and the 50°C isotherm (i.e. 90% and 95% of maximum) for both 3-cm single and 2.5-cm cluster electrodes.
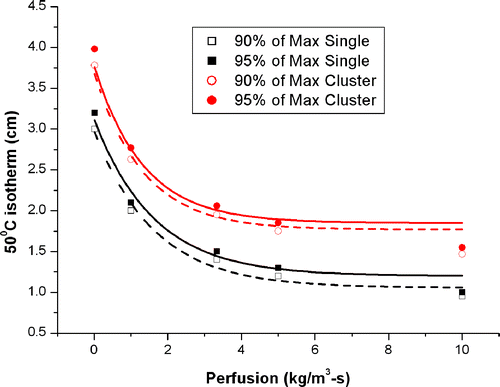
Figure 5. Tissue perfusion vs. time to reach thermal equilibrium. The time required to achieve thermal equilibrium decreases in a negative exponential manner with increasing tissue perfusion. Increasing tissue perfusion (0–10 kg/m3-s) decreases the time required to achieve tissue thermal equilibrium (90% and 95% of maximum thermal equilibrium).
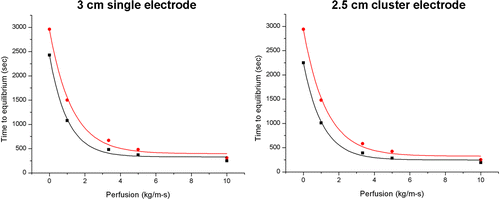
Table I. Effect of perfusion on the size of the ablation zone and time required to achieve thermal equilibrium. Increasing tissue perfusion (0–10 kg/m3-s) for both a 3-cm single and 2.5-cm cluster electrode decreases both the 50°C isotherm and the time required to achieve thermal equilibrium in a negative exponential manner.
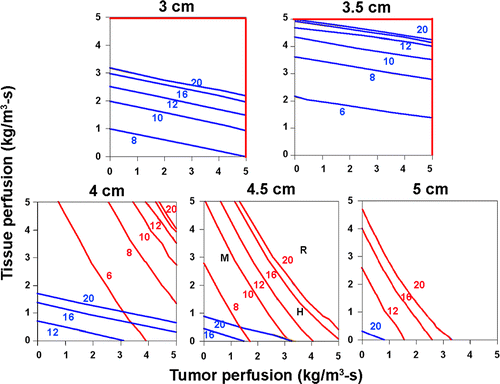
Figure 6. Surface contour maps for RF ablation of varied tumor and tissue perfusion. This set of surface contour maps plots the different 50°C isotherms at 12 min for varied inner (i.e. tumor; X-axis) and outer perfusions (i.e. background tissues; Y-axis) (0–5 kg/m3-s) over a range of tumor sizes (2–5 cm in diameter) for both 3-cm single and 2.5-cm cluster electrodes. For smaller tumors, the horizontal pattern denotes that results were dependent largely on background tissue perfusion. For larger tumors (greater than 4 cm for single and 5 cm for cluster electrodes), the vertical orientation of the 50°C isotherm (i.e. the amount of ablation) depended largely on the perfusion within the tumor.
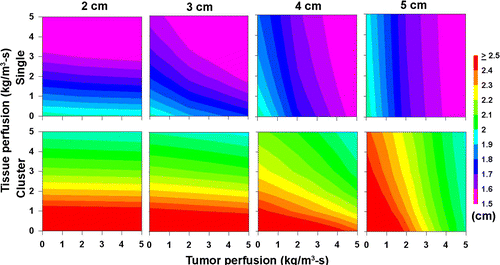
Figure 7. Effect of perfusion and the time required to ablate with RF energy. The 50°C isotherm for achieving complete tumor ablation without (red isobars) and with (blue isobars) a 5-mm ablative margin was plotted for different RF ablation times (6–20 min) and different tumor sizes (2–4 cm diameter) using a 3-cm single electrode. Tumor and background tissue perfusion were varied 0–5 kg/m3-s. For 2- and 3-cm tumors, the red line denotes that complete ablation of the tumor could be achieved at 6 min of RF ablation time for all levels of outer and inner perfusion. With increasing tumor size, achieving complete ablation requires longer RF times, achieving an ablative margin becomes increasingly difficult, and the effect becomes increasingly dependent on inner perfusion. Additionally, there are almost no inner/outer perfusion levels at which an ablative margin could be achieved for tumors equal to, or larger than 3.5 cm.

Figure 8. Effect of perfusion on the time required to achieve ablation for a cluster electrode. The 50°C isotherm for achieving complete tumor ablation without (red isobars) and with (blue isobars) a 5-mm ablative margin was plotted for different RF ablation times (6–20 min) and different tumor sizes (3–5 cm diameter) and varied inner and outer perfusion 0–5 kg/m3-s using a 2.5-cm cluster electrode. The approximate inner/outer perfusions for varying types of commonly treated tumors overlay the 4.5-cm tumor surface response contour and are represented as: Colorectal metastases to normal liver (M), renal cell carcinoma (R), and hepatocellular carcinoma (H). The time and ability to completely treat tumor or achieve a 5-mm ablative margin varies considerably based upon tumor type and size. In this scenario, achieving complete ablation of the colorectal metastasis would take 10 min, while the HCC would require greater than 12 min of heating and the RCC in excess of 20 min.