Figures & data
Figure 1. Photograph of the experimental set-up showing: (A) the overall experimental configuration (with the coupling liquid removed) and (B) a close-up of the imaging chamber with the gel phantom surrounded by the monopole antennae which pass through the floor of the tank and can be vertically positioned to the desired height.
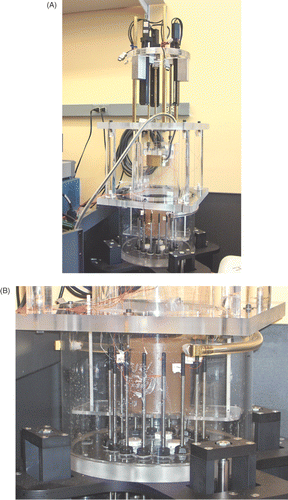
Figure 2. Schematic diagram of the US beam steering sequence for the 6.5 cm diameter circular scan experiment.
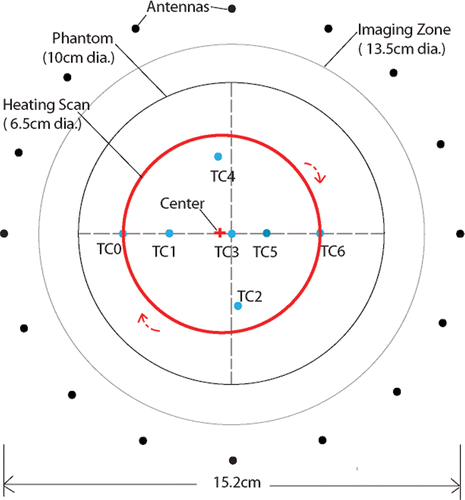
Figure 3. Sequence of 1100 MHz conductivity difference images at time points (in seconds from the start of the first microwave image acquisition) during and after heating (US power was turned on at 143 seconds and off at 1420 seconds) from the beam steering pattern shown in : (A) 143, (B) 321, (C) 499, (D) 678, (E) 856, (F) 1034, (G) 1213, (H) 1391, (I) 1569, (J) 1748, (K) 1926, and (L) 2105 seconds, respectively. Difference images were formed by subtracting the pre-heating baseline conductivity image from the conductivity image acquired at the time points indicated.
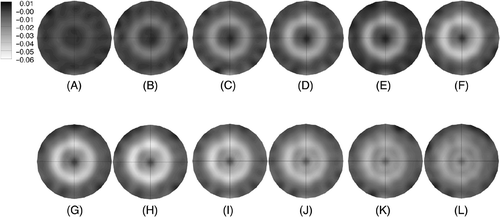
Figure 4. Plots of (A) temperature and (B) average conductivity difference as a function of time at selected points in the imaging plane: thermocouples (TC) 0 and 6 reside along the path scanned by the beam focus (see ). A reference measurement is included from the center of the imaging zone.
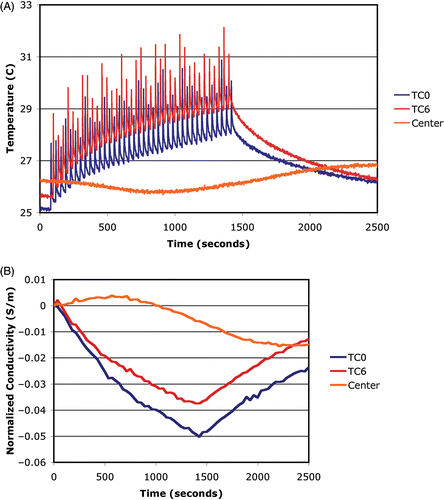
Figure 5. Schematic diagram of the US beam steering sequence for the partial circular scan experiment.
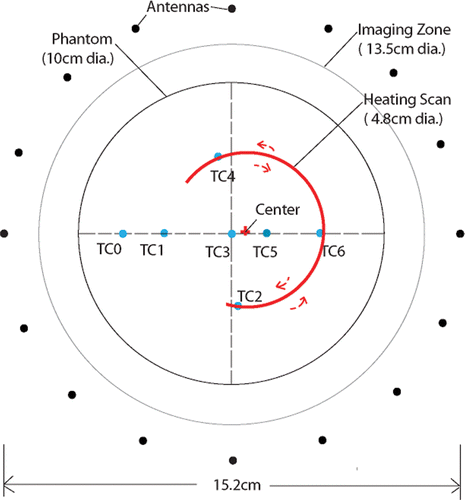
Figure 6. Sequence of 1100 MHz conductivity difference images at time points (in seconds from the start of the first microwave image acquisition) during and after heating (US power was turned on at 120 sec and off at 1280 sec) from the beam steering pattern shown in : (A) 321, (B) 499, (C) 678, (D) 856, (E) 1034, (F) 1213, (G) 1391, (H) 1569, (I) 1748, (J) 1926, (K) 2105, and (L) 2283 seconds, respectively. Difference images were formed by subtracting the pre-heating baseline conductivity image from the conductivity image acquired at the time points indicated.
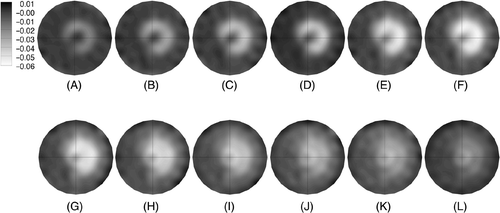
Figure 7. Plots of (A) temperature and (B) average conductivity difference as a function of time at selected points in the imaging plane: TC2 is located at the lower terminus of the scanned heating arc, TC4 is near the upper terminus (but not on it), and TC6 is midway along the arc, respectively. A reference measurement is included from the center of the imaging zone.
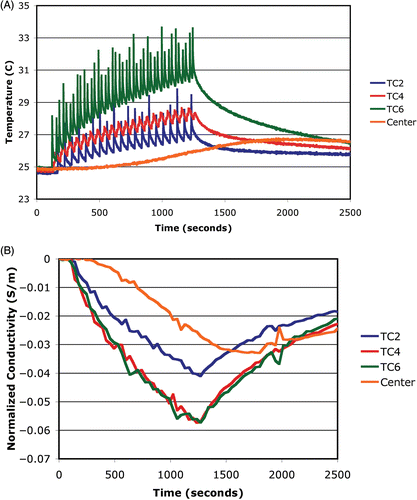
Figure 8. Schematic diagram of the US beam steering sequence for the four sequential spiral scan experiment.
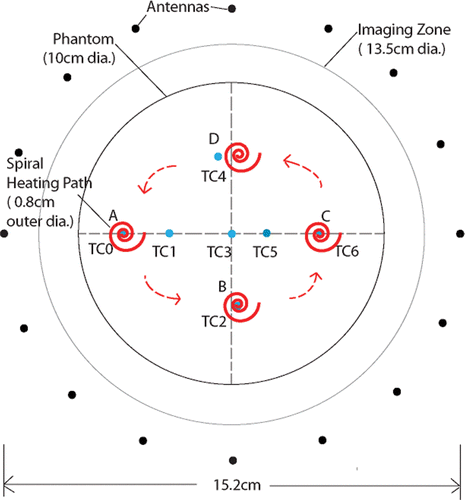
Figure 9. Sequence of 1100 MHz conductivity difference images at time points (in seconds after the first microwave image acquisition) during and after heating (US power was turned on at 210 seconds and off at 1484 seconds) from the beam steering pattern shown in : (A) 357, (B) 499, (C) 642, (D) 785, (E) 927, (F) 1070, (G) 1213, (H) 1355, (I) 1498, (J) 1641, (K) 1784, and (L) 1926 seconds, respectively. Difference images were formed by subtracting the pre-heating baseline conductivity image from the conductivity image acquired at the time points indicated.
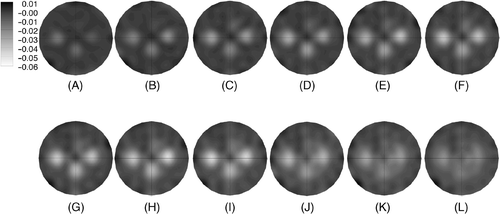
Figure 10. Plots of the (A) temperature and (B) average conductivity difference as a function of time at selected points in the imaging plane: TC0 is located at the center of the first spiral scan of the beam focus, TC2 at the center of the second spiral, and TC6 at the center of the third spiral, respectively. A reference measurement is included from the center of the imaging zone.
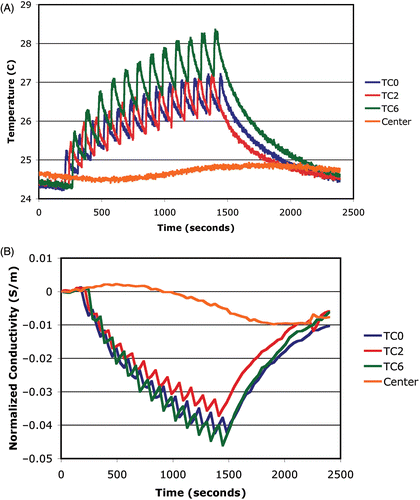
Figure 11. Plot of the reconstructed conductivity as a function of actual temperature for the data shown in for (A) TC0 and (B) at the center of the phantom.
