
Abstract
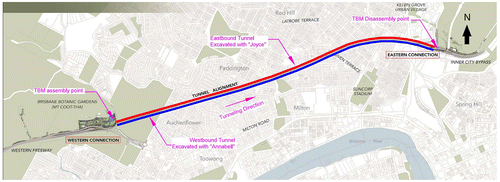
Legacy Way is a 4.25 km twin tunnel which will connect the Western Freeway at Toowong to the Inner City Bypass at Kelvin Grove in Brisbane. Legacy Way is an initiative of Brisbane City Council and has been designed and constructed by Transcity, a joint venture of Brisbane based BMD Constructions, Spanish construction company Acciona and tunnelling specialist Ghella from Italy. The project’s two parallel tunnels were bored with two hardrock tunnel boring machines (TBMs) through approximately 3500 m of Bunya Phyllite and 700 m of Neranleigh-Fernvale with a UCS in the range of 60–100 MPa. These double-lane motorway tunnels will have cross passages approximately every 120 m throughout the tunnel and a smoke duct to remove smoke out of the tunnel in case of a fire. The westbound tunnel was excavated by the TBM named ‘Annabell’, whereas the eastbound tunnel was excavated by the TBM named ‘Joyce’.
The TBMs started boring from the Western portal in the third quarter of 2012 and broke through at the Eastern portal in the second quarter of 2013, where they were disassembled and transported off site to the TBM supplier’s yard in Brisbane who bought the machines back for potential future reuse (Figure ).
Figure 1. Legacy Way tunnel alignment.
This article focuses on the methodology used to disassemble the two TBMs using a hydraulic jacking system.
1. Structure of the tunnel boring machines
The tunnels were excavated using two 12.4 m diameter double-shield tunnel boring machines (TBMs) manufactured by Herrenknecht, a German company for the CLEM7 project in Brisbane and refurbished and modified for the Legacy Way tunnels (Figure ).
Figure 2. Tunnel boring machine- overall length.
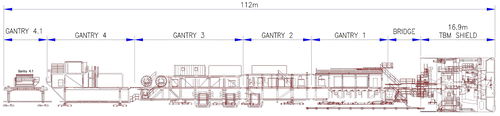
Based on their functionality, the structure of the TBMs can be divided into two main sections, the TBM shield (called the shield later in this article) and the Backup gantries (called the gantry/gantries later in this article). The shield represents the first 16.9 m and consists of all equipment to cut the rock, move the machine and install precast concrete tunnel lining segments.
Five gantries connected with pins are towed by the shield running on rubber wheels on the tunnel lining. These gantries have two to three platform levels which house all hydraulic and electric equipment to operate the TBM, all equipment to unload and handle the tunnel lining segments, all installations to handle and place the backfill grout, all installations to extend service lines and cables, as well as the operator’s cabin and all facilities for the crews.
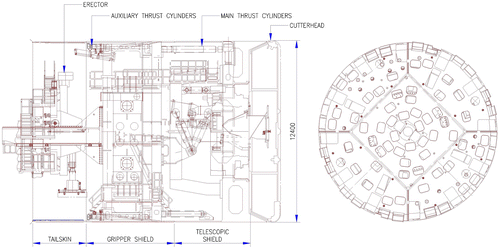
Refer to Figure . Being a Double-shield machine, the TBM is capable of excavating the tunnel with the Cutterhead at the front and simultaneously installing the tunnel lining in the Tailskin with the Erector assembly. In this mode of operation, the Gripper shield forms a fixed point by pushing the Gripper shoes against the excavated rock surface. The Front shield with the Cutterhead is pushed forward by the Main Thrust Cylinders excavating the tunnel. The Main Thrust Cylinders are located around the periphery between the Front shield and the Gripper shield and are being protected from the rock by the Telescopic shield. The tunnel lining ring which consists of precast segments is placed by the Erector in the Tailskin. Once the segment is built inside the Tailskin and the Main Thrust Cylinders have been fully extended, the Gripper shoes are retracted and the Gripper shield and all components behind it including the whole backup are moved forward by pushing against the tunnel lining with the Auxiliary Thrust Cylinders closing the Telescopic shield. This process is called ‘Regripping’. During the Regripping, bi-component grout is pumped through tubes embedded in the Tailskin in the bottom 120°. The remaining space is grouted manually through the grout injection holes in the tunnel lining segments as the TBM moves forward.
Figure 3. TBM shield and face of the cutterhead.
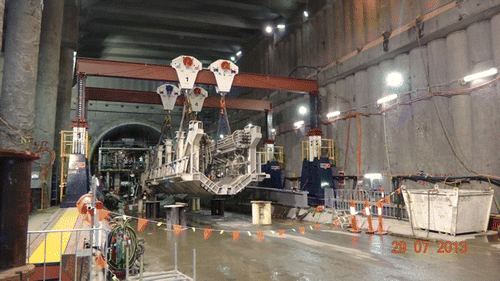
After the preassembly of the TBM’s in the supplier’s yard in Brisbane (Figure ), the machines were split in components of up to 180 tonne and transported to the western portal. The assembly of these components occurred inside an acoustic shed with three overhead gantry cranes with a lifting capacity ranging from 40 to 260 tonne.
Figure 4. Preassembly of the TBM.

1.1. Technical data
Length of tunnels: 4.25 km each
Excavation diameter: 12.4 m
Length of TBM shield (all telescopic cylinders fully collapsed): 16.9 m
Length of Backup gantries: 95 m
No of backup gantries: 5
Total Weight of shield components: 1980 tonne
Total Weight of Backup gantries: 780 tonne
Weight of heaviest component lifted: 260 tonne
2. TBM disassembly options
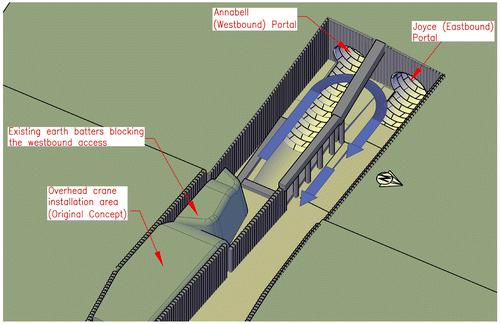
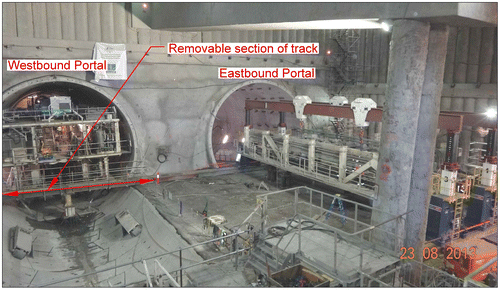
A cut and cover box made up of concrete piles and a precast concrete roof was constructed at the Eastern portal where the TBMs were to be disassembled. The access to the box was only available through the eastbound lanes during the time of the TBM disassembly. Therefore, both TBMs had to be transported out of the box using the eastbound lanes. This was a straightforward process for Joyce, but for Annabell a full ‘U’ turn with the TBM components was required to exit the box (Figure ).
Figure 5. Eastern portal TBM disassembly box – available access indicated by blue arrows (roof removed).
Joyce had broken through seven weeks before Annabell. A key consequence of having a single access was that the disassembly of Annabell could only be started after completing the Joyce disassembly works. Therefore, Annabell had to be parked at its disassembly position for eight weeks until Joyce had been removed from the site. Preparation works, such as welding of lifting lugs, were carried out during this time.
A cleaning area was set up on the surface, where components were cleaned using a high pressure water jet. From there, they were transported off site to their final destination.
2.1. Original disassembly options
The choice of the disassembly method was highly dependent on the status of the ongoing civil construction works at the Eastern portal. The initial approach to disassemble the TBMs was to utilize a direct crane access from the surface and a combination of overhead gantry or portal cranes of varying capacities. Civil structures, such as the access box, concrete cradles, foundations and site access needed to be ready to allow the installation of these overhead cranes. Based on the original civil works programme, different disassembly alternatives were being investigated, most of which utilized overhead cranes.
Due to the high production rates of the TBM’s and a changed construction programme of the civil works at the Eastern portal, it became apparent that the use of the original methods would lead to a delay of at least six months after the first TBM had broken through as the anticipated civil structures would not be ready. Such a delay in the disassembly of the TBMs would have created a negative flow on effect for the overall construction schedule. Consequently, the idea of using the direct surface access and the use of overhead cranes for the disassembly of the TBMs was abandoned and other alternatives were investigated.
The Transcity plant team responsible for the disassembly of the TBMs studied the following alternatives;
| • | Leave the shield underground: A niche or pit would have to be constructed inside the disassembly box and the shield would have to be placed there and sealed with the concrete. The backup gantries could be dismantled into small pieces using mobile cranes and scrapped. This option was ruled out since the construction of the niche or pit would have delayed the civil works in the area of the eastern portal even further. On top, the project would have lost the buyback amount of the TBM’s. | ||||
| • | Use of mobile cranes to disassemble shield and backup: A number of detailed studies showed that this option was not feasible, since the space inside the disassembly box was too narrow for a crane of adequate size to set up and move the shield components past itself to be loaded on a trailer. For instance, a 500 tonne mobile crane would have been necessary for the disassembly of the main drive, the heaviest piece to be dismantled. | ||||
| • | Thermal Lancing technology could be used to cut up the TBM into pieces that could be handled with smaller mobile cranes. While this option was feasible, neither the estimated duration nor the cost for this option was attractive. Again, the project would lose the buyback amount from the TBM supplier. | ||||
| • | Use of a hydraulic jacking system: A detailed investigation proved that this alternative would be more effective and cost efficient in the existing situation than any of the other solutions. | ||||
3. The hydraulic jacking system
Hydraulic jacking systems are generally used in the installation of transformers, gas turbines and for lifting of locomotives where they are mainly used for picking up and transferring a load. They also have been used for moving specific components of TBM’s in the past, but are not commonly used for a complete disassembly of a TBM.
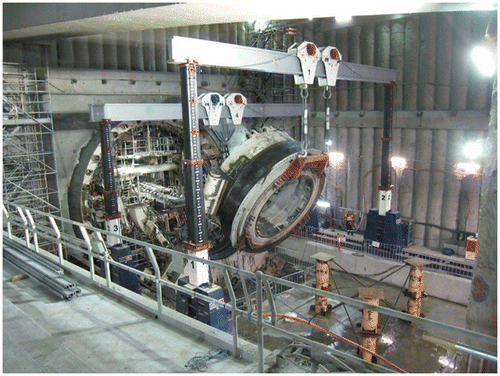
The main lifting mechanism of the jacking system consists of four telescopic towers which can be extended or retracted by applying hydraulic pressure through a hydraulic power pack. The towers used for this project had a two-stage telescope and had a high inertia wheelbase moving on top of preinstalled steel tracks. These wheels are hydraulically powered to provide the longitudinal movement of the towers (Refer to Figure ).
Figure 6. Components of hydraulic jacking System- Blue arrows indicating movement of different components.
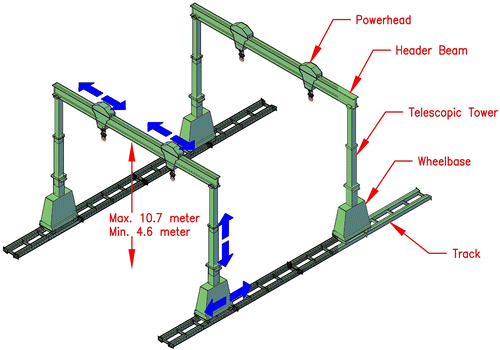
Two jacking towers connected with a header beam at the top resting on two independent parallel tracks form a basic mechanism for lifting and lowering of the load. Hydraulically driven power heads are installed on the header beam to allow the sideways movement of the load. In case of the TBM disassembly, two independent sets of header beams (i.e. with four towers) were required for lifting, turning and loading of the components on the trailer. These two systems are connected to individual hydraulic circuits to facilitate the individual movements of the beams which were an essential requirement for the disassembly of the TBM components requiring turning.
The loads are handled in the following three modes of operation of the jacking system;
| • | Lift or Lower: The two towers connected together with a header beam are extended or retracted in a pair to the required level. The minimum and the maximum level these towers could physically reach were 4.6 and 10.7 m, respectively, from the ground. | ||||
| • | Translation (Longitudinal movement): The jacking system moves horizontally along the track driven by hydraulic motors. | ||||
| • | Side shift: The hydraulically driven 90 tonne capacity power heads move along the header beam to provide sideways movement of the load. | ||||
The combined maximum lifting capacity of the four tower system was 450 tonnes.
Due to the structure of the TBM, the disassembly process requires Rolling and/or Turning of about 50% of all major components to transport them out, which is a less common operation for a jacking system (Figure ). Theoretically, this process requires a simultaneous translation and lift/lower of the jacking towers if the turning is to be continuous. However, the hydraulic design of the system does not allow performing these two operations at the same time. Therefore, a protocol was set up to execute these movements in small steps, i.e. a small lift/lower movement would be followed by a small translation movement.
Figure 7. Rolling and turning operations.
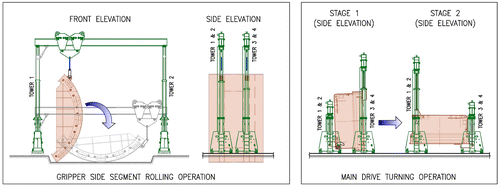
Figure 8. Actual TBM disassembly programme (Refer to Section 7: Stages of the TBM disassembly for information about the backfilling operations).
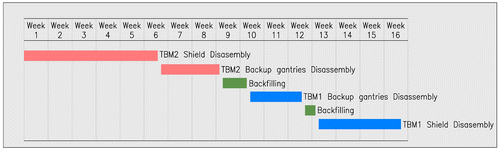
Figure 9. Operations inside jacking system envelope.
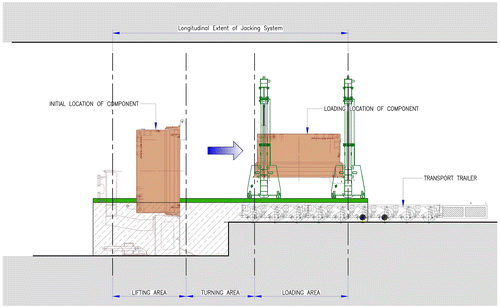
Figure 10. TBM disassembly stages – roof removed.
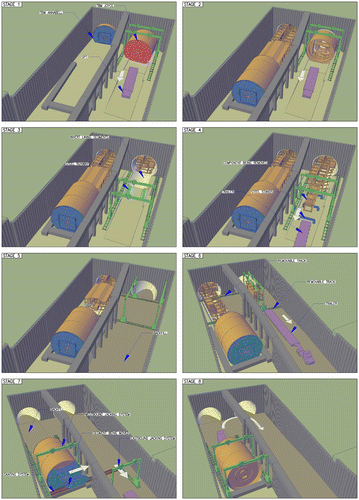
Figure 11. Jacking system layout for Joyce shield.
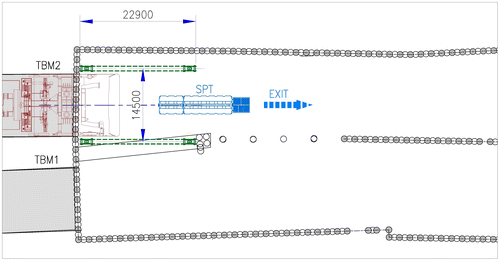
Figure 12. Turning of the main drive.
Generally, the circular segments of the shield require rolling on the ground after they are picked up by the jacking system (Figure ). The component is released to roll on the ground around its periphery until it arrives to the static equilibrium. The movement is controlled by applying a combination of the load handling modes of the jacking system described above. Once the component settles on the ground, it is re-rigged to load it on top of the trailer.
Figure 13. Rolling of the Gripper shield side segment.
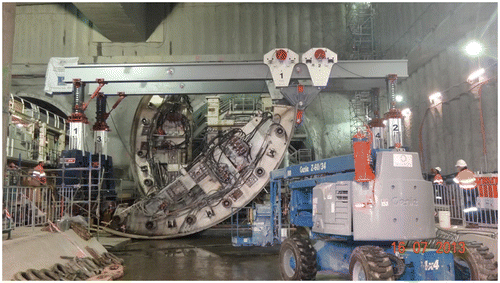
Some components, for example the Main Drive, which cannot be rolled on the ground because of its shape, size and the weight need to be turned on air with controlled operation of the jacking system in a process referred to as Turning (Figure ). In this operation, the load is picked up at two ends by two independent pair of jacking towers and the turning is achieved by applying stroke in the opposite direction between the pair of towers. The turned component is then lowered on top of a trailer.
Both the TBMs were disassembled with the same jacking system. The foundation tracks were relocated and reoriented to different locations at each switch between the shield and the gantry disassembly.
4. Programme and cost
The speed of the jacking system is clearly slower than the speed of an overhead crane, which is a factor affecting the overall time of the disassembly as shown in Table . However, since the movements were designed to be very short and also since the disassembly process involves a number of other activities like the welding of lifting lugs and the rigging of the components, the slower speed of the jacking system created only a minor impact on the overall programme. The overall disassembly period ended up more than a third faster compared to the disassembly of the same TBM in a past project using three overhead cranes. It has to be pointed out tough that in this particular case the experience and work ethic of the disassembly crew on the tools was a major reason for this improvement (Figure ).
Table 1. Crane speed comparison showing maximum achievable speeds.
As the disassembly works continued, the working crew developed more confidence and experience with the operations. Remarkably, the second TBM (Annabell) disassembly was finished four weeks earlier than planned. This early completion of the works directly saved a substantial amount of the disassembly cost. As the result, the total hire cost of the jacking system and the SPT were lower than the forecast cost for the use of the existing overhead cranes in the original planning. Additionally, the site could be handed over earlier to start the remaining civil works, which increased the financial benefit to the project.
5. TBM disassembly method
The components of the TBM shield are held together either by structural bolts or welding. The majority of the shield components are in the shape of cylinder sectors. Independently of the lifting arrangements for the disassembly, the disassembly process consists of;
| • | Partially removing the connection leaving a minimum required to hold the self-weight of the component. | ||||
| • | Taking the load with the dismantling crane. | ||||
| • | Removing the remaining connections. | ||||
| • | Lifting the component, moving it away and placing it either directly on top of a trailer or beams and steel stands. In this case, trailer can drive under the load, lift up the trailer platform to take the load off the stands and move out. Components picked up vertically need rolling or turning before they can be removed with the trailer. (Figure 9). | ||||
The size of the disassembly box was a major restriction for the choice of any of the alternatives including the jacking system. To lift a component, a minimum head room is required to accommodate the height of the header beams, the component and the rigging length. The rigging length depends on the type of rigging (vertical or triangular) and the available locations to connect the rigging to the component. Due to the restrictions in height and jacking system stroke the rail level for the system, the floor level for rolling of components and loading of the trailer had to be designed specifically to ensure the tallest components could be manoeuvred on top of this level within the stroke and space limits within the box. On the other hand, short rigging lengths would not allow the component to be landed directly on the trailer since the header beam cannot come down to rail level. In this case, the component has to be landed on stands, re-rigged and lowered to trailer level once the stands have been removed. This is obviously an operation that adds time to the process and should be avoided.
In addition, if the component needs turning prior to the loading on the trailer, the available stroke in the set-up becomes an important consideration since a full turn of the component without re-rigging should be achieved.
Since the piles and ceiling of the disassembly box were already partially constructed when the planning of this revised sequence started the only variable available were the rail level and the level of the rolling and trailer loading area. A detailed study was required to finalize the geometrical design of mainly to determine;
| • | The various levels of the concrete floor. | ||||
| • | The separate layouts of the jacking system for the disassembly of the shield and the gantries. | ||||
Most of the components were unique in their shape, size and weight which had to be considered in the design. A number of iterations was required to finalize a working layout of the jacking system. In parallel, a detailed lift study for all major components was done by adjusting the variables listed below to get a final geometrical solution that worked for all of the components;
| • | Foundation levels of the jacking system. | ||||
| • | Floor and rail levels. | ||||
| • | Horizontal and vertical alignment of the TBM near the portal. | ||||
| • | Redesign of the lifting lugs and rigging arrangements. | ||||
| • | Alternative lifting and turning solutions. | ||||
6. Safety and quality standards
Since there is no Australian Standard that is specifically dealing with Jacking systems and the system was manufactured overseas, the following considerations were made to ensure a compliant operation in an Australian working environment. The system was checked for compliance with related Australian Standards for lifting devices
| • | The American and the British Code of Practice for the use of jacking systems were considered in the development of the relevant safety and operational procedure. All Structural components including the header beams, equalizer plates etc. were engineered and fabricated based on the worst case load conditions during the disassembly process. A factor of safety in accordance with the Australian standards for Lifting Devices and Cranes was used. | ||||
| • | Prior to the disassembly, a lifting test system was set up in a comparable arrangement as it was anticipated for the actual TBM disassembly. The test lifts included vertical lifting and turning of loads not only to fully understand the capabilities and limitations of the system but also to train the operators and riggers involved in the process. | ||||
| • | The system did not have a load cell or similar arrangement to directly indicate the weight of the lifted load. However, the power pack’s control panel had independent pressure gauges linked to the jacking towers, the readings from which were used to determine the weight of the lifted object. During these tests, the gauges and load charts were re-calibrated. | ||||
| • | A detailed work procedure with a complete risk analysis and a Safe Work Method Statement were prepared for the operation of the jacking system. | ||||
| • | A complete lifting and rigging study was prepared for all major components. | ||||
| • | The lifting, turning and rolling procedures of all critical components were discussed with the manufacture of the Jacking system. | ||||
Most of the shield components required a redesign of the lifting lugs, since the lugs used during the assembly of the TBM were designed for lifting with a single hook and relatively long rigging as it is common for mobile or overhead crane applications. This redesign included structural analysis of lifting lugs and components (with the application of Finite Element Method for some major components), provision of workshop drawings and fabrication as per AS 3776. An independent company was employed to develop welding procedures suitable for the designed lugs and then also to test and qualify the welders who were involved in the welding of these lifting lugs. During the welding of each of the lifting lugs, the company performed and documented the testing of all the lugs. A Non-Destructive Test of all welds for these lugs (NDT) as per AS2062, AS 1171, AS1710/AS2207 and AS/NZS 1554.1 SP2011 was carried out.
All the temporary structures and supports used in the process were designed and certified by an external designer prior to manufacturing and use on site.
The whole disassembly process was carried under close supervision of the project team with a strong focus on change management ensuring that proposed changes and improvements were adequately discussed and documented before they were used in the process, in cooperation with the safety team.
7. Stages of the TBM disassembly
7.1. Stage 1 Joyce shield disassembly- front sections
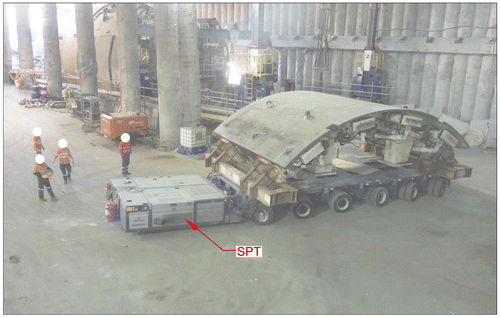
Refer to Stage 1 on Figure . After breaking through, Joyce completed a partial invert excavation for a distance of 11 m. At this position, the shield components including the gripper shield were still inside the tunnel. This length of partial excavation was limited by the available longitudinal extent of the jacking system. The shield disassembly required a minimum gauge (spacing between the tracks) of 14.5 m. A maximum of 20 m of longitudinal track length could be installed with this gauge without clashing with the intermediate piles. All lifting, (rolling/turning) and loading of components had required to be done within this 20 m as shown in Figure . It is important to note that the space required for loading of many of the heavy components was driven by the length of a suitable trailer capable of accepting these loads. Since a conventional roadworthy trailer with its limits in axle load would have been too long to fit within the available 9 m between the shield and the end of the jacking extent, a remote-controlled self-propelled Trailer (SPT) with high allowable axle loadings was used for this purpose. The main benefit of the SPT was on one side that it was short enough to load the components within the narrow loading zone and on the other side that it could transport the heavy components up on 6.5% grade out of the box (Figure ).
The shield components of front and telescopic shield were dismantled at this position. A number of components required rolling on the ground before they could be loaded on the SPT. The Main drive (weighing 260 tonne) was lifted and turned with a single rigging arrangement and required a very detailed analysis of the structure and all rigging components due to its weight and the shifting of the centre of gravity between the two header beams during the turning process (Figure ).
7.2. Stage 2 Joyce shield disassembly -rear sections
Refer to Stage 2 on Figure . Once the components of front and telescopic shield were removed, the TBM was pushed forward to bring the rest of the shield out of the tunnel into reach of the jacking system. The Gripper shield side segments (weighing 180 tonne) required special attention considering its weight, size and shape. Similar to the main drive, they also required a separate engineering analysis for the redesign of the lifting lugs and detailed analysis of the rolling process (Figure ).
7.3. Stage 3 Preparation for Joyce backup gantry disassembly
Refer to Stage 3 on Figure . The whole gantries were parked inside the tunnel when the shield disassembly was completed. To be able to move the gantries out of the tunnel, a runway for its wheels had to be provided outside of the tunnel. The longest gantry was gantry 3 with an overall length of 19 m. The first 11 m of the runway was created by installing lining segments of the permanent tunnel lining in the invert partially excavated by the TBM. For the remaining 8 m, a steel runway was designed and installed.
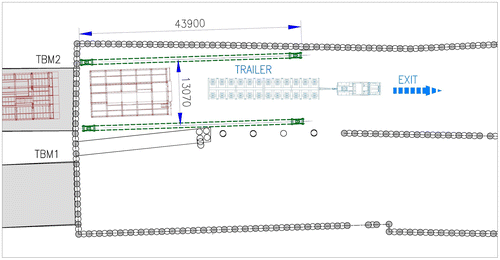
Since the majority of the gantry components were substantially longer than the shield components, extension of the jacking system track was required. At the same time, a narrower gauge of 13 m was sufficient for all the gantries, which made it possible to establish a rail alignment that missed the intermediate piles and could therefore be extended to the required 43.9 m (Figure ).
Figure 14. Jacking system layout for Joyce gantry.
7.4. Stage 4 Joyce backup gantries disassembly
Refer to Stage 4 on Figure . The gantries were pushed forward by replacing the pin connection between them by a fully extended hydraulic cylinder. The idea was to chock the wheels of the gantry ahead of the cylinder to make it a fix point then retract the cylinder to pull the set of gantries behind the cylinder. Once fully retracted, the wheel chock was relocated to the gantry immediately behind the cylinder and the cylinder was then fully extended to push the front gantry forward. This cycle was repeated until the front gantry reached fully under the the jacking system. (Figure ).
Figure 15. Joyce gantry component being disassembled.
The lifts for the gantry disassembly did not require any rolling or turning of components. Furthermore, since the weight of the components was comparatively less, road trailers, which were much cheaper to hire than SPT, were used to transport them out of the box.
7.5. Stage 5 Preparation for Annabell gantry disassembly
Refer to Stage 5 on Figure . After the completion of the Joyce gantry disassembly, the eastbound cradle was backfilled to create the access to Annabell. Due to the lack of access from the front, the disassembly had to be done in ‘Reverse order’ with the gantries being disassembled prior to the shield. Moreover, the shield components had to be dismantled starting from the rear towards the front. This required that the whole TBM shield had to move 50 m further than the actual breakthrough face to have sufficient length available for the longest gantry between the breakthrough face and the shield.
7.6. Stage 6 Annabell gantry disassembly
Refer to Stage 6 on Figure . For the disassembly of the backup gantries of Annabell, the jacking system rails were placed across the portals. This meant that each individual gantry had to be located in the path of the jacking system, disconnected from the other gantries and then the rail for the jacking system on the portal side had to be reinstated in order to start the lifting sequence (Figures and ).
Figure 16. Jacking system layout for Annabell gantry.

Figure 17. Annabell gantry component being disassembled
The components were then lifted and moved towards the eastbound portal where they were placed on top of a set of beams and stands. This arrangement would then allow a transport trailer to move under the component and pick them up by jacking up its platform and transport them to the washing bay. The gantries were pulled forward using a similar setup applied for the Joyce.
7.7. Stage 7 Annabell shield disassembly – The cutterhead
Refer to Stage 7 on Figure . Once the gantry components were disassembled, the jacking system was removed and the cradle behind the shield was backfilled to create the access for the SPT. The level of this backfill was matched with the existing backfill on the eastbound portal.
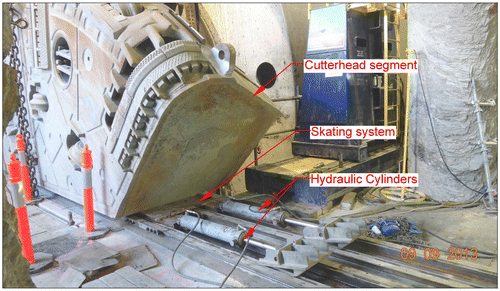
The concept for the cutterhead removal was to install a parallel skating system at the front which ran across the eastbound and westbound portals. The skating system consisted of a steel base sliding along the top of a rail system. The sliding movement was achieved by using hydraulic cylinders.
A reinforced concrete foundation was designed and constructed ahead of the TBM to provide a runway for the skating system. One pair of the jacking towers was installed at westbound side to pick up the cutterhead segments. A second pair was installed in parallel on the eastbound ramp. The westbound jacking system was used to pick-up the cutterhead components, load them on the skating system to transfer them to the eastbound ramp. The eastbound jacking system turned the pieces and loaded them on top of the SPT to be transport out.
The cutterhead was composed of a central square section surrounded by four geometrically identical side segments bolted together.
Each side segment was lifted by orienting it to 12 o’clock position by turning the cutterhead. The advantage of lifting at this position was that the segment wouldn’t need rolling for placing it on the skating system.
The mechanism of the cutterhead was not designed to turn it with partial segments removed which would result an eccentric situation. Therefore, the jacking system was used to turn the cutterhead in an arrangement shown in Figure . During the turning process, steel stands were welded to the segments to avoid the unintended movement due to eccentric mass of the cutterhead as shown in Figures –.
Figure 18. Cutterhead turning with Jacking System.
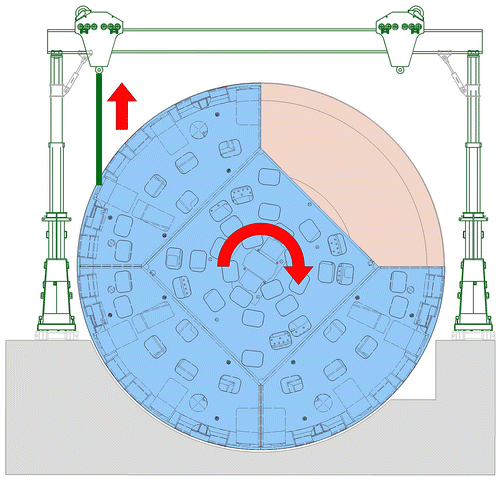
Figure 19. Stages of cutterhead segments removal – arrow indicating the orientation; Yellow members indicating temporary steel stands.
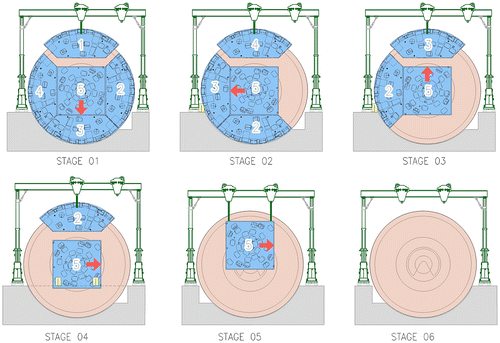
Figure 20. Cutterhead segment 1 being lowered.
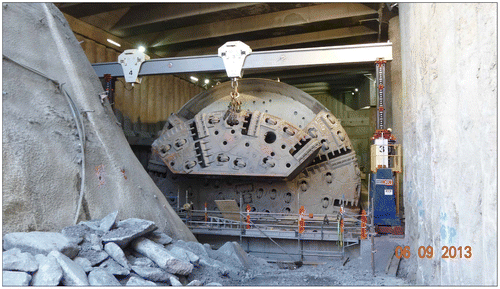
Figure 21. Cutterhead segment being moved with skating system.
7.8. Stage 8 Annabell shield disassembly
Refer to Stage 8 on Figure . Once the removal of the cutter head was completed, the jacking pair was relocated to the westbound track for the disassembly of Annabell shield.
The concept of the Annabell shield disassembly was to disassemble the components starting from the back and working towards the front of the shield and load them on the SPT at the back of the shield. The SPT would then transport the components by exiting through the eastbound access performing a full ‘U’ turn inside the disassembly box, a movement which could not have been performed by a roadworthy trailer of equivalent capacity (Figures and ).
Figure 22. Jacking system layout for Annabell shield.
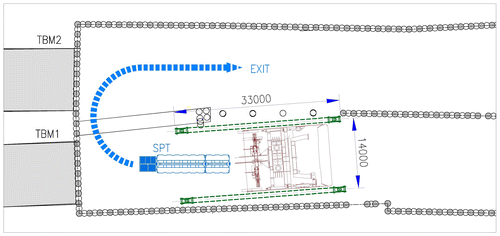
Figure 23. SPT performing ‘U’ turn after picking up a shield segment- Looking from Eastbound (Joyce) portal.
8. Conclusion
The removal of complete TBMs using a hydraulic jacking system was an approach which became a necessity for the project since all other alternatives would either have delayed the project substantially or created substantially higher costs.
The key learnings from this operation are summarized below:
8.1. Increased requirement for detailed planning
A very detailed lift study, engineering and risk assessment had to be done prior to bringing the system into operation. The primary focus was to ensure the lifting and turning processes within the limited space of the disassembly box were safe and practical. All technical and safety relevant documents were prepared in close coordination between the Legacy Way plant and safety team, the jacking system supplier, the TBM supplier and independent local engineers.
It is important to point out that the arrangement and design of the lifting lugs for the operation of a jacking system in such a confined environment can be substantially different to normal crane lifts where long rigging and a single hook is used.
8.2. Reduced impact on residents
The underground environment of the disassembly box created the perfect noise barrier which allowed the works to proceed 24 hours a day without any impact on the residents in the vicinity and without the need to erect an acoustic enclosure for the operation. Past experience has also shown that the actual erection and removal of such an additional structure can cause a negative impact on residents in the immediate vicinity.
8.3. Programme and cost benefits
The extent of structures and foundations required for the jacking system and was substantially less than for the initially envisaged gantry crane solution. The system was compact enough to be installed and operated inside the disassembly box and besides some minor changes in the invert of the box no major structures or foundations were required, which created a direct programme and cost benefit.
Given these substantially reduced space and access requirements the use of the jacking system allowed the disassembly to proceed more than six months earlier than the originally envisaged solution which created the main benefit for the project.
The disassembly period was also shorter than for the same TBM in a previous project which used multiple overhead gantry and mobile cranes even though the actual operational speed of the jacking system was slower compared to these types of cranes. The complete disassembly of Joyce and Annabell took 56 and 42 days, respectively. This remarkable improvement is in large part an achievement of the highly experienced and effective team on the tools and can therefore not only be attributed to the use of the jacking system.
This time saving nevertheless translated in additional cost savings since the costs of a TBM disassembly are mainly driven by labour and equipment rental cost.
8.4. Future application
The successful use of a jacking system for the disassembly of the TBMs in Legacy Way has shown that this approach can be the most efficient and cost-effective solution in circumstances, where an adequate ramp for the transport of the TBM components but no access from the top and very limited space around the TBMs is available.
With detailed planning and preparation, a solution with a jacking system may also prove to be the most effective solution for the assembly of large scale TBMs in future projects.
Notes on contributor
Sharad Bista (BE Civil, CpEng, RPEQ) is currently employed as a project engineer for Ghella Pty Ltd, a 100% subsidiary of an Italian construction company specialized in tunnelling. After finishing his bachelor’s degree in Civil Engineering in 1999, Sharad worked as a tunnel engineer for a 70 megawatt hydroelectric power project in Nepal. Since his arrival to Australia in mid 2007, he has involved in the tunnel construction of Clem7, Airport Link and Legacy Way projects in Brisbane, all of which utilized Tunnel Boring Machines (TBMs). He has mostly been involved in engineering, planning and works preparation required for the assembly, commissioning, maintenance and disassembly of the TBMs and the other plant items required for the tunnel construction.
Notes
* An innovative approach for the disassembly of Brisbane’s legacy way tunnel boring machines