Abstract
The rheological behaviour of an ultra high strength (UHS) steel is investigated by Gleeble tensile tests at low-deformation rates and high temperature, from 1200°C to solidus temperature. Results show that large thermal gradients exist in specimens, resulting in heterogeneous deformation, which makes the identification of constitutive parameters difficult from the directly deduced nominal stress–strain curves. The advantages of an inverse identification method – associating a direct finite element model of Gleeble tests and an optimization module – are demonstrated in such conditions. The constitutive parameters identified by this technique have been successfully applied to additional tests, more complex in nature than those used for the identification of parameters. However, such tests combining successive loading and relaxation stages have revealed some limitations of the considered constitutive model.
Nomenclature
| A | = | unknown parameter vector |
| A | = | material constant (s−1) |
| E | = | elastic Young's modulus (N m−2 or GPa) |
| = | the identity tensor | |
| J | = | electrical current density vector (A m−2) |
| Jimp | = | prescribed electrical current density (A m−2) |
| = | volume heat source due to Joule effect (resistance heating) (W m−3) | |
| = | interface heat source due to Joule effect (resistance heating) (W m−2) | |
| Q | = | apparent activation energy (J mol−1) |
| R | = | perfect gas constant (J mol−1 K−1) |
| S0 | = | original cross-section area of the specimen (m2) |
| T | = | stress vector (N m−2 or MPa) |
| T | = | temperature (°C or K) |
| Tenv | = | environment temperature (°C or K) |
| Vimp | = | imposed velocity of the mobile grip (m s−1) |
| b | = | thermal effusivity (J m−2 K−1 s−1/2) |
| cp | = | specific heat (J kg−1 K−1) |
| ez | = | unit vector in specimen axial direction |
| h | = | specific enthalpy (J kg−1) |
| helec | = | effective electrical transfer coefficient (Ω−1 m−2) |
| hc | = | heat transfer coefficient at interface between specimen and grips (W m−2 K) |
| hth_eff | = | effective heat transfer coefficient at the surface of specimen between grips, or at the surface of grip in contact with framework (W m−2 K) |
| L | = | specific latent heat (J kg−1) |
| l0 | = | length of the effective working zone (m) |
| ln | = | boundary length associated with boundary node n (m) |
| m | = | strain rate sensitivity coefficient |
| n | = | outward unit normal vector |
| n | = | strain hardening coefficient |
| p | = | pressure (N m−2) |
| qimp | = | imposed heat flux density (W m−2) |
| re | = | radial coordinate of the element centre (m) |
| rn | = | radial coordinate associated with boundary node n (m) |
| = | deviatoric stress tensor (N m−2) | |
| tms | = | the starting time of the mechanical tension |
| v | = | velocity vector (m s−1) |
| vg | = | grip velocity vector (m s−1) |
| Δl | = | elongation of specimen (m) |
| Δre | = | element dimension along radial direction (m) |
| α | = | material constant (N−1 m2 or MPa−1) |
| = | total strain rate tensor (s−1) | |
| = | elastic strain rate tensor (s−1) | |
| = | thermal strain rate tensor (s−1) | |
| = | irreversible (viscoplastic) strain rate tensor (s−1) | |
| = | von Mises equivalent strain rate (s−1) | |
| = | nominal strain rate (s−1) | |
| εnom | = | nominal strain |
| λ | = | thermal conductivity (W m−1 K−1) |
| ρ | = | density (kg m−3) |
| v | = | Poisson's ratio |
| φ | = | electrical potential (V) |
| σelec | = | electrical conductivity (Ω−1 m−1) |
| = | von Mises equivalent stress (N m−2) | |
| σ | = | Cauchy stress tensor (N m−2) |
| σnom | = | nominal stress (N m−2) |
| σzz | = | axial stress component (N m−2) |
| χp | = | penalty coefficient |
| = | cost function |
1. Introduction
Various defects in as-cast products are often encountered in shape or continuous casting production. In industrial practice, hot tearing is a frequent defect (also called solidification cracking), which occurs at the end of the solidification process, at very low liquid fraction. Hot tears initiate just above solidus temperature in the mushy zone when it is subjected to a tensile state Citation1. Such defects, either near the surface or in the core part of the as-cast products, cannot be eliminated by post thermo-mechanical treatments. For the prediction of hot tears or hot cracks, many hot tearing ‘macroscopic’ criteria have been proposed, mostly involving critical stress Citation2, critical strain Citation3–5 or critical strain rate Citation6. Therefore, mathematical modelling of the formation of hot tears and cracks in cast products is a complex task, which requires in particular a good knowledge of the constitutive equations and parameters of the material especially at high temperature.
Experimental studies of the rheological behaviour of non-ferrous metals have been reported in literature for many years. In fact, there are quite a few papers dealing with the characterization of steels at very high temperatures, namely over 1200°C and up to the mushy state. The difficulties are mainly caused by the very high level of steel melting point in comparison with non-ferrous metals like aluminium alloys, which demand strict requirements for the experimental devices. The Gleeble™,Footnote1 thermo-simulator systems are efficient tools for the subject, as they provide the means for characterizing mechanical properties of metals at high temperature, under vacuum and along complex thermal-mechanical testing paths. Regarding parameter identification for steel at very high temperature, low strain rate and low strain, it has been achieved by using the force–displacement curves recorded on Gleeble thermo-simulators, under the assumption of uniform stress, strain and strain-rates in the deformed region of the specimen Citation7,Citation8. However, it should be noted that as reported in literature Citation7–9, thermal gradients always exist at high temperature in Gleeble-type specimens. Because the mechanical properties of steel are temperature dependent, such thermal gradients are the source of deformation heterogeneity in specimens. As a consequence, the estimation of strain in the ‘deformed region’ is somewhat arbitrary. An accurate analysis of Gleeble tests, therefore, should be conducted by means of the numerical modelling of such tests, instead of relying on usual assumption of uniform stress, strain and strain rate in the effective deformation zone of the specimen. Based on an accurate reliable direct numerical modelling of Gleeble tests, inverse methods are efficient tools to evaluate the interesting constitutive equations and identify the unknown parameters. Hojny and Glowacki Citation10,Citation11 developed such an inverse numerical method to identify constitutive parameters for steel from Gleeble compression tests under high strain and strain rate, which was appropriate for semi-solid processing such as thixoforming. In this study, the rheological behaviour of an ultra high strength (UHS) steel is investigated by Gleeble tensile tests at high temperature from 1200°C up to solidus temperature, under small strain rates (<10−2 s−1) and strains (<5%). An automatically inverse numerical identification method (NIM), involving the direct coupled electrical–thermal–mechanical modelling of Gleeble tests, is set up and used for the identification of the constitutive parameters under such conditions, in view of its application to the solidification context, including the prediction of hot tearing initiation.
2. Experimental procedure
An UHS steel is studied in this article, the composition of which is: 0.16 wt% C, 0.22 wt% Si, 1.89 wt% Mn, 0.18 wt% Cr, 0.02 wt% Ti, <0.02 wt% P, <0.013 wt% S, and the solidus temperature is 1437°C. Cylindrical tensile specimens with 10 mm diameter and 120 mm length () have been tested using a Gleeble 1500D thermo-mechanical simulator, which is schematically shown in .
Figure 1. Schematic representation of Gleeble 1500D tensile testing system, (a) temperature measurements of the cylindrical specimen; (b) section view of the tensile specimen installed in the machine.
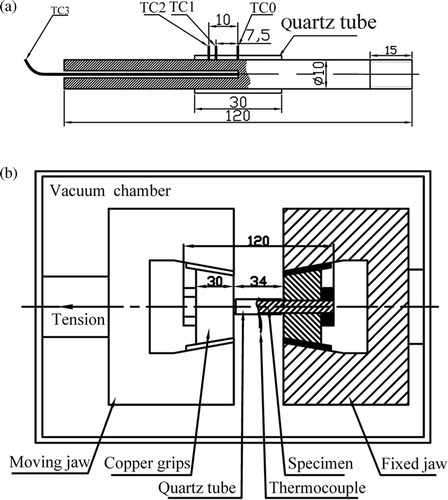
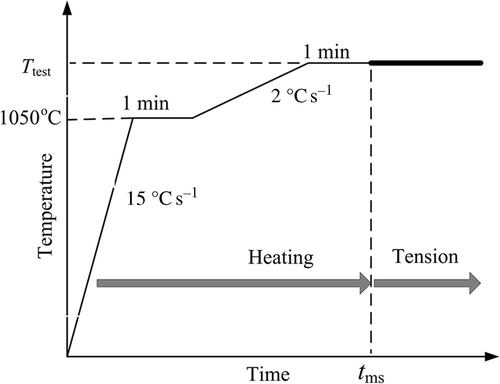
The specimen is rapidly heated by resistance heating, with a regulated alternating current (AC) being introduced into the specimen through the copper grips. As shown in , in a first step, the specimen is rapidly heated up to 1050°C with a heating rate of 15°C s−1 and maintained at this temperature for 1 min. In a second step, it is heated up to the testing temperature (at 2°C s−1), and maintained at the testing temperature for 1 min before loading. During the whole testing period, including heating and mechanical loading, the input AC is then monitored according to the temperature measured by the thermocouple welded onto the surface of the specimen, at mid-length position (TC0 in ). In the following parts of this article, in the absence of complementary information, the temperatures that are mentioned are those measured or predicted at this location TC0. To prevent oxidation, the specimen is placed in the vacuum chamber with 5 × 10⁻⁴ torr (about 0.067 Pa). A transparent quartz tube is used to cover the specimen surface to support the possible melt of the working zone.
In order to get the knowledge of the temperature distribution in the specimen, temperatures are continuously measured at several locations in specifically dedicated tests ():
| • | Along the surface of the specimen, at three locations: mid-length (TC0), 7.5 mm and 10 mm from centre (TC1 and TC2, respectively). This provides information on the axial temperature gradient. In addition, the temperature measurement in position TC0 is used all along the test for the monitoring of the electrical input. | ||||
| • | In core centre, on the symmetry axis, in the mid transverse section of the specimen (TC3). By comparison with TC0, this gives access to the radial temperature gradient. | ||||
After tms (in ) that denotes the starting time of tension, the specimen is pulled in tension by the grips with a prescribed velocity, possibly time-dependent, the value of which determines the nominal strain rates of tensile tests.
3. Direct modelling of Gleeble tension test
3.1. Geometrical model
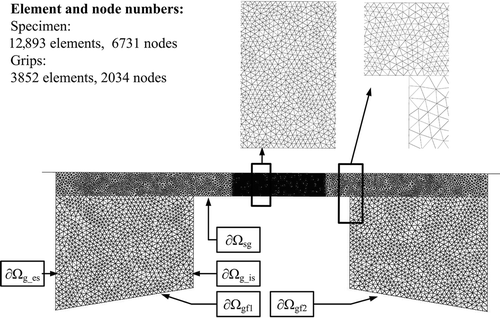
In the numerical modelling of Gleeble tension tests, both the specimen and copper grips are taken into consideration and assumed axi-symmetric, without considering the nuts at both ends of the specimen, as is shown in . To be clear, free surfaces and contact interfaces which will be mentioned in the following sections are also indicated. ∂Ωgf1 and ∂Ωgf2 are the surfaces of the grips in contact with Gleeble framework. ∂Ωsg is the contact interface between grip and specimen. ∂Ωs indicates the surface of the specimen which is covered with quartz tube. ∂Ωg_es and ∂Ωg_is are the lateral surfaces of the grips, respectively.
3.2. Electrical potential resolution
The electrical potential field in a conductor is governed by Maxwell's equation of conservation of charge. When assuming steady-state direct current (DC), the equations can be written as follows:
(1)
(2)
The solution of the electrical field problem then consists in solving the following Poisson-type equation for the electrical potential:
(3)
with three types of boundary conditions:
(4)
(5)
(6)
Equation (4a) stands for a prescribed electrical potential φimp at the boundary. This boundary condition is used on the surface ∂Ωgf2 of the fixed grip with φimp = 0. Equation (4b) corresponds to the application of an electrical current density Jimp, n denoting the local outward unit normal vector. This boundary condition is used on the surface ∂Ωgf1 of the mobile grip, with the value of Jimp being automatically updated by a simple proportional-integral-derivative (PID) algorithm to control the specimen temperature. Equation (4c) expresses a non-perfect electrical contact: the input electrical current density is then related to the local difference of electrical potential. φcontact is the local electrical potential at the surface of the neighbour domain and helec is an effective electrical transfer coefficient. This condition is used along the interface ∂Ωsg between the specimen and the grips. In the case of a quasi perfect electrical contact, an arbitrary large value for helec is used, resulting in a very small difference between the electrical potentials, expressing the quasi continuity of φ through the interface.
A standard Galerkin finite element formulation is used to discretize the weak form of Equation (3), with boundary conditions specified in Equation (4), leading to a set of linear equations to be solved for the nodal values of the electrical potential. A multi-domain iterative resolution strategy is used to solve the electrical potential in the grips and the specimen.
3.3. Energy equation resolution
Considering Joule effect, but neglecting the heat source arising from mechanical coupling (only low stresses and low strain rates are considered here), the energy conservation equation is written as
(7)
where ρ denotes the density, h the specific enthalpy, λ the heat conductivity, T the temperature and
the volume heat source associated with resistance heating. The electric source term
is defined by Joule's law:
(8)
The specific enthalpy h is defined as
(9)
with Tref an arbitrary reference temperature, cp the specific heat, fl the mass fraction of liquid and L the specific latent heat of fusion. However, in this study, the material will be considered in the solid state only, simply yielding
.
Three types of thermal boundary conditions are considered:
(10)
(11)
(12)
where
Equation (8a) means a prescribed heat flux. Such a condition is applied to the inner and outer surfaces of grips ∂Ωg_es and ∂Ωg_is, and to the end surface of specimen ∂Ωs_es, with qimp = 0 expressing assumed adiabatic boundary conditions. Equation (8b) represents the non-perfect thermal contact condition at the interface ∂Ωsg. The Joule heat power is distributed between the two domains in contact according to their thermal effusivity b. Due to the complex heat transfer conditions between the specimen, the transparent quartz tube and the environment, an equivalent heat transfer model (8c) between the specimen and the environment is assumed by defining an effective heat transfer coefficient hth_eff, which is determined by an inverse numerical calculation, based on the experimental temperature measurements. It should be noted that when the current computing domain is one of the grips, the heat transfer model of (8c) is also applied at the surface (∂Ωgf1 or ∂Ωgf2) in contact with the framework.
Similar to the solution based on electrical field concepts, a standard Galerkin finite element formulation is used to discretize the weak form of Equation (5), with boundary conditions specified in Equation (8). This leads to a set of non-linear equations to be solved for the nodal values of specific enthalpy. This set is linearized by means of an implicit formulation and a Newton–Raphson method, for which the tangent stiffness matrix involves the nodal values of ∂T/∂h. A multi-domain iterative resolution strategy is used to solve the temperature field in specimen and grips.
3.4. Mechanical momentum equation resolution
The steel is modelled by a thermo-elastic–viscoplastic constitutive law. The total strain rate tensor can be additively decomposed into elastic, viscoplastic and thermal contributions, which are described by the following equations:
(13)
(14)
(15)
(16)
In Equation (9d), the change of the material density ρ expresses the thermal expansion terms. denotes the identity tensor.
is the deviatoric stress tensor as deduced from the Cauchy stress tensor σ:
(17)
and
, the von Mises equivalent strain rate and equivalent stress, respectively, are defined by
(18)
Different constitutive equations can be introduced to describe the relationship between them. The one-dimensional constitutive equation used in this study is adapted from the constitutive equation proposed by Han et al. Citation12.
(19)
in which
denotes the cumulated viscoplastic strain and R is the perfect gas constant. The apparent activation energy Q, and the coefficients A, n, α and m are the five-material parameters.
The local mechanical equilibrium is governed by the momentum conservation equation, in which, regarding the low velocities in such Gleeble tests, inertia, as well as gravity effects are ignored:
(20)
Regarding mechanical boundary conditions, the grips are assumed to be nondeformable. One grip is fixed while the mobile grip has a prescribed time-dependent velocity Vimp(t). Denoting the velocity fields in the specimen and in the grips by v and vg, respectively, the bilateral sticking condition can be expressed by
(21)
(22)
The fulfilment of Equation (14) is obtained by means of a penalty method, which consists in applying a stress vector T (Equation (15)) to the surface of the specimen, with χp denoting the penalty coefficient (a large positive number).
The mechanical problem is solved using a mixed formulation with velocity and pressure as primitive variables. The problem to be solved is then composed of two equations. The first one is the weak form of the momentum equation, also known as the principle of virtual power. Since p is kept as a primitive variable, only the deviatoric part of constitutive equations is taken into account and has to be solved locally in order to determine the deviatoric stress tensor . Therefore, the second equation consists of the weak form of the volumetric part of the constitutive equations. It expresses the incompressibility of the plastic deformation. This leads to
(23)
where v* and p* are, respectively, a vector and a scalar test functions which can be seen as virtual velocity and pressure fields. The form of the term integrated in the second equation is
(24)
After spatial discretization with the triangular mini-element (P1+/P1), for which details can be found in literature Citation13, Equation (16) can be cast into a set of non-linear equations, the unknowns of which are the nodal velocities and pressure. This system is solved by a Newton–Raphson method Citation14.
4. Inverse optimization method
To determine the unknown set of parameters A = (m, n, Q, α, A) in the constitutive Equation (12), a numerical inverse optimization method is used. Considering a set of Gleeble tension tests performed under specific conditions (temperature, imposed grip velocity), the calculated tensile forces, which depend on the set of unknown parameters A, can be obtained by the direct simulation of these tests, and can be compared to the measured results through the following so-called ‘cost function’:
(25)
where
and
are the calculated and measured tensile force at the ith sampling point on the jth test curve. Lexp is the total number of test curves, Mj is for each test j (j = 1, Lexp), the number of sampling points used for comparison. The aim of automatic identification is to find the values of parameter set A resulting in a minimum of the cost function
.
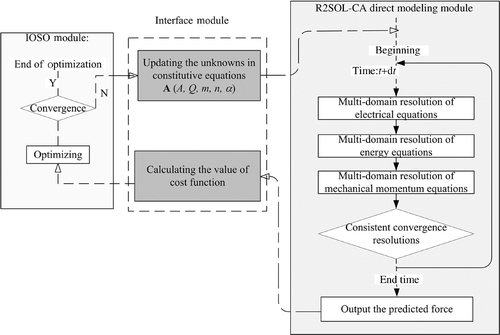
The commercial software package Indirect optimization based on self-organization (IOSO) Citation15 with public-licence has been used in the present study to identify A. IOSO technology is based on the response surface methodology, which is very efficient for large-scale optimization tasks Citation16,Citation17. As is shown in , the house-code R2SOL-CA, responsible for the direct modelling of the Gleeble tension test, is linked with IOSO module by an interface that is used to transfer the successively updated sets of parameters A from IOSO to R2SOL-CA, and to calculate the values of the cost function and transfer them to the IOSO module. At the beginning of the inverse calculation, the sets of parameters A, provided by IOSO module, are used to initialize the model parameters in R2SOL-CA by means of the interface module. The direct modelling of tension tests involving the coupled electrical–thermal–mechanical resolution can be executed to obtain the predicted curves of tensile force versus elongation, which then are used in the Interface Module to calculate the value of the cost function according to Equation (18). The inverse calculation is then processed, yielding a newly updated set of parameters A, which will be used in the next iteration in the direct simulation. This iterative process runs until the convergence conditions are achieved. In IOSO module, the convergence criterion that stops the optimization process is taken as the prescribed accuracy value econv of the solution. When the actual search region becomes narrower than econv, at least for one of the parameters, the optimization process stops. In this study, econv is set as 1 × 10⁻⁴. This is expressed in the following equation:
(26)
where xmax, xmin and xcurr denote, respectively, the upper and lower limits of the current searching range and the current value of x.
5. Results and discussion
5.1. Temperature distribution
The thermal properties of the studied steel, which are used in the present simulation, are listed in in Appendix A. The strong heat transfer between copper grips and water-cooled steel framework is taken into account by setting the heat transfer coefficients hth_eff as 2000 W m−2 K−1) along the surface ∂Ωgf1 and ∂Ωgf2. When Equation (8c) is applied to the specimen surface ∂Ωs, the heat transfer coefficient hth_eff is inversely determined by the measured temperature differences (Tc − Ts) (shown in ). The coefficient hc in Equation (8b) is also inversely determined according to the measured surface temperatures along specimen axis (). It can be seen that, as expected, the radial temperature gradient increases significantly with the surface temperature of the specimen. For a temperature as high as 1360°C (TC0), the core temperature will be about 1415°C, which is slightly lower than the melting point, 1437°C. This means that the tests that have been conducted at temperatures ranging from 1200°C to 1360°C (TC0) actually cover the range from 1200°C up to the solidus temperature of the UHS steel.
Figure 5. Measured radial temperature difference (core with respect to surface) in the medium transverse section of the specimen, as a function of surface temperature.
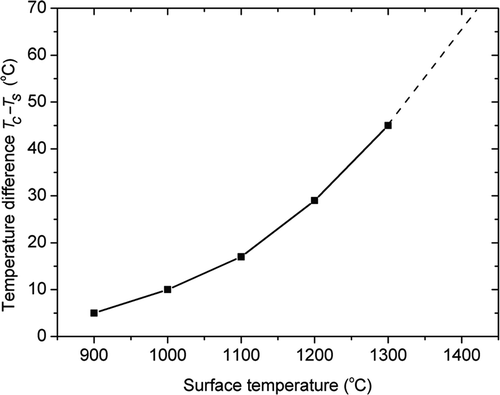
Figure 6. Temperature distribution for three different nominal temperatures. (a) calculated surface temperature profile in the axial direction together with experimental measurements; (b) calculated radial temperature distribution in the mid transverse section. Superimposed are two measurements at position TC3 (centre of specimen).
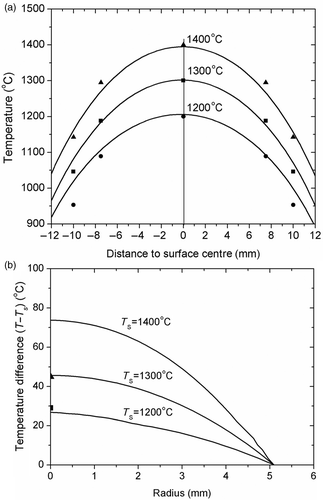
shows a comparison between calculated and measured longitudinal temperature profiles along the surface of the specimen in its central region (up to 12 mm from the mid-length transverse section). This comparison is given for three controlled temperatures for the central thermocouple TC0: 1200°C, 1300°C and 1400°C. Because of the numerical PID monitoring of the calculated temperature in the numerical simulation, there is a perfect agreement between simulation and experiment for this position.
Although the vacuum chamber and quartz tube are used in the tests, there exist surface heat losses from the free surface of the specimen between grips. The radial thermal gradients are increased with the increasing surface temperature, which can be clearly seen in the simulation results in . It can also be seen that the identification of coefficient hth_eff yields core temperature in excellent agreement with the measurements already reported in .
5.2. Identification of rheological parameters
5.2.1. Numerical identification method
Inverse identification consists in finding the set of material parameters A, minimizing the difference (the cost function in Equation (18)) between measured and calculated force–elongation curves for a set of tensile tests performed in different conditions. Regarding the elongation of the working zone, it is directly obtained in the simulation by the following integration of time-dependant imposed velocity:
(27)
where Vimp is the velocity that is imposed on the movable grip. As for the tensile force, its calculation is more delicate. In this finite element approach, it is calculated by summing all contact nodal forces associated with the penalty treatment of sticking contact:
(28)
where the nodal stress vector (surface force) is calculated by Equation (15), ez denotes the unit vector along the axial direction, rn and ln are, respectively, the radial coordinate and the control length associated with any boundary node n. In the second method, the force is deduced from the distribution of axial stress components along the central transverse section of the specimen:
(29)
where the summation is applied to the triangular element e crossed by the central transverse section, σzz(e) is the axial stress component calculated at the centre of element e, re is the radial coordinate of the centre of element e and Δre is the dimension of element e along the radial direction. It has been checked that the two methods lead to very close values of F.
The parameters A = (m, n, Q, α, A) in Equation (12) are automatically identified by the method introduced in Section 4. To concretely evaluate the discrepancy between predictions and measurements, the following mean error is used:
(30)
To make provision against possible non-uniqueness of the solution, practical measures have been taken. First, the weighting factors 1/Mj are introduced in Equation (18) to ensure that the number of selected sampling points for each curve does not affect the solutions. Second, the experimental data base covers multiple testing conditions: 15 tensile tests at five temperatures (1200°C to 1360°C, at TC0) and three constant velocities (10−3, 10−2 and 10−1 mm s−1), with about 10 sampling points per curve, are taken into account to calculate the minimum cost function.
In order to calculate the predicted forces in Equation (18), the direct modelling of Gleeble tension tests can be carried out, including both the heating and tension parts () in each direct simulation. However, in order to reduce the computation time of the automatic identification process, the direct modelling of tension tests can be divided into two successive steps: direct heating modelling (before time tms) and direct tension modelling (after time tms). Nodal information, such as temperature and coordinates, is stored at the end of the first step and is used as the initialization of the second step, which is iteratively executed in the automatic identification process as indicated in .
A classical issue in numerical inverse modelling is the estimation of the influence of the accuracy of the direct model (here the finite element code R2SOL-CA) on parameter identification. In the framework of this study, the effect of mesh size and time steps have been studied in order to combine good accuracy and computational efficiency. As shown in , the mesh is refined in the deformed region (mesh size: about 0.25 mm). In addition, small time steps are used to get incremental deformation of about 10−3 in the same zone (dt = 0.1 s for velocity 0.1 mm s−1, dt = 1 s for 0.01 mm s−1 and dt = 10 s for 0.001 mm s−1, which means that 50 time increments are prescribed for each test, the elongation being 0.5 mm). It has been checked that further refinement of both mesh size and time step does not change significantly the results of the direct model for a relevant set of material parameters. As a consequence, it can be thought that the influence of those numerical parameters on the accuracy of the parameters identification is reduced to a minimum.
The calculation time for direct tension modelling of each tension test is about 40 s on a computation platform Intel® 2.4 GHz 2Gb−1. During optimization, the value of function Ψ decreases with iterations, as shown in . The searching domain for each parameter is reduced with iterations until the convergence criterion has been reached for at least one parameter, as is shown by an example of m optimization history plotted in . The set of parameters A are then automatically identified, with the results listed in .
Figure 7. (a) Cost function optimization history and (b) m optimization history with iterations passed by IOSO module.
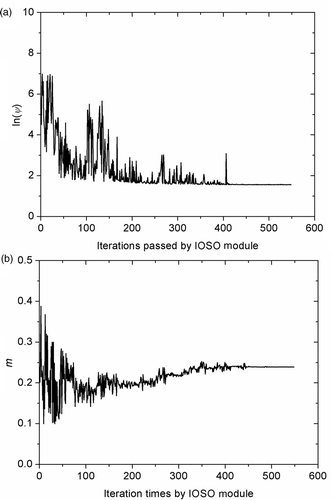
Table 1. Parameters identified by NIM.
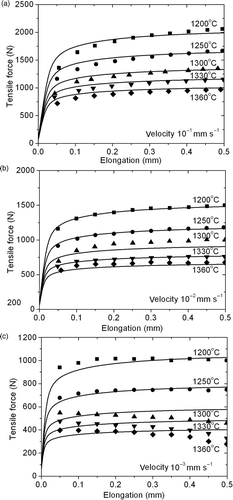
The predicted curves of force versus elongation by the direct modelling of Gleeble tension tests are shown in . A good agreement between predictions (solid lines) and measurements is observed, with a mean error emean = 2.2%. However, the calculated forces at high temperature and low velocities (in ) are overestimated compared with the measured results that apparently show a material softening phenomenon. This failure in the prediction of the softening phenomena will be discussed in Section 5.3.
5.2.2. Simple identification method (SIM)
Instead of using the NIM mentioned above, a simpler identification method based on the calculation of nominal stress, nominal strain and nominal strain rate may also be used to identify the set of parameters A. The evaluation of those nominal stresses relies on the assumption of a uniform deformation of a certain effective working zone around the centre of the specimen, and on the assumption that elastic deformation can be neglected. Based on the thermal analysis of the tests (), the length l0 of this effective working zone can be roughly and arbitrarily estimated to be 10 mm. In this zone, the strain rate and accordingly the stress state are supposedly uniaxial: and
. The nominal strain εnom and the nominal strain rate
are then defined as follows:
(31)
Δl is the elongation of the effective working zone at time t, which is supposed to be equal to the displacement of the moving grip. The calculated nominal stress is then directly obtained by inverting Equation (12):
(32)
In this expression, three methods have been used to determine the value of the nominal temperature Tnom attached to each test. By reference to the thermocouple measurements at positions TC0 (surface temperature Ts) and TC3 (core temperature Tc), they correspond to
(33)
In this alternative method – SIM, the minimum cost function is calculated by the following expression:
(34)
in which the calculated and measured nominal stresses are used. Now regarding the measured nominal stress in Equation (27), it is calculated as
(35)
where Fexp is the measured tensile force and S0 is the original cross-section area of the specimen.
The set of parameters A can then be identified by minimizing function Ψ (in Equation (27)), using the IOSO module. Without consideration of direct numerical modelling, the SIM is obviously much faster than the numerical identification technique. The identified parameters based on the SIM are listed in . The calculated and deduced nominal stress–strain curves are shown in . A reasonable agreement can be observed between the predicted and the directly deduced nominal stress–strain curves. However, as listed in , the assumed nominal temperatures attached to each test greatly affect the identified values of A and Q, with little influence on the other three parameters. The identified parameters can predict the nominal stress–strain relations, but the prediction ability for real tests should be checked by the accurate direct modelling of Gleeble tension tests through electrical-thermal-mechanical models aforementioned. The results will be discussed in the next section.
Figure 9. Comparison between the directly deduced (symbols) and calculated (lines) flow stresses of UHS steel at various nominal temperatures and nominal strain rates of (a) 1 × 10⁻² s−1, (b) 1 × 10⁻³ s−1 and (c) 1 × 10⁻⁴ s−1, respectively. The predicted curves consist of the dashed lines (SIM-1), the dotted lines (SIM-2) and the dash dotted lines (SIM-3), which appear to be perfectly superimposed.
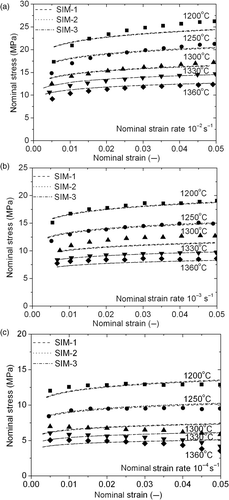
Table 2. Parameters identified by SIM.
5.2.3. Results analysis
The SIM is based on several assumptions, such as a uniform temperature distribution and a uniform deformation in a 10 mm long working zone. Inversely, no such assumptions have been made in the NIM. Such rough assumptions in SIM lead to the obvious higher values of Q in than that in . In order to compare those two methods better, the SIM-parameters listed in have been applied in the direct modelling of the Gleeble tension tests to calculate the force–elongation curves, which are compared with the experimental measurements, and with the prediction resulting from the NIM-identification, as shown in . The mean errors calculated by Equation (23) are listed in for the different methods.
Figure 10. Comparisons between calculated and measured force–elongation curves. Calculated curves result either from NIM (identified parameters in , solid lines), or from direct finite element modelling using the rheological parameters identified by the simplified identification method (parameters in ). (a) grip velocity 10−1 mm s−1; (b) grip velocity 10−2 mm s−1; (c) grip velocity 10−3 mm s−1.
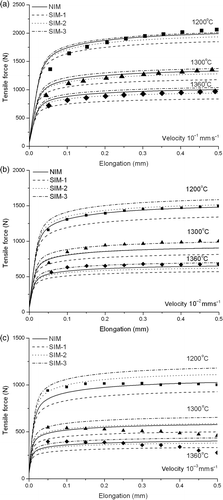
Table 3. Obtained mean errors on force versus elongation curves with the different identification methods.
As already seen in Section 5.2.1, the predicted force–elongation curves calculated with the numerical identified parameters (listed in ) agree quite well with the measured experimental data, with the mean error 2.2%. This expresses the relevance of the selected constitutive equation (Equation (12)). Regarding the SIM, it is quite interesting to note that, contrary to the curves of nominal stress versus nominal strain in Section 5.2.2 (), the predicted force-elongation curves associated with the three methods SIM-1, -2 and -3 now show significant differences. Because of temperature gradients, when the parameters listed in are used in the real direct modelling of Gleeble tension tests, this results in quite different force versus elongation curves. This is clearly shown in . The forces predicted by NIM are basically between the forces predicted by SIM-1 and SIM-3, and close to that predicted by SIM-2. This means that in the case of simple identification, it is preferable to choose the mean temperature between the core and the surface as the nominal temperature. This leads to the lowest error between predictions and measurements among the three options regarding the estimation of the nominal temperature: a 6.6% error is obtained instead of more than 11% for the other two options.
These results show the difficulty and unreliability of SIM that relies on critical estimations, like the nominal testing temperature and the assumption of the length of an effective deformation zone. They demonstrate the advantages and the reliability of NIM in the presence of thermal gradients and deformation heterogeneity.
5.3. Application of the identified constitutive model
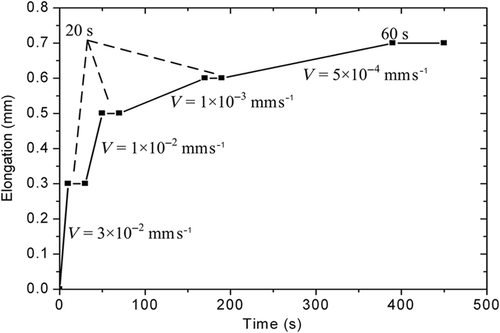
In order to test the prediction capability of the numerically identified model, more complex tensile tests, including stepwise strain-rate changes are considered. They consist of a succession of constant velocity and relaxation stages, as indicated in , in which the specimen elongation and the grip velocity are indicated. The specimen is extended in four steps with different deformation rates that are sequentially increased stepwise with a 20 s stress relaxation between two loading stages and a final 60 s stress relaxation at the end of test. Two tests have been experimentally performed for the studied UHS steel, at two temperatures 1200 and 1360°C.
The parameters identified by NIM and SIM methods have been used in the modelling of the complex tests, with results shown in . It can be seen that the material behaviour is reasonably well-reproduced by the numerical prediction with parameters identified by NIM (dash lines). The precision of the force evolution during each loading step is quite good, leading to a maximum relative error on the force value of about 10% at the beginning of each force plateau. Parameters identified by SIM have also been applied to the direct modelling of those tests. Results show that numerical predictions with SIM-1 parameters underestimate the forces for the case at 1360°C, whereas SIM-2 and SIM-3 over-estimate the force for the last two loading stages (Vimp = 1 × 10⁻³ and 5 × 10⁻⁴ mm s−1).
Figure 12. Comparison between measurements and numerical predictions for two strain rate stepwise decrease and stress relaxation tests at two different temperatures, 1200°C and 1360°C (at TC0). Continuous lines: force measurements; dashed lines: NIM identified model prediction; dot lines: SIM-1 identified model prediction; dash dot lines: SIM-2 identified model predictions; dash dot lines: SIM-3 identified model predictions.
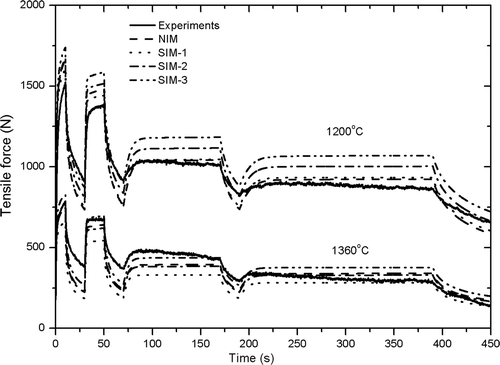
However, the agreement between measurements and predictions by NIM, as well as SIM, is less satisfying with regard to two aspects. First, numerical results generally show an over-estimation of relaxation effects, leading to under-estimated force values. Second, the identified numerical model fails in the prediction of material softening at low strain rates (the two last stages at Vimp = 1 × 10⁻³ and 5 × 10⁻⁴ mm s−1). This softening phenomenon could also be observed in . That probably reveals a limitation of the selected rheological model itself (Equation (12)).
Regarding over-relaxation, it should be noticed that, as shown in Equation (25), the strain hardening effect is combined into the constitutive relation with strain rate sensitivity effects through a multiplication method. During the relaxation stage (loading is stopped with elongation being fixed), the deformation rate decreases to zero dramatically, leading to a rapid decrease of the predicted strength, as has been observed in . The insufficiency of stress relaxation prediction by the current considered constitutive relations probably reflects the shortage of this type of constitutive relations that combines strain hardening and strain rate sensitivity effects by multiplication and does not include any plastic yield. The prediction ability for stress relaxation could be improved by considering an appropriate threshold yield stress in the elastic-viscoplastic model, or it can be thought that an additive-type constitutive equation, providing a better decoupling between those terms, would be preferable. Such constitutive equations have been applied for steels at high temperature by Bellet and Fachinotti Citation18 and Bellet et al. Citation19.
Now let us consider the material softening phenomenon that can be observed at low strain rate (10−4 s−1) in the simple uniaxial tests () and in the complex tension tests (). The current constitutive equation fails in the prediction of these phenomena. It can be thought that such testing conditions, high temperature (higher than 1200°C) and low strain rate (below 10−3 s−1), may generate specific plasticity phenomena that could be associated with microstructure changes in the material. Hence, some specific creep phenomena such as dislocation creep (involving the movement of dislocations assisted by the diffusion of vacancies or interstitials) or diffusion creep (involving the flow of vacancies and interstitials under the influence of applied stress) Citation20 could account for the phenomenon. Such specific phenomena may provide complementary contributions to the current plastic flow equations that could result in material softening during test and lead to a better agreement with experimental results.
6. Conclusions
The rheological behaviour of UHS steel at high temperature and low strain rates has been investigated by tensile tests performed on a Gleeble thermal-mechanical simulator and their associated numerical modelling. The thermal gradient existing in the specimen results in the heterogeneous deformation in the specimen, which is a source of difficulties in the analytical identification of the constitutive parameters. This complexity is taken into account through an automatic NIM based upon finite element inverse modelling. This method associates a coupled electrical-thermal-mechanical direct finite element analysis (code R2SOL-CA) of Gleeble tests with an optimization module (IOSO commercial software). It has been demonstrated that numerical identification provides a better agreement with experimental data than the approximate SIM. In the second part of this article, the numerically identified constitutive equation has been proved to be able to predict reasonably well the measured tensile force during more complex tensile tests consisting of successive loading and relaxation stages. However, some inefficiencies or limitations of the considered constitutive model have also been pointed out, which gives a clue as to further improvements that could be made to the constitutive relations depicting the rheological behaviour of steel at very high temperature and low deformation rates.
Acknowledgement
The authors would like to thank Arcelor Mittal company for the financial support associated with the two year stay of Changli Zhang in the CEMEF laboratory.
Notes
Note
1. Gleeble is a registered trademark of Dynamic Systems Inc, Poestenkill, NY 12140, USA (http://www.gleeble.com).
References
- Eskin, DG, and Katgerman, L, 2007. A quest for a new hot tearing criterion, Metall. Mater. Trans. A 38 (2007), pp. 1511–1519.
- Lahaie, DJ, and Bouchard, M, 2001. Physical modeling of the deformation mechanisms of semisolid bodies and a mechanical criterion for hot tearing, Metall. Mater. Trans. B 32 (2001), pp. 697–705.
- Nagata, S, Matsumiya, T, Ozawa, K, and Ohashi, T, 1990. Estimation of critical strain for internal crack formation in continuously cast slabs, Tetsu-to-Hagane 76 (1990), pp. 214–221.
- Won, YM, Yeo, TJ, Seol, DJ, and Oh, KH, 2000. A new criterion for internal crack formation in continuously cast steels, Metall. Mater. Trans. B 31 (2000), pp. 779–794.
- Bellet, M, Cerri, O, Bobadilla, M, and Chastel, Y, 2009. Modeling hot tearing during solidification of steels: Assessment and improvement of macroscopic criteria through the analysis of two experimental tests, Metall. Mater. Trans. A 40 (2009), pp. 2705–2717.
- Rappaz, M, Drezet, JM, and Gremaud, M, 1999. A new hot-tearing criterion, Metall. Mater. Trans. A 30 (1999), pp. 449–455.
- Seol, DJ, Yeo, YM, Oh, TJ, Park, KH, and Yim, CH, 1999. High temperature deformation behavior of carbon steel in the austenite and delta-ferrite regions, ISIJ Int. 39 (1999), pp. 91–98.
- Kim, K, Oh, KH, and Lee, DN, 1996. Mechanical behavior of carbon steels during continuous casting, Scr. Mater. 34 (1996), pp. 301–307.
- Hojny, M, and Glowacki, M, 2008. Computer modelling of deformation of steel samples with mushy zone, Steel Res. Int. 79 (2008), pp. 868–874.
- Hojny, M, and Glowacki, M, 2009. The physical and computer modeling of plastic deformation of low carbon steel in semisolid state, J. Eng. Mater-T. ASME 131 (2009), pp. (041003)1–7.
- Glowacki, M, and Hojny, M, 2009. Inverse analysis applied for determination of strain–stress curves for steel deformed in semi-solid state, Inverse Prob. Sci. Eng. 17 (2009), pp. 159–174.
- Han, HN, Lee, YG, Oh, KH, and Lee, DN, 1996. Analysis of hot forging of porous metals, Mater. Sci. Eng., A 206 (1996), pp. 81–89.
- Bellet, M, and Heinrich, A, 2004. A two-dimensional finite element thermomechanical approach to a global stress-strain analysis of steel continuous casting, ISIJ Int. 44 (2004), pp. 1686–1695.
- Bellet, M, Decultieux, F, Menai, M, Bay, F, Levaillant, C, Chenot, JL, Schmidt, P, and Svensson, IL, 1996. Thermomechanics of the cooling stage in casting processes: Three-dimensional finite element analysis and experimental validation, Metall. Mater. Trans. B 27 (1996), pp. 81–99.
- Single-objective Optimization Software IOSO NS GT 2.0: software available at http://www.iosotech.com..
- Egorov, IN, Kretinin, GV, Leshchenko, IA, and Kuptzov, SV, 2007. Multi-objective approach for robust design optimization problems, Inverse Probl. Sci. Eng. 15 (2007), pp. 47–59.
- Colaco, MJ, Dulikravich, GS, and Sahoo, D, 2008. A response surface method-based hybrid optimizer, Inverse Probl. Sci. Eng. 16 (2008), pp. 717–741.
- Bellet, M, and Fachinotti, VD, 2004. ALE method for solidification modelling, Comput. Meth. Appl. Mech. Eng. 193 (2004), pp. 4355–4381.
- Bellet, M, Jaouen, O, and Poitrault, I, 2005. An ALE-FEM approach to the thermomechanics of solidification processes with application to prediction of pipe shrinkage, Int. J. Numer. Methods Heat Fluid Flow 15 (2005), pp. 120–142.
- Dieter, GE, 1988. Mechanical Metallurgy. London: McGraw-Hill; 1988.
- Mizukami, H, Murakami, K, and Miyashita, Y, 1977. Elastic modulus of steels at high temperature, Tetsu-to-Hagané 63 (1977), p. s562.
Appendix
The thermal electrical and thermal properties of the UHS steel that is studied in this article are listed in .
