Figures & data
FIGURE 1. Map of Queensland, Australia showing the distribution of surface exposures of Cretaceous sediments in Queensland, the location of the town of Winton and museums in the region, and the location of Belmont Station where the holotype and only known specimen of Ferrodraco lentoni was discovered. This map was drafted by S.F.P. in Adobe Illustrator CC 2017, and includes geological information summarized from Vine and Jauncey (Citation1964) and Vine et al. (Citation1967). (© Commonwealth of Australia [Geoscience Australia] 2019. This product is released under the Creative Commons Attribution 4.0 International License [creativecommons.org/licenses/by/4.0/legalcode].)
![FIGURE 1. Map of Queensland, Australia showing the distribution of surface exposures of Cretaceous sediments in Queensland, the location of the town of Winton and museums in the region, and the location of Belmont Station where the holotype and only known specimen of Ferrodraco lentoni was discovered. This map was drafted by S.F.P. in Adobe Illustrator CC 2017, and includes geological information summarized from Vine and Jauncey (Citation1964) and Vine et al. (Citation1967). (© Commonwealth of Australia [Geoscience Australia] 2019. This product is released under the Creative Commons Attribution 4.0 International License [creativecommons.org/licenses/by/4.0/legalcode].)](/cms/asset/cd0ce9fe-3fc0-401c-8c34-775c123c6dd6/ujvp_a_2038182_f0001_oc.jpg)
FIGURE 2. Ferrodraco lentoni holotype skull AODF 876 from the Winton Formation of Queensland, Australia. Some adherent ironstone matrix has been digitally removed. Three-dimensional surface renders of the premaxilla–maxilla in A, ventral; B, anterior; C, left lateral; D, dorsal; and E, right lateral views. All 3D renders by M.A.W. Scale bar equals 20 mm.
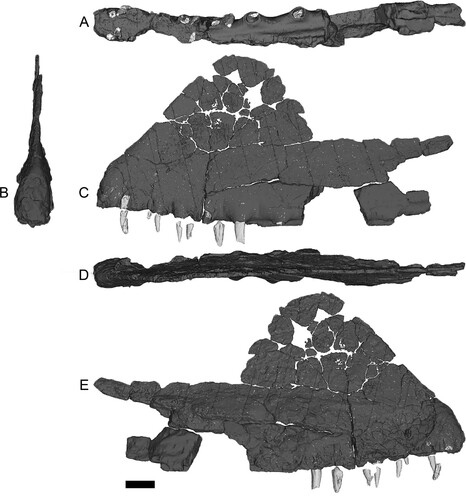
FIGURE 3. Ferrodraco lentoni holotype mandible AODF 876. Three-dimensional surface renders of the mandible in A, ventral; B, anterior; C, left lateral; D, dorsal; and E, right lateral views. All 3D renders by M.A.W. Scale bar equals 20 mm.
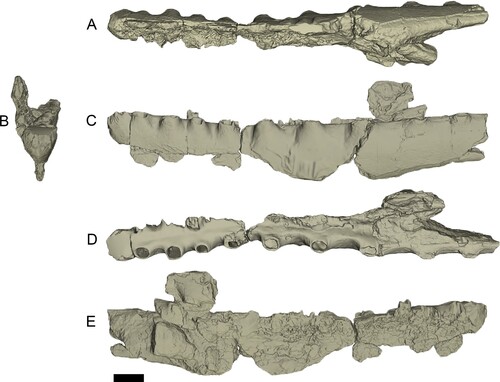
TABLE 1. Measurements of the alveolar diameters observed in Ferrodraco lentoni (AODF 876) in millimeters. Measurements based on incomplete alveoli are indicated with an asterisk (*).
TABLE 2. Interalveolar spacing of Ferrodraco lentoni (measurements taken at apex of alveoli).
FIGURE 4. Ferrodraco lentoni holotype skull AODF 876 (modified from Pentland et al., Citation2019). A–F, left frontal in A, dorsal; B, anterior; C, lateral; D, posterior; E, medial; and F, ventral views. G–L, left mandibular articular region in G, dorsal; H, anterior; I, lateral; J, posterior; K, medial; and L, ventral views. All photographs taken by A.H.P. Scale bar equals 20 mm.
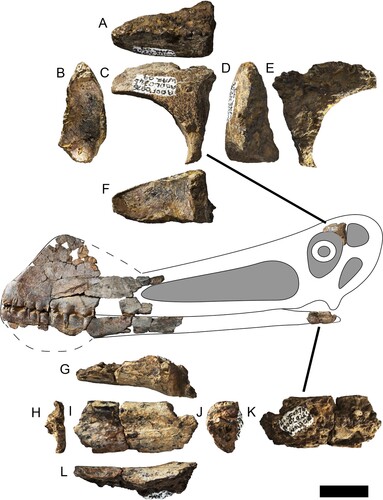
FIGURE 5. Ferrodraco lentoni holotype cervical vertebrae AODF 876. A–F, cervical vertebra A in A, anterior; B, left lateral; C, posterior; D, right lateral; E, dorsal; and F, ventral views. G–L, cervical vertebra B in G, anterior; H, left lateral; I, posterior; J, right lateral; K, dorsal; and L, ventral views. M–R, cervical vertebra C in M, anterior; N, left lateral; O, posterior; P, right lateral; Q, dorsal; and R, ventral views. S–X, cervical vertebra D in S, anterior; T, left lateral; U, posterior; V, right lateral; W, dorsal; and X, ventral views. Y–AD, cervical vertebra E in Y, anterior; Z, left lateral; AA, posterior; AB, right lateral; AC, dorsal; and AD, ventral views. The dashed line represents the missing portion of the extent of the missing exapophysis. All photographs taken by A.H.P. Scale bar equals 20 mm.
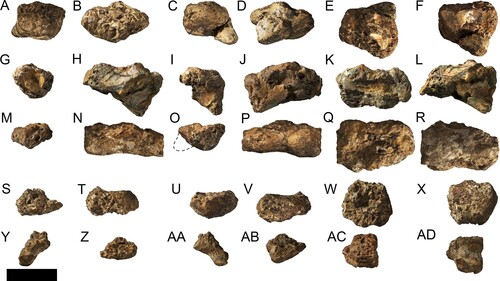
FIGURE 6. Ferrodraco lentoni holotype appendicular elements AODF 876. A–F, right scapulocoracoid in A, dorsal; B, posterior; C, lateral; D, anterior; E, medial; and F, ventral views. G–L, left ulna in G, proximal; H, posterior; I, lateral; J, anterior; K, medial; and L, distal views. M–Q, left radius in M, posterior; N, lateral; O, anterior; P, medial; and Q, distal views. All photographs taken by A.H.P. Scale bar equals 20 mm.
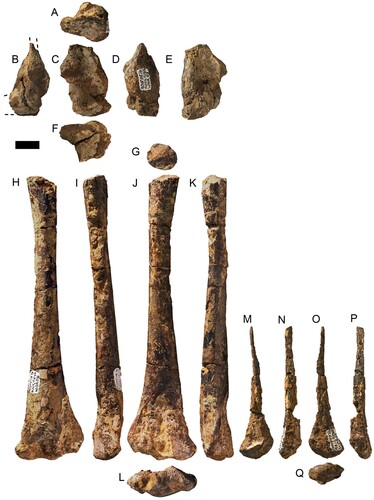
FIGURE 7. Ferrodraco lentoni holotype left syncarpus AODF 876. A–F, photographs of the left syncarpus in A, anterior; B, proximal; C, ventral; D, distal; E, dorsal; and F, posterior views. G–L, three-dimensional surface renders based on CT scan data of syncarpus in G, anterior; H, proximal; I, ventral; J, distal; K, dorsal; and L, posterior views. All photographs taken by A.H.P., 3D renders by M.A.W. Scale bar equals 20 mm.
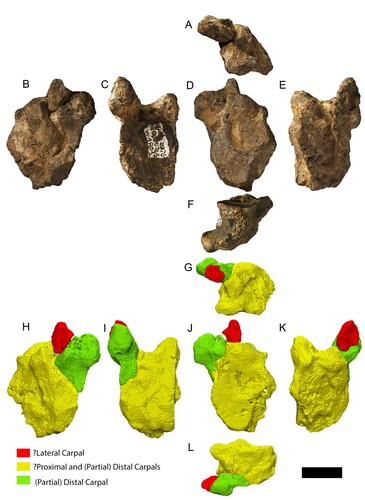
FIGURE 8. Ferrodraco lentoni holotype indeterminate non-wing manual phalanges AODF 876. A–E, left non-wing manual phalanx A in A, distal; B, anterior; C, lateral; D, posterior; and E, proximal views. F–I, left non-flight digit metacarpal B in F, ? proximal; G, ?anterior; H, lateral; and I, ?posterior views. J–O, left non-wing manual phalanx C in J, proximal; K, medial; L, posterior; M, lateral; N, anterior; and O, distal views. All photographs taken by A.H.P. Scale bar equals 10 mm.
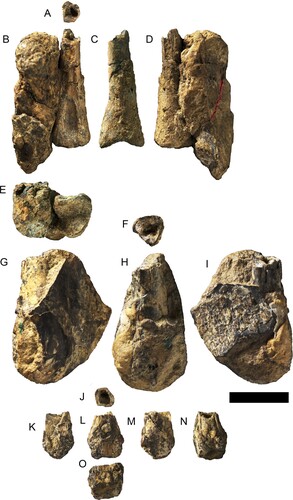
FIGURE 9. Ferrodraco lentoni holotype flight digit metacarpals and phalanges AODF 876. A–E, right metacarpal IV in A, proximal; B, ventral; C, anterior; D, dorsal; and E, posterior views. F–K, left metacarpal IV in F, proximal; G, dorsal; H, anterior; I, ventral; J, posterior; and K, distal views. L–P, proximal end of left first wing phalanx (IV-1) in L, proximal; M, posterior; N, dorsal; O, anterior; and P, ventral views. Q–U, distal end of left first wing phalanx in Q, posterior; R, dorsal; S, anterior; T, ventral; and U, distal views. The dashed line represents the missing portion of the diaphysis. All photographs taken by A.H.P. Scale bar equals 50 mm.
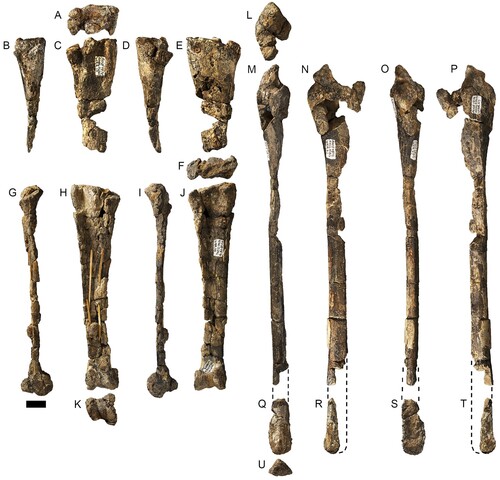
FIGURE 10. Time-calibrated phylogenetic trees of Anhangueria. The box next to each taxon denotes its temporal range (including stratigraphic uncertainty). A, tree based on the matrix of Holgado and Pêgas (Citation2020); B, tree based on the matrix of Pêgas et al. (Citation2019), with Ferrodraco lentoni and Mythunga camara included. Figure drafted by A.H.P.
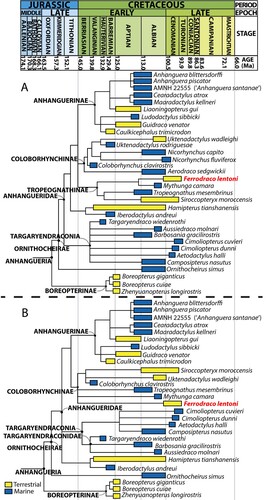
FIGURE 11. Partial pterosaur dentaries derived from the upper Albian Toolebuc Formation. A–E, Aussiedraco molnari holotype QM F10613 in A, dorsal, B, anterior, C, right lateral, D, left lateral, and E, ventral views. F–I, partial mandible, QM F44423 in F, left lateral, G, dorsal, H, right lateral, and I, ventral views. All photographs taken by S.F.P. Scale bar equals 10 mm.
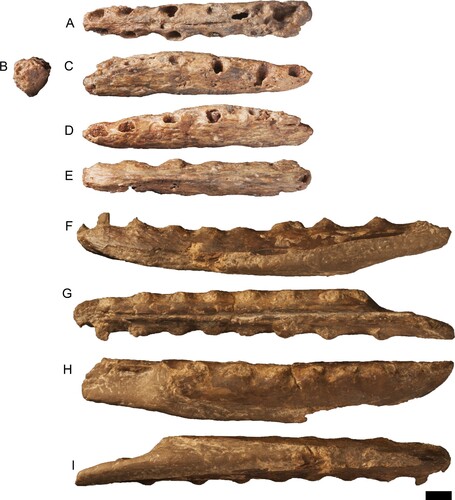
FIGURE 12. Pterosaur postcranial remains derived from the upper Albian Toolebuc Formation. A–C, left scapulocoracoid, QM F10612 in A, posterior, B, lateral and C, anterior views. D–H, proximal end of a left metacarpal IV, QM F44321 in D, proximal; E, anterior; F, dorsal; G, posterior; and H, ventral views. I–M, distal end of a left wing phalanx, QM F44312 in I, dorsal; J, posterior; K, ventral; L, anterior; and M, distal views. All photographs taken by S.F.P. Scale bar equals 10 mm.
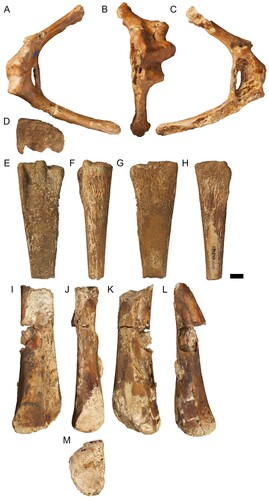
FIGURE 13. Pterosaur right metacarpal IV from the upper Albian Toolebuc Formation NMV P197962 in A, proximal; B, posterior; C, ventral; D, anterior; E, dorsal; and F, distal views. All photographs taken by A.H.P. Scale bar equals 20 mm.
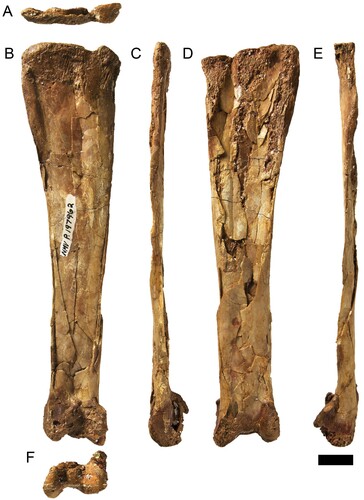
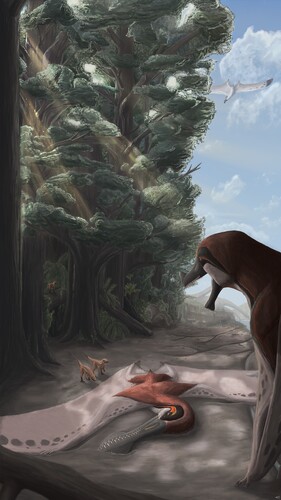
FIGURE 14. Life restoration of Ferrodraco lentoni. Illustration by R.J.D.