Figures & data
Figure 1. Map to indicate the location of the Rinnigal Pinnace, close to the Rinnigal Pier, Scapa Flow, Orkney Islands (Authors).
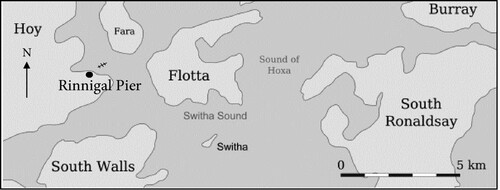
Figure 2. (A) Boilerplate from the wreck at Rinnigall pier. (B) Close up showing the number from the Boilerplate. (C) Yardlist. (D) Photograph of the bell (engine order gong). (E) Close up of the bell (engine order gong) indicating the crows foot (inset). (F) Engine Order Gong photographed in situ on the restored SP.199 at Portsmouth Historic Shipyard (photo credits: Frank Fowler).

Figure 3. (A) Initial sketch map of the site showing datum points. (B) Site map showing key features of the wreck identified. (C) Site map with measurements of key features incorporated (Bob Anderson and Joanne Porter). (D) Side scan sonar image of the Rinnigal Steam pinnace provided by Sula Diving Ltd. This image indicates key features of the wreck such as the boiler, the A frame and the bow section. It also shows the biophysical context of the site; the substrate around the wreck comprises muddy sand (Kevin Heath).
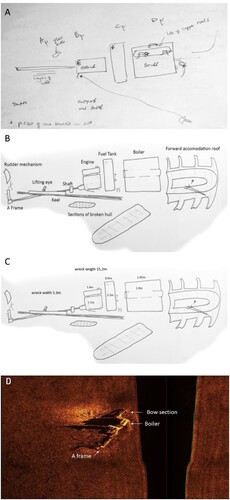
Figure 4. (A) View of the bow section with boiler in background, from off starboard side. B) Closer view of the boiler from starboard side. (C) View of the back of the boiler and the fallen away hull plates, taken from starboard side. (D) Closer view of the midships section showing remains of the double diagonal hull plates. (E) View of the propeller shaft, a frame and hub of the propeller (propeller was salvaged), taken from the stern. (F) View of the lifting eye, one of two used to bring the pinnace back on board the mother vessel when not being used, taken from the stern looking along the portside. (G) View of the midships area of portside showing the propeller shaft meeting the engine block (H) View from the portside of the area connecting between the engine, fuel tank; the boiler (now fallen over) is positioned towards the left of the image and has a large hole in the outer casing (Authors).
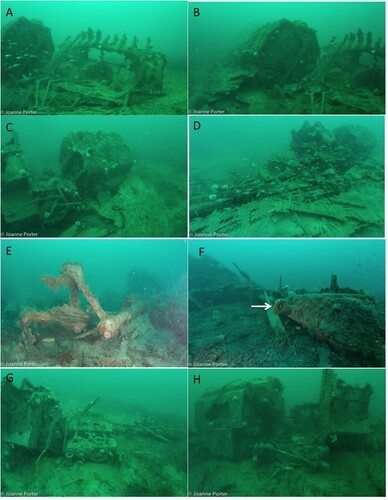
Figure 5. (A) A photomosaic of 12 stitched images to show the double diagonal planking construction of the hull (Scale Bar = 5 cm). (B) A sketch of the photomosaic image of a close-up section of the hull with annotations of the key features relating to the distinctive type of construction used (Bob Anderson).
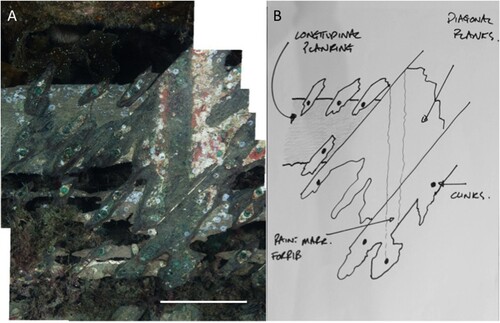
Figure 6. (A) A photomosaic to illustrate the top of the cylinder block on the engine (Scale Bar = 8 cm). (B) In this diagram, key features of the engine block are identified to support interpretation of the photomosaic of the top of the engine block (Authors).
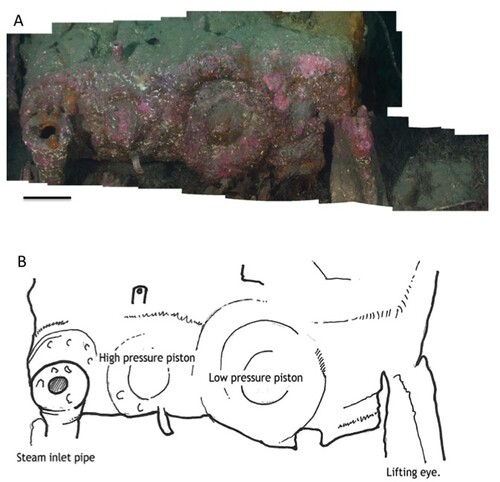
Figure 7. (A) A schematic of a pinnace similar but not exactly the same, as the one surveyed (image from Stapleton, 1980, reproduced with permission). (B) Pinnace 199 restored by the Royal Naval Museum (Portsmouth) (Photo: Frank Fowler).
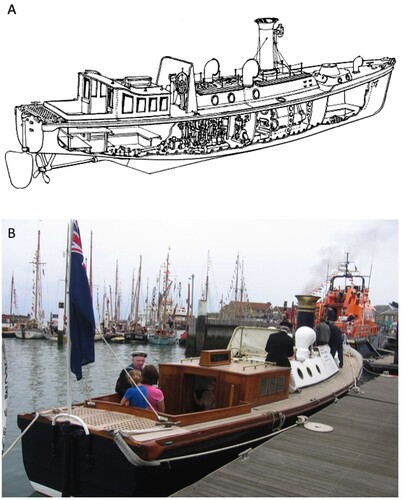
Figure 8. (A) Underwater sketch of the marine life and habitats of the wreck following MNCR Phase 2 method by diver Rebecca Grieve (RG) (B) Sketch by Jenni Kakkonen (JK) illustrating the surveyed area adjacent to the wreck.
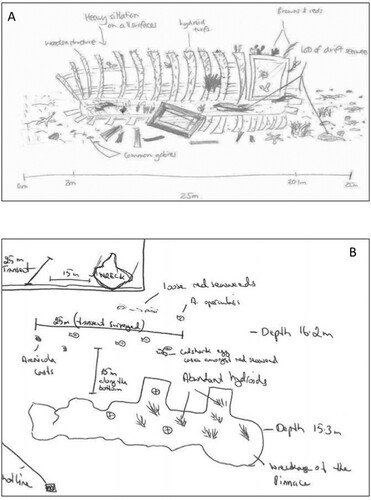
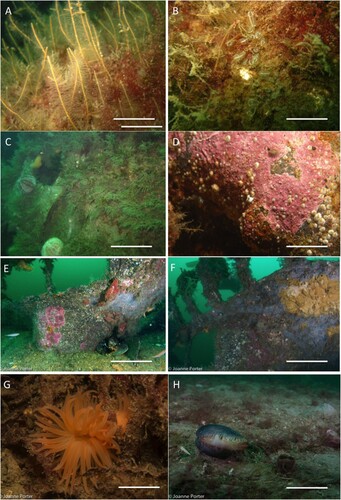
Figure 9. (A) Clumps of the branching hydroid Nemertesia ramosa on the upper surfaces of the wreck (RG) Scale Bar = 5 cm. (B) Clumps of the light bulb sea squirt Clavellina lepadiformis growing on the vertical surfaces of the wreck (RG) Scale Bar = 5 cm. (C) Upper surface of the wreck with abundant clumps of the Herringbone hydroid Halecium halecinum, and grazing edible sea urchins, Echinus esculentus. Occasional patches of Dead Men’s Fingers, Alcyonium digitatum were also present and are indicative of areas where current flows more strongly over the wreck surface. There is a dense understory of short red algal turf, indicating that light levels are sufficient for some seasonal algal growth (RG) Scale bar = 20 cm. (D) Encrusting pink algae growing over the surface of the wreck, with abundant barnacles and rare occurrence of the china limpet Tectura testudinalis (RG) Scale Bar = 8 cm. (E) A European lobster (Hommarus gammarus) using the remains of the roof aft accommodation as a home. Other fauna and flora encrusting the wreckage include the solitary ascidian Ascidia mentula, pink encrusting algae and the white fur-like polyps of the sessile life stage of the moon jellyfish Aurelia aurita. Scale Bar = 25 cm. (F) A large colony of the yellow encrusting sponge Myxilla incrustans, a plumose anemone Metridium senile, Deadman’s finger Alcyonium digitatum and encrusting pink algae present on another section of the remains of the roof of the aft accommodation. Scale bar = 25 cm. (G) A flame shell (Limaria hians) nestling in amongst a pile of the red seaweed Phyllophora crispa. Scale Bar = 3 cm. (H) The filter feeding bivalve mollusc Ocean Quahog (Arctica islandica) and the actively feeding siphon of Mya truncata, a burrowing bivalve mollusc, photographed in the area adjacent to the wreck of Steam Pinnace 744. Scale Bar = 6 cm (Joanne Porter).