Figures & data
Figure 1. Flow chart showing how to delimit tectonic units in poly-deformed and poly-metamorphic terranes; redrawn after CitationSpalla et al. (2005).
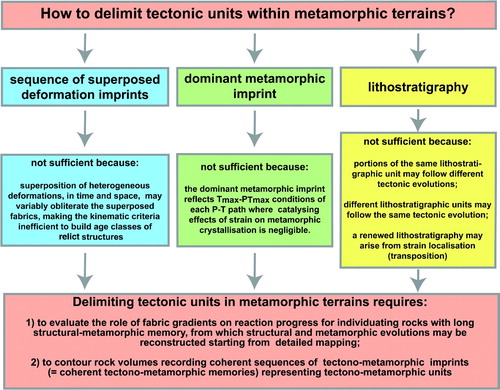
Figure 2. Tectonic sketch map of the Alps; 1 = crystalline massifs of the Helvetic units; 2 = continental Penninic units; 3 = Austroalpine units; 4 = Southalpine crystalline basement units; 5 = Periadriatic Oligocene intermediate to granitic magmatic bodies. Stars = Permian gabbroic bodies in the pre-Alpine continental crust: g1 = Corio – Monastero (SLZ); g2 = Sermenza (SLZ); g3 = Matterhorn – Collon – Sassa (DB); g4 = Fedoz – Braccia; g5 = Sondalo; g6 = Baerofen and Gressenberg; g7 = Bressanone - Chiusa; g8 = Predazzo - Monzoni; g9 = Val Biandino; g10 = Ivrea Val Mastallone; g11 = Ivrea - Finero. The red star locates the Sassa complex.
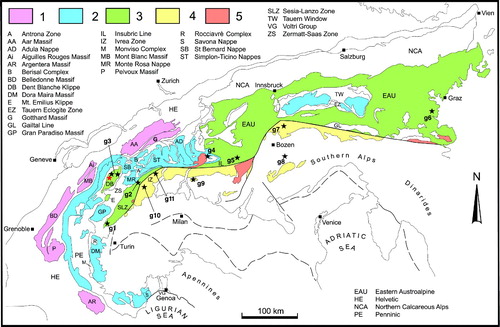
Figure 3. Schematic block diagram showing strain partitioning, generating mylonitic, tectonitic, and coronitic textures, as a consequence of deformation of a homogeneous massive rock volume. The close up shows the corresponding textures of the Sassa gabbro. Legend: 1 = coronite, 2 = tectonite, 3 = mylonite. Redrawn after CitationLardeaux and Spalla (1990).
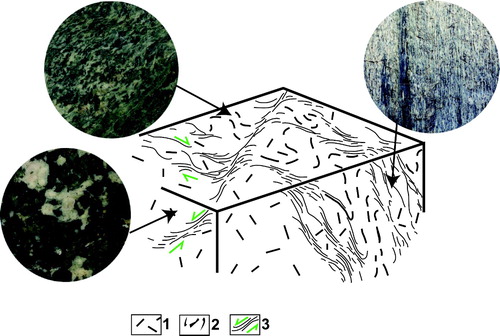
Figure 4. Detail of the map (southern sector of Berger de la Sassa subarea) showing hectometer-scale deformation partitioning: poorly deformed domains preserving the magmatic structures are wrapped by S1 or S2 foliated domains. Legend as in the ‘Structural and petrographic map of the Sassa gabbro complex’.
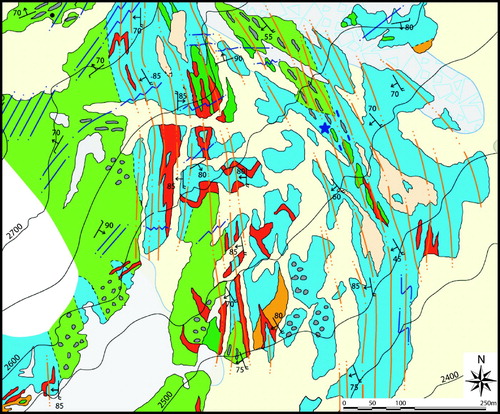
Table 1. Textural and mineralogical features of different lithotypes (a = acidic protoliths. b = basic protoliths) in the two mapped subareas.
Table 2. Summary of the intrusion relationships in the Sassa gabbroic complex.
Table 3. Pre-Alpine and Alpine superposed structure and related mineral assemblages as inferred by microstructural analysis. Mineral abbreviations after CitationWhitney and Evans (2010) except for white mica (Wm).
Figure 5. (a) leucocratic/melanocratic alternating layers (from cm- to m-thick) affected by D3 folds in metagranitoids; close to Bivouac de la Sassa; (b) mesocratic metagabbro with dark green clinopyroxene rimmed by dark amphibole, showing grain-size variation; scale bar in centimeters; (c) mm-grained metamorphic microgabbro cut by a meta-plagiogranitic vein with undulate contacts; red scale bar is 1 cm long; (d) mm-grained leucocratic metagabbro with less than 30% of amphibole and biotite content; red scale bar is 1 cm long; (e) melanocratic metagabbro mainly consisting of amphibole (dark green), opaque minerals, and chlorite (light green); red scale bar is 1 cm long; (f) mm-grained meta-anorthosite consisting of 95% of plagioclase (dark portions are fresh plagioclase grains); red scale bar is 1 cm long; (g) contact between metagabbros (deep green color) and metagranitoids (yellowish color) is frequently marked by a thick mylonitic layer as in the case of upper Vallone d'Otemma; (h) meta-tonalite rich in porphyritic enclaves in Vallone d'Otemma.

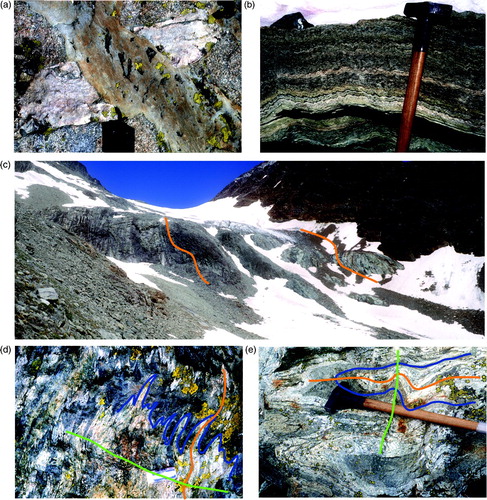
Figure 6. (a) metagabbro cut by meta-aplites and type II meta-porphyritic dykes. Porphyritic dykes show chilled margins. Black Brunton compass for scale; (b) S3 crenulation cleavage develops where S2 is more pervasive in mylonitic metagranitoids (Bivouac de la Sassa subarea); (c) View of the base of the Glacier de la Sassa. Valpelline Series and Arolla Series rocks are on the right side and left side of the picture respectively. The contact between the two Series is mylonitic, parallel to the S2 foliation recorded in the metagranitoids, and affected by meter-scale D3 folds; S2 trace in orange; (d) interference pattern between D2 and D3 folding in melanocratic metagranitoids; S1, S2, and AP3 are in blue, orange, and green, respectively; 4 cm long eraser as scale; (e) Ramsay's type 3 interference pattern between D2 and D3 folding in leucocratic metagranitoids; S1, S2, and AP3 are in blue, orange, and green, respectively.