
Figures & data
Figure 1. Schematic illustration of the use of HDNBPIF in treating fingertip amputation. HDNBPIF is designed and superficial skin channel is cut like shown in (A). Black arrow shows the dissected digital nerve in flap. Green arrow shows the broaden pedicle. Grey arrow shows the stump of the proper digital nerve. We rotated the flap with the flap’s vascular nutrient stripe and the broaden pedicle is also shown in (B). Red arrow shows the pivot point. Green arrow shows the rotated broaden pedicle. Blue arrow shows the nutrient stripe of flap.
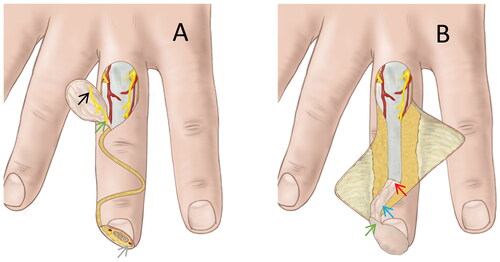
Figure 2. Typical case presentation. An Allen’s type 3 fingertip amputation is shown in (A). The exact location and width of flap and broaden pedicle is shown in (B). During operation, we dissected the digital nerve in the flap (C). Postoperative status was shown in (D). At 18 months follow-up, the index finger showed good contouring and appearance (E and F).

Table 1. Patients and results.
Table 2. Demographic and surgical details of the cases in this study.
Table 3. Outcomes at the final follow-up.
Table 4. Vancouver scar scale results at the donor and recipient sites.