Figures & data
Figure 1 Model 1 of the box-like head-and-face shield and its assembly. (A) Front oblique view of the head-and-face shield before preparation and (B–D) the folding process used to prepare the shield for use. A box that is open at the top and bottom is flattened into a two-layer sheet. A face opening is cut and sealed with a thin plastic sheet (A-1) attached from the inside before folding. The dotted lines (A-2, 4, 5, 6) indicate where the paper is bent, and the straight line (A-3) denotes a pre-cut incision. The sheet is bent along the four straight dotted lines (one of them is shown as A-2) to form a three-dimensional box-like shape (arrow) (B). The four flaps separated by pre-cut incisions in the front, back, and sides at the top of the box (only one of which is shown as A-3) are then bent along the four dotted lines at the top part of the box (along both lateral sides, one of which is shown as straight dotted line A-4, and on the front and back, one of which is a line curved downward, A-5). Thus, the front and back flaps overlap each other (arrows) to form the head covering, and the box can hold its square shape (C, D). The front of the box is then bent in the middle under the chin along the dotted line (A-6) to form an obtuse angle, providing extra breathing space for the wearer.
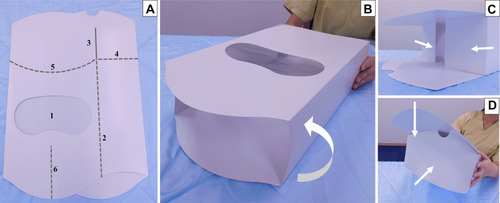
Figure 2 Images of a person wearing Model 1 of the proposed head-and-face shield. (A) Front, (B) front oblique, and (C) back oblique views. The visual field is wide enough to allow the wearer to administer medical care (A, B) while completely covering the wearer’s head and neck (A, C). This shield can play the roles of a hair covering, goggles, and face shield, and the user can also wear glasses or a mask under the shield (A, B).
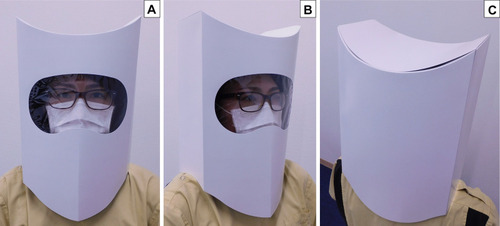
Figure 3 Model 2 of the box-like face shield and its preparation. (A) Front and (B) back oblique views of the face shield before folding. Although the front is similar to Model 1 (A), the lower part of the back is cut off (B-1). Pre-cut incisions, which are usually closed, are positioned near the nasal orifices, to make it possible to collect a nasal swab for viral testing while the patient is wearing the shield (A, black arrows). The sheet is bent along the dotted lines (A, B) upon preparation. (C) Folding process. This model is easily prepared by pushing on both sides toward the center (black and white arrows), which is made possible by gluing the top part of the back to the top part of the front in the center (arrowheads).
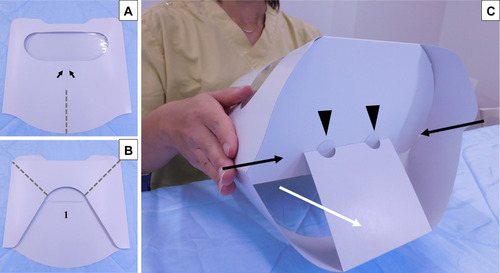
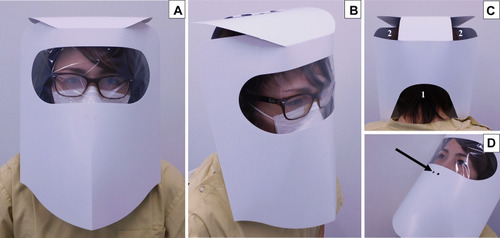
Figure 4 Images of a person wearing Model 2 of the proposed face shield. (A) Front, (B) front oblique, (C) back oblique views. This model completely covers the front part of the head, face, and neck like Model 1 (A, B). However, there are wide openings on the lower half of the back (C-1) and on both sides at the top (C-2), which prevents heat and moisture build-up by allowing air ventilation through the openings. (D) Image of collecting a swab from the nasopharynx of a person wearing Model 2 of the face shield. Nasal swabbing for viral testing (such as polymerase chain reaction testing) can be conducted on a patient wearing the Model 2 shield through pre-cut incisions near the nasal orifices (black arrow). The cotton applicator is inserted through one of these incisions, which are otherwise closed but can be opened easily by applying pressure with a finger to remove the covering. This shield could reduce the clinician’s exposure to droplets from the patient (such as if he or she coughs or sneezes) when collecting the samples.