
Figures & data
Figure 1 The preoperative images.
Notes: (A–C) An extensive osteolytic lesion in the talus. (D) Bone scan revealed an increased uptake around the ankle.
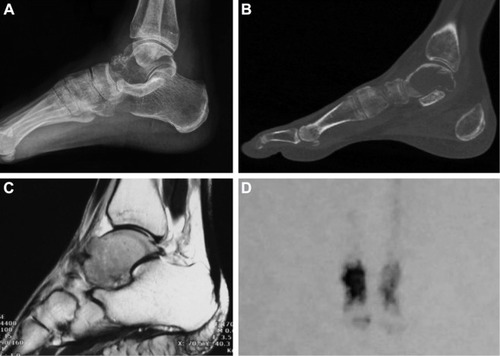
Figure 2 The prosthesis design.
Notes: (A) Anterolateral view of the installed prosthesis, with the sinus tarsi completely filled (red arrow). (B) Top view of the lower modular component of the prosthesis placed on the calcaneus. Pre-drilled holes for screws can be seen. (C) Mediolateral view of the installed prosthesis showing the direction of the screw fixation (not the length of screws). The sinus tarsi is completely filled (red arrow).
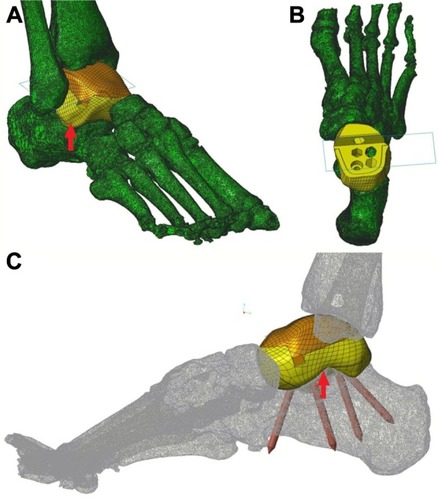
Figure 3 The models and the finished product.
Notes: (A, B) Models of the prosthesis and adjacent bones were printed and tested to verify our plan before the final production. Anterolateral view of the installed prosthesis, with the sinus tarsi completely filled (red arrow). (C–F) The three-dimensional printed press-fit modular prosthesis. The lower modular component (E, F), with porous structures on the bottom to facilitate subtalar arthrodesis, is made of titanium alloy. The upper modular component (C) is made of ultra high molecular weight polyethylene (UHMWPE). (G) The installed prosthesis fits well to the calcaneus and navicular bone. The gap (green arrow) is designed for easy separation of the two modular components. The hole (yellow arrow) is predrilled for fixation of the talonavicular joint, but it was not fixed during the surgery in order to obtain better foot function.
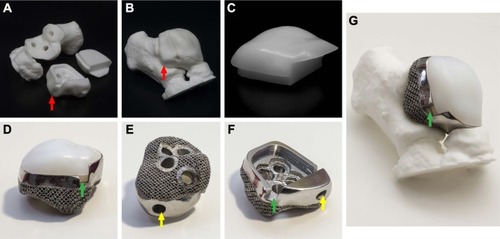
Figure 4 The intraoperative pictures.
Notes: (A, B) After the removal of the talus through anterior approach, the modular prosthesis was inserted and fixed to the calcaneus. (C) The en bloc resected talus was almost identical to the three-dimensional printed model of the prosthesis of the talus.
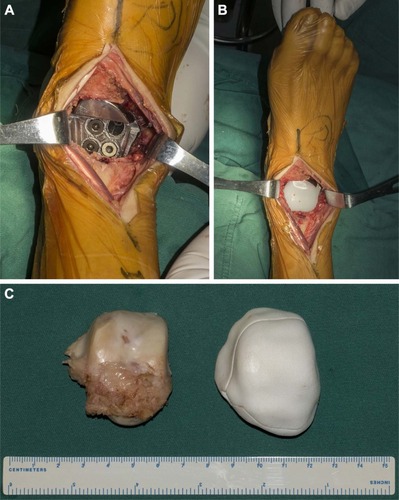
Figure 5 The postoperative roentgenographs.
Note: (A, B) The modular prosthesis and the screws are in good position.
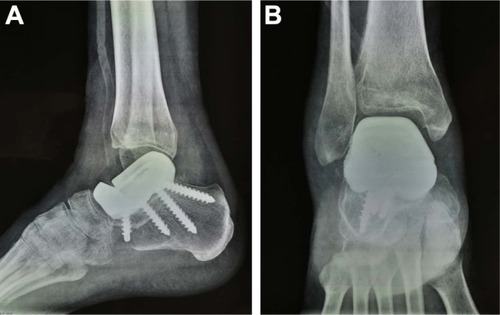
Figure 6 Standing appearance.
Note: (A) Dorsiflexion/plantarflexion (B, C) around 6 months after total talar replacement with the three-dimensional printed modular prosthesis in the right foot.
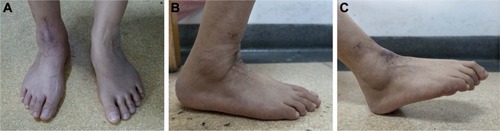
Figure 7 Follow-up radiographs 6 months after surgery.
Note: (A, B) The prosthesis is well positioned, and no abnormalities are noted.
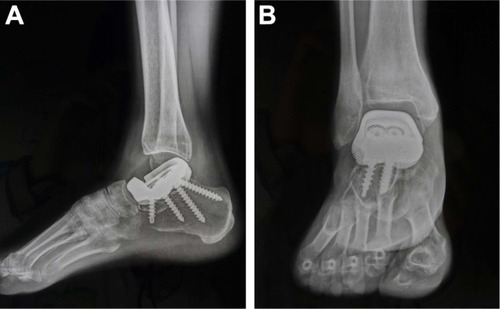
Table 1 Treatment techniques and outcomes for total talar replacement