Figures & data
Figure 1. High level diagram of the MicroBlate treatment and measurement system.
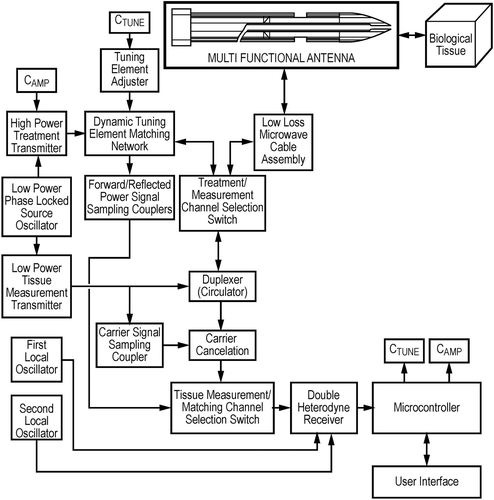
Figure 2. The 2.2-mm antenna. The white ceramic tip is the microwave antenna, and the impedance matching mechanism of the generator ensures that energy is released from the tip of the antenna leading to spherical ablations.
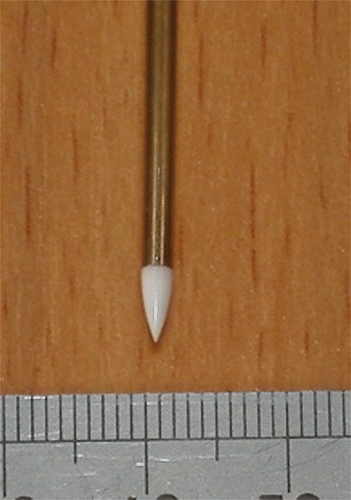
Figure 3. Macroscopic appearance of ablated parenchyma. After 30 s at 50 W, a mean ablation diameter of 21.3 mm ± 1 was achieved. Note the antenna track with some evidence of charring (A), white zone, consisting of blanched parenchyma within the ablation zone (B), red zone, the rim of haemorrhagic tissue (C) and the surrounding normal-looking parenchyma (D).
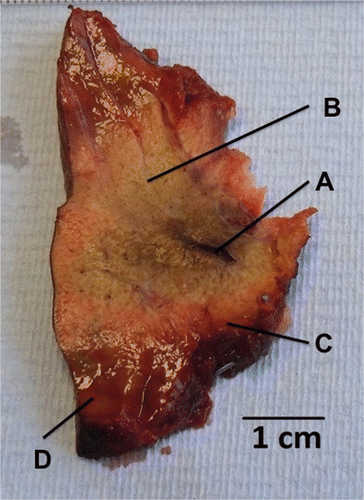
Table I. Patient information, neoadjuvant therapy and tumour characteristics. Ablations performed in tumour showed similar size to ablations performed in normal parenchyma.
Figure 4. Maximum ablation diameter achieved in ex vivo human modelling. Increased time and power leads to increased ablation diameter. Although the curves appear to plateau, increasing treatment time continues to increase ablation zone diameter.
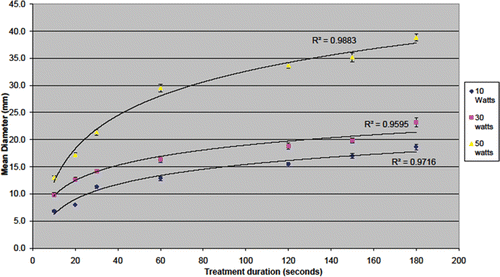
Figure 5. Macroscopic appearance of the ablation zone within tumour. The necrotic tumour tissue shows the edge of the ablation zone less clearly (A), although the antenna track is clearly visible within the tumour. Histological examination of the resected tumour showed apparently viable-looking adenocarcinoma within the ablation zone.
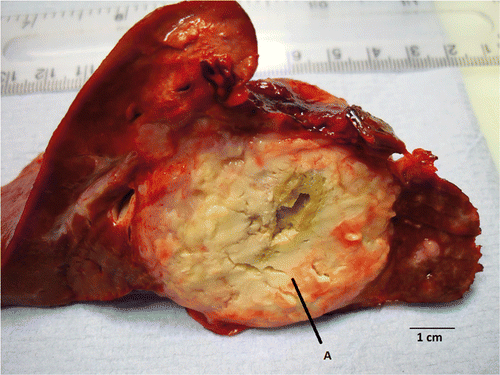
Figure 6. Normal untreated parenchyma (A) and ablated parenchyma (B) (magnification ×20, H&E stain). Hepatocytes within the white zone exhibit central nuclear smearing (arrow), have increased density (hyperchromasia), and have taken on a slightly shrunken appearance. The characteristic cellular anatomy is well maintained between ablated and non-ablated tissue.
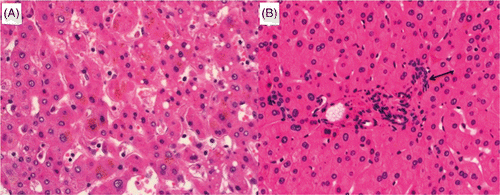
Figure 7. Untreated (A) and ablated (B) colorectal liver metastasis ×20 (H&E stain). Cells have large nuclei and disorganised glandular structure, appearances consistent with viable well differentiated adenocarcinoma. Further investigation using enzyme histochemistry and transmission electron microscopy confirmed that despite well preserved cellular anatomy this tumour was not viable.
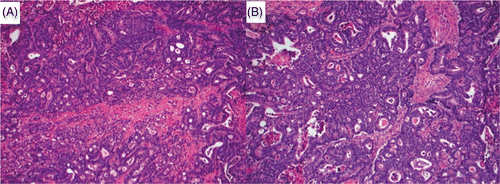
Figure 8. Macroscopic resection of ablation zone showing fresh tissue (A) and NADH-stained tissue with black staining demonstrating viability (B). The absence of staining with the white zone of the ablation site confirms lack of tissue viability. There is some staining within the red zone, and so ablation size was calculated on the size of the white zone (white arrow).

Figure 9. Parenchyma (magnification ×10) from the edge of the white zone sampled as a frozen section, stained for NADH. P indicates the site of antenna insertion. The sudden change from viable to non-viable tissue on NADH staining appears to correlate with the border between the white zone and the surrounding red zone on macroscopic section. Identifying this transition from treated to untreated tissue on routine H&E analysis was more difficult, with a more subtle change in cellular appearance.
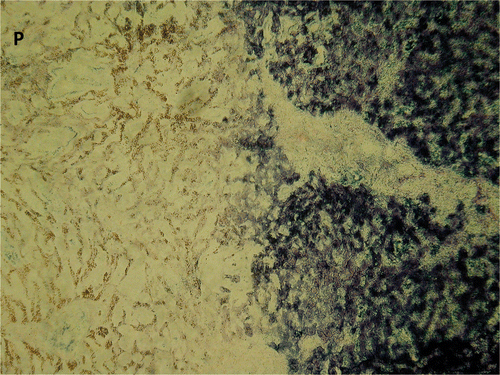
Figure 10. Transmission electron microscopy of untreated (A) and ablated (B) tumour. Tissue from untreated adenocarcinoma demonstrates well preserved nuclear structure and clearly identifiable mitochondrion and rough endoplasmic reticulum within the cytoplasm. The presence of intact erythrocytes was associated with untreated tissue, whereas erythrocytes within the ablation zone had ruptured cellular membranes. By contrast, the ablated tumour demonstrates atypical nuclear and cytoplasmic appearance, suggesting that despite normal cellular appearance, subcellular structure is markedly altered by ablation.
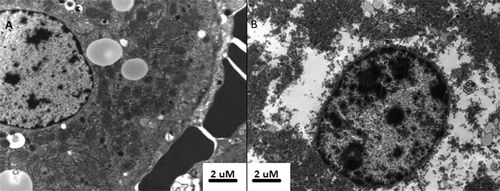
Table II. Number of discreet spots identified on SDS-PAGE using Progenesis SameSpots analysis. SD, standard deviation, CoV, % co-efficient of variation. A similar number of spots were detected between ablated and non-ablated tissues run under both reducing and non-reducing conditions.