Figures & data
Figure 1. Weak-perspective cone beam projection model is used for C-arm calibration. The X-ray is emitted at location fA and projects a spatial point vA onto the image plane as vI. pI is defined by the point where rays pass directly normal through the plane.
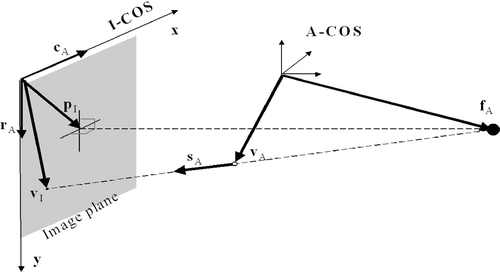
Figure 2. Geometric model of the distal part of the nail (left; a cylinder with two distal locking holes) and the model of the distal locking holes (right; an inner cylinder model with two cone trapezoid openings). The model of the DLH is described by four closed curves: two inner circles and two outer curves. [Color version available online.]
![Figure 2. Geometric model of the distal part of the nail (left; a cylinder with two distal locking holes) and the model of the distal locking holes (right; an inner cylinder model with two cone trapezoid openings). The model of the DLH is described by four closed curves: two inner circles and two outer curves. [Color version available online.]](/cms/asset/2dbae198-391c-4cd0-b1ac-c5a103317b71/icsu_a_238697_f0002_b.gif)
Figure 3. Schematic view of the initialization for automatic nail localization. The thick dotted curves represent the detected edge pixel sets E1 and E2, including true edge pixels from nail projections and false edges from outliers; the thin dashed lines represent the major axis AEk computed by applying Principal Component Analysis (PCA) on Ek; O1 and O2 are the source points of C-arm shots S1 and S2, respectively.
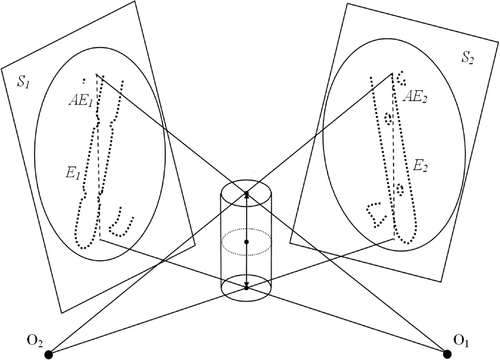
Figure 4. Example of the initialization (a) and final result (b) of automatic nail localization. The geometric model of the DP-IMN and its axis are superimposed on the images together with the detected “raw” edge pixels.

Figure 5. Example of pose recovery of a DLH by fitting its geometric model to the images. Top: The initial situation, where the thin white points are the detected DLH edge pixels and the thicker yellow points are the simulated X-ray projections of the DLH model. Bottom: The situation after the algorithm converges to the optimal solution. [Color version available online.]
![Figure 5. Example of pose recovery of a DLH by fitting its geometric model to the images. Top: The initial situation, where the thin white points are the detected DLH edge pixels and the thicker yellow points are the simulated X-ray projections of the DLH model. Bottom: The situation after the algorithm converges to the optimal solution. [Color version available online.]](/cms/asset/2cc43f90-a2f1-4928-8e5f-e4302da6ea5c/icsu_a_238697_f0005_b.gif)
Figure 6. The cadaveric bone and nail used in our preliminary in vitro experiments. [Color version available online.]
![Figure 6. The cadaveric bone and nail used in our preliminary in vitro experiments. [Color version available online.]](/cms/asset/d6cd6ea5-88be-43e7-aa4b-a70a99981884/icsu_a_238697_f0006_b.gif)
Figure 7. Experimental setup for image acquisition (left), and examples of acquired images (right). [Color version available online.]
![Figure 7. Experimental setup for image acquisition (left), and examples of acquired images (right). [Color version available online.]](/cms/asset/0e0371bf-2380-49c7-bf44-f79abda9fab5/icsu_a_238697_f0007_b.gif)
Figure 8. Experimental setup for obtaining ground truths by direct pointer-based digitization. The ground truth of the DLH was obtained after image acquisition by inserting a custom-made steel rod through the hole and then digitizing both the top and bottom centers of the rod using a sharp pointer. [Color version available online.]
![Figure 8. Experimental setup for obtaining ground truths by direct pointer-based digitization. The ground truth of the DLH was obtained after image acquisition by inserting a custom-made steel rod through the hole and then digitizing both the top and bottom centers of the rod using a sharp pointer. [Color version available online.]](/cms/asset/2b83c8cb-17aa-4a06-9cdc-7f8605478986/icsu_a_238697_f0008_b.gif)
Figure 9. The six acquired images, three generic AP images (left column) and three generic ML images (right column), used in our experiments.

Figure 10. The DLH edges extracted with different degrees of precision. Top: Edges extracted by applying a Canny edge detector without interpolation of the underlying sub-images. Bottom: Edges extracted by applying a Canny edge detector with interpolation of the underlying sub-images.

Figure 11. The geometrical model of the DLH with different approximation accuracies. Left: The less accurate model using 18 points to approximate the inner circle and 12 points for the outer curve. Right: The more accurate model using double the number of points in each case. [Color version available online.]
![Figure 11. The geometrical model of the DLH with different approximation accuracies. Left: The less accurate model using 18 points to approximate the inner circle and 12 points for the outer curve. Right: The more accurate model using double the number of points in each case. [Color version available online.]](/cms/asset/8bfaefa1-a341-4ec2-9af7-8d1d0250483b/icsu_a_238697_f0011_b.gif)
Table I. Experiment results when DLH edges were detected without interpolation and the less accurate model of DLH was used.
Table II. Experiment results when DLH edges were detected with interpolation and the less accurate model of DLH was used.
Table III. Experiment results when DLH edges were detected with interpolation and the more accurate model of DLH was used.