Figures & data
Table I. Representative thermophysical properties of biological tissues used in the current study Citation[20–22].
Figure 1. Schematic illustration of a pullback operation, where Region I is frozen first (a), followed by freezing of Region II (b).
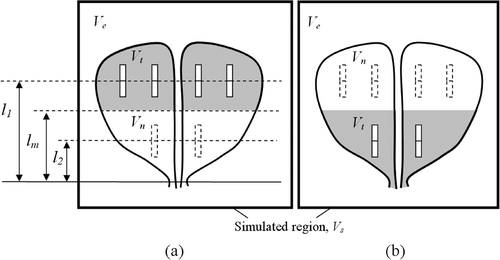
Figure 2. Schematic illustration of the process to determine the initial positions of bubbles in Stage II of pullback, where the upper illustrations display the cross-section perpendicular to the cryoprobe axis, and the lower illustrations display longitudinal cross-sections of the prostate: (a) independent Stage II bubble packing; (b) independent Stage I bubble packing; and (c) based on proximity on the plane perpendicular to the direction of cryoprobe insertion bubbles are paired, and simultaneous bubble packing is performed in both regions.
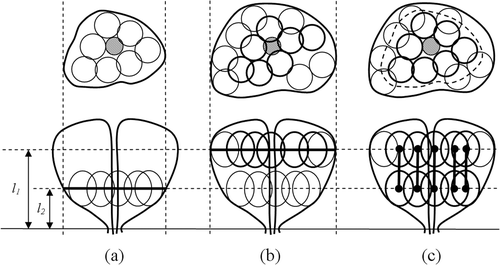
Figure 3. Schematic illustration of forces acting on a pair of bubbles.
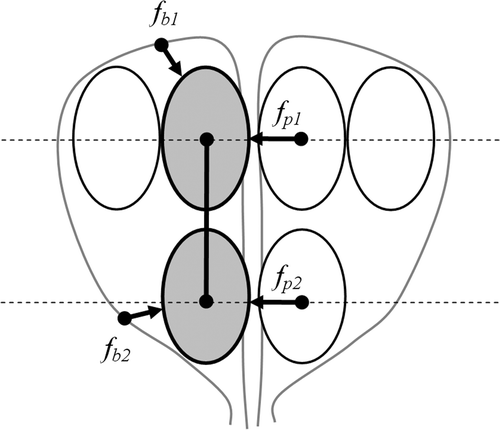
Figure 4. Reconstructed prostate (model B), combined with an assumed urethral warmer and a cryoprobe layout based on bubble-packing results for 14 cryoprobes in Stage I and 7 cryoprobes in Stage II. [Color version available online.]
![Figure 4. Reconstructed prostate (model B), combined with an assumed urethral warmer and a cryoprobe layout based on bubble-packing results for 14 cryoprobes in Stage I and 7 cryoprobes in Stage II. [Color version available online.]](/cms/asset/036808ab-022a-4bcf-afaa-55c72ccd4a6e/icsu_a_288424_f0004_b.gif)
Table II. Summary of prostate model dimensions and pullback planning results. VP is the prostate volume, LP is the prostate length, LV2 is the distance from the apex of the prostate to a plane dividing the prostate into two sections of identical volume, P1 is the number of cryoprobes in Stage I, P2 is the number of active cryoprobes in Stage II, l1 is the optimal insertion depths for Stage I, l2 is the optimal insertion depths for Stage II, Gtotal is the overall defect taking into account both stages, ΔG is the difference between Gtotal and a corresponding defect of a non-pullback case, tBP is bubble-packing runtime, and tHT is the combined runtime of the bioheat transfer simulation from both stages.
Table III. Summary of results for 14 cryoprobes in Stage I and a variable number of cryoprobes in Stage II. P2 is the number of active cryoprobes in Stage II, l1 is the optimal insertion depths for Stage I, l2 is the optimal insertion depths for Stage II, and A1 and A2 are the cross-sectional areas at depths of l1 and l2, respectively.
Figure 5. A 2D surface illustrating the total defect as a function of insertion depths in both stages for prostate model B using 14 cryoprobes in Stage I and 7 cryoprobes in Stage II.
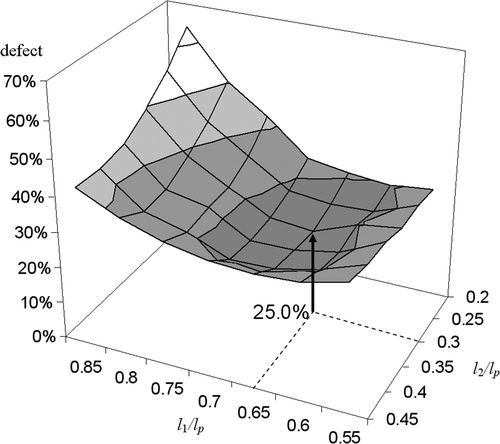
Figure 6. Contours of the prostate cross-section and the urethral warmer location for prostate model B, using 14 cryoprobes in Stage I and 7 cryoprobes in Stage II: l1 = 32 mm (solid line) and l2 = 15 mm (dashed line).
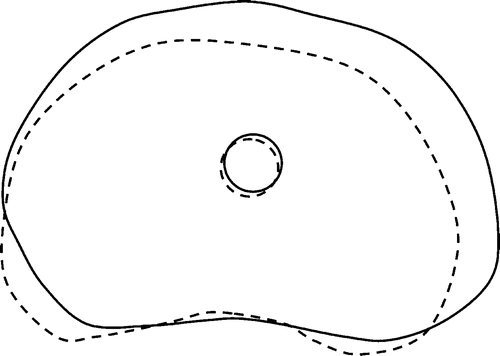
Figure 7. Temperature volume histogram of the target region for pullback cases with 15-mm cryoprobes (a), and non-pullback cases with 25-mm cryoprobes (b), where the defect volume is normalized with respect to the prostate volume (prostate model B, ).
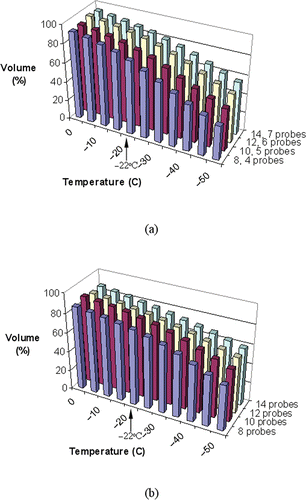
Figure 8. Temperature volume histogram of the external region for pullback cases with 15-mm cryoprobes (a), and non-pullback cases with 25 mm cryoprobes (b), where the defect volume is normalized with respect to the prostate volume (prostate model B, ).
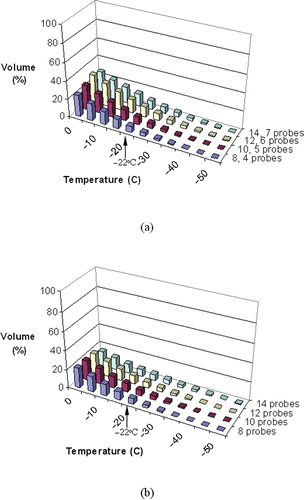
Figure 9. Temperature field illustrated on the surface of the reconstructed prostate, where blue represents areas with temperatures below −45°C, green represents 0°C, and red represents 37°C: (a) front view of pullback case; (b) front view of non-pullback case; (c) back view of pullback case; and (d) back view of non-pullback case, all for prostate model B. [Color version available online.]
![Figure 9. Temperature field illustrated on the surface of the reconstructed prostate, where blue represents areas with temperatures below −45°C, green represents 0°C, and red represents 37°C: (a) front view of pullback case; (b) front view of non-pullback case; (c) back view of pullback case; and (d) back view of non-pullback case, all for prostate model B. [Color version available online.]](/cms/asset/234f15de-cad0-4036-91cc-e748d01e2b5a/icsu_a_288424_f0009_b.gif)