
 ?Mathematical formulae have been encoded as MathML and are displayed in this HTML version using MathJax in order to improve their display. Uncheck the box to turn MathJax off. This feature requires Javascript. Click on a formula to zoom.
Abstract
The classic Tower of Hanoi puzzle involves moving a set of disks on three pegs. The number of moves required for a given number of disks is easy to determine, but when the number of pegs is increased to four or more, this becomes more challenging. After 75 years, the answer for four pegs was resolved only recently, and this time complexity question remains open for five or more pegs. In this article, the space complexity, i.e., how many disks need to be accommodated on the pegs involved in the transfer, is considered for the first time. Suppose m disks are to be transferred from some peg L to another peg R using k intermediate work pegs of heights , then how large can m be? We denote this value by
. If k = 1, as in the classic problem, the answer is easy:
. We have the exact value for two work pegs, but so far only very partial results for three or more pegs. For example,
and
, but we still do not know the value for
.
1 Introduction
It is often extremely hard to formally prove the optimality of an algorithm, even if it looks beyond doubt. A good example is the 4-peg Tower of Hanoi problem. The Tower of Hanoi (TOH) is a popular puzzle whose origin dates back to 1883, due to French mathematician Édouard Lucas [Citation6]. In its original version, there are three pegs on a board and m disks of different sizes are stacked on one peg in descending order of size. The puzzle requires us to move all the disks to another peg, while moving just one disk at a time, and never placing a larger disk on top of a smaller one. A simple recursive algorithm which runs in steps is well known. Proving its optimality is not difficult, due to the obvious fact that when the largest disk moves from one peg to another, all the other m – 1 disks must be on the third peg.
A natural extension of TOH is to increase the number of pegs from three to four or more, whereupon the situation changes drastically. Its time complexity, certainly smaller than the above steps, was first asked in the literature by Stewart [Citation8] in 1939, and two years later, Stewart and Frame independently proposed what they call “optimal” algorithms without proof. The two algorithms turned out to be equivalent [Citation9] and since then they have been known as the Frame–Stewart algorithm, and its optimality presented as a challenging open question. Indeed, as reported in [Citation7], Donald Knuth wrote in a letter to Martin Gardner in 1979 that he doubted “if anyone will ever resolve the conjecture; it is truly difficult.”
After some partial solutions (e.g., [Citation4]) and exhaustive checks up to some number of disks by computer [Citation3], the optimality was proved by Bousch [Citation1] in 2014 for four pegs. The solution for more pegs still remains open [Citation2]. Thus the time complexity of TOH has been a popular topic, but there has been no literature about its space complexity. Judging by the history of the time complexity, the space complexity could be equally nontrivial. In this article, we provide some preliminary results and give an exact solution for the case of four pegs. By convention, disks are initially located on the leftmost peg (denoted by L) and they have to move to the rightmost one (denoted by R). The other pegs between L and R we call the work pegs, and use k for the number of them. The height of a peg is the maximum number of disks that can be held on the peg. Pegs L and R have unbounded height. We regard the finite heights of the work pegs as the space complexity of the problem. For k = 1, i.e., for the standard 3-peg model, it is easily seen that a work peg of height m – 1 suffices to execute the optimal algorithm and it is also necessary for any algorithm. For k = 2, Frame–Stewart needs a height of approximately for one work peg and
for the other, but this is not necessary in general.
This article shows we can indeed use substantially shorter pegs for k = 2, the heights of which can be described exactly by a simple formula. Let H(i, j) denote the maximum number of disks that can be moved from L to R using two work pegs of height and
. Our main contribution is to prove
So for m disks, it is sufficient to take i and j equal to a rounded value of , much smaller than the height needed for the Frame–Stewart algorithm. The lower bound proof is relatively easy, just by giving a recursive algorithm. Its optimality (the upper bound part), however, needs a lot more work. As in the standard model with one work peg, a key step in the analysis is when the largest disk leaves L and goes to one of the work pegs or to R. The other work peg can hold several disks, so there are many possible subsequent moves.
For general k, we give a recursive formula for a seemingly close lower bound for . However, it is not likely that it can be presented as a closed-form formula, or that we can easily extend the upper bound proof for k = 2 to this general case. Surprisingly, if the successive work peg heights grow relatively slowly, satisfying
and
for
, then the tight bound can be given as a simple formula, namely we can prove
.
2 Preliminaries
All the problems we will consider involve transferring the set of disks from an unbounded initial peg L, via a set of bounded work pegs W, to an unbounded final peg R. In this article, W consists of some number k of pegs of heights
and we denote this storage structure as
.
We define to be the maximum number of disks that can be moved from L to R using
, e.g.,
.
A stack is any legal pile of disks, usually listed top-down, i.e., in order of increasing size. A disk move removes a disk from the top of the stack on one peg and places it on the top of the stack on another peg provided that it is smaller than the current top disk on that peg and the move does not produce a stack exceeding the height of that peg. The r-cone Cr is the stack of disks and, for
, the (r, s)-frustum
is the stack (or set)
. We will find it convenient to extend these definitions such that Cr is the empty set when
, and
is empty when r > s.
A configuration gives the contents of each peg. We denote a configuration C with the contents of L, R, and W being X, Y, and U, respectively, as . When the contents of
, say, are given in more detail as U1, U2, we write
. An empty set is denoted by “–”.
If a sequence σ of disk moves changes configuration C1 to C2, we write or just
when σ is unspecified. Since any sequence of disk moves is reversible, if
then
. So we may write
when
and we want to emphasise that this is an equivalence relation.
We make precise an obvious “monotonicity” property: if some sequence of disk moves is feasible, then so is the subsequence obtained by eliminating some of the disks.
Lemma 1
(Monotonicity Lemma). Let S be the subset of disks that remains after some eliminations. Let C1 and C2 be two configurations and and
be the configurations corresponding to C1 and C2 but restricted to the disks in S. If
then
.
Proof.
For any sequence of moves σ, let be the sequence formed as follows: for any move
of disk d, if
then let
, and if
then
is the null move. Clearly, if
then
. □
3 Single work peg
When there is just one work peg of bounded height, determining H(j) is fairly easy. The proof methods we introduce here will be used in later sections.
Theorem 2.
For all .
Proof.
We first prove that . We show by induction on j and m that, for
, Cm can be transferred from L to R using a single work peg of height j. This holds trivially for m = 0, and also for j = 0 since one disk can be transferred directly from L to R. Suppose now that j > 0,
, and
can be transferred from L to R. We want to show that if
then
. The sequence we use below is not optimal in the number of moves, but is a better introduction to the more complicated transfers required later.
Using the inductive hypothesis, move
from L to R leaving disk m on L.
Move disk m to W.
With space j – 1 remaining on W, by induction
Moving disk m to R, then
For the upper bound, we want to prove that if when W is a single peg of height j then
. Again we proceed by induction on j. The result holds for j = 0, since C2 cannot be transferred from L to R without W. We assume as inductive hypothesis that
, and consider a supposed transfer
, where W is a peg of height j.
If disk m moves directly from L to R, then the other m – 1 disks must all be on W, so as required. Supposing that m never moves directly between L and R, consider the configuration A immediately after disk m moves from L to W for the last time, so
. Let B be the configuration immediately before the next time that m moves from W to R. So
and m remains in W all the time between A and B. During this period
is transferred from R to L using only the remaining j – 1 positions on the work peg. This implies that
, and
by induction. Hence
, completing the proof. ■
4 Unit work pegs
Define where there are k work pegs each of height one. As seen above,
. To help the reader become familiar with the notation, we show the transfer of five disks in 25 moves using two unit work pegs. Here we merely use a superscript on the “
” to give the number of disk moves involved, leaving the reader to determine the sequence in detail. A concatenation of stacks on one peg is separated by commas, e.g.,
represents the cone {1, 2} on top of the disk 4. It should be noted that a cone on top of a suitably sized frustum will result in a larger cone, so
.
Lemma 4 shows that five is the maximum number of disks that can be transferred using two unit work pegs, but we do not know whether the number of moves used above can be reduced.
Since W contains only unit pegs, there is no point in disk moves between pegs in W and a configuration needs only define the set of at most k disks in W without specifying their positions. In this case of unit pegs, a frustum in W just refers to the set of disks
on
pegs without regard to their order.
The lower bound is provided by Lemma 3.
Lemma 3.
for
.
Proof.
To prove the result, we show by induction on m and k that, for all , Cm can be transferred from L to R using the set W of k unit work pegs. The result is true for
, for any
, since C1 can be transferred without using W.
We assume the inductive hypothesis for and for all
, and consider the transfer of Cm from L to R using k unit work pegs where
.
Move from L to R. This is feasible, by induction on m since k > 0.
Move the (at most) k disks in the frustum to the work pegs W.
Move back to L, leaving disk m occupying one of the work pegs.
Move from the top of R back to L using the k – 1 empty work pegs, by induction on k, since
.
Move the remaining k – 1 disks from R to the k – 1 empty work pegs.
Move disk m to R and place on top of this on R.
Move from the top of L to R, resulting in the cone
. This is feasible using the k work pegs by induction on m.
Move from the top of R back to L. This is feasible using the k work pegs by induction on m.
Move from L to R to complete the task. ■
For the upper bound:
Lemma 4.
for
.
Proof.
The result is true for k = 0 since . To prove the result by induction on k, we assume that
, where
, and prove that
.
Suppose the number of disks is m. We want to prove that if then
. If m can move directly from L to R, then
, as required.
Otherwise, as in the proof of Theorem 2, we focus on two critical stages in the sequence of moves. Let A be the configuration just after the last time that disk m moves from L to W, and B the configuration after which m moves from W to R the next time after A. Suppose and
. Let
, so
, since
,
, and
. The monotonicity lemma (Lemma 1) shows that the set of disks Z can be transferred from R to L using only k – 1 pegs in W. By the inductive hypothesis,
, and so
, completing the proof. ■
Together, Lemmas 3 and 4 establish the precise value for .
Theorem 5.
for
.
We conclude this section with a simple consequence of this theorem.
Theorem 6.
.
Proof.
It is easy to show that any work peg P of height a + b can be simulated by the pair of work pegs and
of heights a and b, respectively. If there are b or fewer disks on P, then they are stored on
, otherwise the largest b disks are on
and the rest on
.
Thence, can be simulated by
unit pegs, and the result follows from Theorem 5. ■
5 Two work pegs
We show matching upper and lower bounds for H(i, j), the maximum number of disks that can be transferred from L to R using two work pegs P1 and P2 of heights i and j, respectively. A major difference from the case of unit pegs is that it might be advantageous to move the largest disk within W. This turns out not to be the case with just two pegs, but the possibility complicates the proof of the upper bound. We begin with the lower bound.
Lemma 7.
For all .
Proof.
The proof is by induction on i and j. The result holds when either i = 0 or j = 0 since this corresponds to a single work peg and it is known that . To show the bound for H(i, j), we assume as inductive hypothesis that the result holds for all
with
. We may also assume that
and consider the transfer of the cone Cm from L to R, where
. For this we again use induction, this time on m. If
, then Cm can be transferred, since
by induction on i + j. So we now assume that
and that
.
We show how Cm is transferred from L to R. Here we assume without loss of generality that . If j < i, then the same algorithm is used with the roles of P1 and P2 reversed.
Transfer from L to R. This is feasible by the inductive hypothesis on m.
Move the frustum to the work peg P1, using work peg P2, since
, and then move disk m to P2.
Move back to L, using the remaining capacity j – 1 of P2 since
.
Move from the top of
on R back to L. This is feasible using the remaining capacity
of work pegs, since
, by the inductive hypothesis.
Disk m is inserted underneath a frustum of size i, just like a reversal of steps 2 and 3 above.
Move from the top of L to R and then move the resulting
from the top of R back to L. These operations are feasible using the now-empty work pegs, by induction on m.
Move from L to R to complete the task. ■
In the algorithm that provided the lower bound, the largest disk moved from L to W, then remained on the same peg in W and finally moved from W to R. We now have to deal with the possibility that the largest disk may move between pegs in W. In preparation, we prove two lemmas which establish useful properties of sequences that satisfy a requirement, such as moving some set of disks from one peg to another during some interval.
The first lemma shows, under some conditions, that if a disk d can move from W to R, then there is a sequence whose net effect is only to remove d from W and to insert it into the present stack on R. In the rest of this section, we often consider sequences of moves such that the largest disk m remains in W throughout. We write “” for the operation of such a sequence.
For a configuration where m is in W, we say disk
can reach R if
where
. Furthermore, disk d in U1 can shift to R if
, i.e., the only difference made by the sequence is to remove disk d from its work peg and insert it into place on R. The definition for
is similar.
Lemma 8.
While m remains in W throughout, for any configuration with L empty, if d is the largest (other than m) of the set of disks in W that can reach R, then d can shift to R.
Before the proof, let us see an example to illustrate the lemma. Let and
. To help the reader, we use hyphens to represent the spare capacity on work pegs. Here, m = 7, and d = 5 is the disk of interest. Using the spare capacity in P2, stacks of height three can be moved from one peg to another. So
We see that d can indeed reach R. The lemma constructs a sequence of moves from C which can shift d to R. For example,
Proof.
Let where
, and suppose that
is the largest disk (other than m) in W that can reach R. (There may be larger disks in W that cannot reach R.) Suppose that σ is a sequence of moves starting from C up to but not including the first move in which d reaches R. We assume that m remains in W throughout σ.
Let Z be the subset of disks in V that are larger than d. It may be that during σ some disks in Z move out of R. We show that such moves can be eliminated. Consider the sequence σ1 that is σ but omitting all moves of disks in Z. By the monotonicity lemma, σ1 is well-defined: all moves in σ1 are possible because they are between configurations in which L and W hold subsets of their contents at the corresponding step of σ. Disks in Z remain on R and cannot obstruct any other disks or the move of d to R. Let σ2 be the sequence consisting of σ1 followed by the move of d to R, followed by the reversal of σ1 also omitting any moves of d. By monotonicity again (disk d has been omitted), this reversal is valid, and σ2 has the required property of returning all disks to their position in C except for d, which has been inserted in R. The case with d initially in U2 is similar. ■
A simple, but useful, lemma finally prepares us for our upper bound result.
Lemma 9.
If , then
for any U1,V1,U2,V2 with disjoint unions
.
Proof.
By monotonicity, for any , cone Cr can be moved between L and R. The stacks U1 and V1 can be merged into Cm by forming
successively. This increasing set of cones is made by shuttling partial cones between L and R, collecting the disks from U1 and V1 in increasing order. The same holds for U2 and V2. ■
Now we can prove our upper bound for two work pegs.
Lemma 10.
For all .
Proof.
As in Lemma 7, the proof is by induction on i and j, and then on m. The result holds when either i = 0 or j = 0, since this corresponds to a single work peg and . To show the bound for H(i, j), we assume as inductive hypothesis that the result holds for all
with
. We may also assume that
and
.
For our inductive proof, let . By the definition of H(i, j),
for some sequence of moves σ. We focus on one particular segment
of σ during which the largest disk m remains in W. Let
begin at configuration
, when m has just moved for the last time from L to W, onto P1 say, and finish at
or
, the next time that m is about to move from W to R.
Disk m is on L just before the start of and on R just after the end of
, and by Lemma 7,
since i > 0 and j > 0. Hence disk m cannot move directly from L to R, since the other m – 1 disks exceed the total capacity of W which is i + j. Therefore
is well-defined.
Recall that is used for a sequence where the largest disk m remains in W throughout.
We first consider the case where disk m remains on P1 throughout , so
Since each of X1 and X2 are on P2 at some time, . Let
. Then, by the monotonicity lemma, we may ignore disks in
to show that
for some sequence , and where
. Since disk m remains on P1 throughout
, we have
. Hence by induction,
as required for this case. The case where m moves to P2 at time A, and remains there throughout
, is similar.
Now we consider the case where disk m does move between work pegs during . The above argument fails because a set Z of size
might be transferred if disk m can be moved to P2, and
if i < j. We used the fact that
, while for the general case we want to have
.
For disk m to move from P1 to P2, each disk on P2 in configuration A has to be removed from W, either to L directly or else via R. For the latter, any such disk can reach R and so we need Lemma 8.
Suppose that is the set of disks in decreasing order of size that are on P2 and can reach R. By Lemma 8, d1 can be shifted to R, resulting in configuration
. Now d2 can still reach R starting from
(by first reversing the sequence shifting d1 if necessary), and is now the largest disk on P2 that can reach R. By Lemma 8, d2 can be shifted to R, and so on, until all of D has been shifted. The result is a configuration
where no disk in
can reach R.
Suppose is the configuration before the first move of m from P1 to P2 during
. Then
where
, since no disk in
can reach R.
By monotonicity, if we consider only disks in and only moves between L and W and within W, we may ignore peg R completely and derive
Therefore, and so
.
By a symmetric argument, if then
for some
where
, and similarly if m is on P2 in B.
As in the cases where m never switches work pegs, we define , but now we have the stronger inequality
. Again by the monotonicity lemma, we may ignore disks in
, and so
for some sequence
, and where
.
What remains to be proved is that moving m between P1 and P2 cannot achieve the transfer of more than disks.
Let . It is sufficient to show that there can be no sequence τ such that
It is not relevant here whether m is on P1 or P2 in these configurations. Any such sequence τ consists of segments where m remains on the same work peg, separated by moves of m between pegs. We focus on the positions of disk r at each such move of m. Clearly r is on L or R at these moves. Suppose r switches between L and R during one of these segments , so
where
and
, or similarly with
and
.
Since , we may use the method in Lemma 9 to collect
and V into
on L, and
and
into
on R. Hence
This gives a contradiction since at most disks can be transferred from L to R while m remains on P1, and
, and similarly where m is on P2 and
. So cone Cr cannot be transferred from L to R while m remains on P1 nor while m remains on P2 and, for any move of m between P1 and P2, r is either on L or on R.
Therefore , and hence, by induction,
Together, Lemmas 7 and 10 establish
Theorem 11.
For all .
6 More work pegs
When there are three or more work pegs, we have some partial results. Theorem 12 gives a simple formula similar to that in Theorem 11. Theorem 14 gives an improved lower bound in the form of a recursive formula, but there does not seem to be an equivalent explicit formula. Theorem 15 gives an exact result when work peg heights are sufficiently slowly growing. Finally, when we restrict our attention to the case of three work pegs, we have an improved algorithm in Theorem 17 which could even be optimal.
We begin with the easy lower bound which is an explicit polynomial formula proved in much the same way as Lemma 7.
Theorem 12.
For all and nonnegative
,
Proof.
For any , the proof by induction on
is analogous to that in Lemma 7. The base of the induction holds when jw = 0 for
, and a single disk can be transferred directly from L to R. Suppose without loss of generality that jk is the height of a largest work peg. Let
For ease of notation we define the frusta, , where
and
, so
, etc.
Following a similar sequence to that used in the proof of Lemma 7, we show that Cm can be transferred from L to R using , establishing that
as required.
The cone
Using Pk, the s disks in
The remaining capacity
Disk m is inserted beneath the frustum of size s on R, just like a reversal of the procedure in steps 2 and 3 which extracted m from beneath
The final stages are as in the proof of Lemma 7. The cone
Finally we check that :
by induction. ■
The corollary gives a polynomial formula when the work pegs are of equal height.
Corollary 13.
If , then
.
For two work pegs, we showed in the proof of Lemma 10 that no move within W of the largest disk could be useful. This is not the case when there are more than two pegs. Theorem 12 gives , but, as we will see in Theorem 14, this bound can be improved to 17. The reader may wish to explore this case now, starting with a transfer of C13 from L to R.
Improved multipeg algorithm
We outline the transfer of m disks with work space . In the course of our recursive algorithms, we will encounter the work spaces W(0) and
, where there is either a single work peg with zero height or no work peg at all. In these cases, just a single disk can be transferred, i.e.,
.
The work pegs should be sorted in order of height, so we assume . In the first stage of the algorithm, an appropriately sized cone Cs is transferred from L to R recursively.
In the second stage, the longest work peg Pk is loaded with mk disks by using all the other work pegs. We continue in this way loading disks on each of
in turn, using all the currently empty work pegs. We will choose each
, and choose s so that
. We define frusta
as in Theorem 12, but now with
, and
. The effect of this second stage is therefore
and L is empty after these transfers. The transfer of disks from L to P1 has no other work peg to help. Therefore
and m is the only disk on P1.
In the third stage of the algorithm, disk m remains in W but all other disks in W are returned to L, clearing pegs in succession. At most j1 disks can be moved back from P2 since there is only free space
on P1. We choose therefore,
. From now on there is more than one work peg to assist the transfer of disks from Pi to L, but one of these must contain disk m. It might seem best for disk m to be on a longest peg
at this time, giving total work space
for this transfer. This is true when only two work pegs are used, but we know, for example, that
, so with work space
it would be better to put m on P1. To account for this, it is convenient to define the function K.
(
∗
)
(
∗
)
We use our multipeg algorithm recursively and so can move up to disks back from Pi to L, since at this time disk m is the only disk in
and can be moved freely to any work peg. We choose
for
. Remember here that the parameters for K and H may need sorting again. After these transfers back to L from pegs
, we have the configuration
, where
.
In the fourth stage, we transfer the top disks from R to L reaching configuration
using the same method.
Note that the second and third stages taken together achieve the following,extracting disk m from under a stack of
disks on L. The fifth stage of the algorithm reverses such a sequence in order to insert disk m under the
on R. This is possible if
, i.e.,
. We choose
. Then
The final stages of the algorithm are smaller versions of previous transfers.
The last transition is by induction on m.
This algorithm yields the following lower bound for multipeg Hanoi. Recall that if we choose , then m disks can be transferred.
Theorem 14
. For , and K as defined above in (
),
where
for
.
For a general set of work pegs an explicit exact formula seems unlikely, but we can give a special case for which this can be shown.
In Theorem 14 we define for
. For
we say that
(
∗∗
)
(
∗∗
)
For example, in , P3 is tight because
, P2 is tight because
, and P1 is tight because
.
For the case where all pegs are tight the recursion becomes
Recall that the function K is designed to optimize the position in W of the largest element during a major transfer from L to R. We will see that placing this on Pk achieves optimality when all pegs are tight, so . It is then easy to check that all pegs are tight in
, even after any necessary re-sorting.
Now we can verify the lower bound , since
Theorem 6 provides the matching upper bound, giving the following result.
Theorem 15.
If all pegs are tight in , i.e.,
for
, then
The example , mentioned in our abstract, illustrates this theorem. Here, when
, all pegs are tight. As in the example
above, P1, P2, P3 of heights
, respectively, are tight. So P4, of height
, is also tight, as
. (Since
for P3 is tight, so is
.) It is easily seen that this continues for subsequent work pegs.
There is more work to be done for the general case, as the following example shows.
Example 16.
For , Theorem 14 gives
and
, and
. (We assume here that
and will return to this later.) However,the following sequence shows that
.
We have found some sequences of moves much easier to follow using a reduced notation. The sequence labeled “see below” moves the largest disk to P3 from under a stack of five disks on L. Peg R is not involved. We denote the initial configuration before this sequence as , where, as in the proof of Lemma 10, peg R is ignored. The required sequence is then
The sequence labeled “similarly” moves disk 37 from P3 to below on R. This is just like the reverse of the sequence that moves 37 from the bottom of
to P3, which we gave in detail above.
In Theorem 14, the biggest disk m moves from P1 to P2, then from P2 and P3 and so on, one by one, but in the above example m moves from P1 to P3 directly. Such a “jump” of the biggest disk also allows us to show that . We can generalize this jumping strategy in the form of an algorithm, but there is unlikely to be a succinct specification of m1 through mk based on that. We restrict ourselves therefore to the case of three work pegs and present an algorithm which may be optimal.
Jump algorithm
This algorithm follows a similar scheme to that in Theorem 14 but makes use of the tactic introduced in Example 16 where the largest disk may jump directly from P1 to P3. The heart of the algorithm lies in the choice of the values for m2 and m3.
The heights of pegs P1,P2,P3 are j1,j2,j3, where , and we describe the transfer of Cm from L to R. As in the algorithm for Theorem 14, in the first stage some suitable cone Cs is transferred recursively from L to R. In the second stage, frusta of sizes m3, m2 and m1 are loaded successively from L onto pegs P3, P2, and P1. We choose
with two alternatives plans for m2 and m3
We will use the plan that gives the larger value for , though note that Plan (B) is only feasible when
. We can verify in this case that the two plans have equal performance if
, while Plan (A) is better when j3 is greater than this, and worse when less. The parameter s in the first stage is chosen so that
, and therefore peg L is emptied in the second stage.
Stage 3 now begins to return all disks except for the largest to L. The sequences now become more intricate and we rely on the growing expertise of the reader to interpolate the details. We extend the alphabetic notation introduced in Example 16 to a more advanced level in which lower case letters denote single disks, while upper case letters denote frusta of given sizes.
Plan (A): with , m2 = j1,
.
In the first stage,where
and
. Now AB remains on R and the second stage is to move g to W from below
on L. Here,
, and
. We see that
as required.
As in Example 16, we will just show the contents of L and the work pegs. Note that in the second sequence F is transferred from P2 to L using the space on P1, and in the third sequence the transfer of C from P3 to L is possible since
.
The third stage is to achievei.e., to transfer A back to L, and then to insert g below B on R. Note that
, so the transfer of A to L is possible with an appropriate positioning of disk g in W. Since
, the insertion of g below B has the same pattern as the reversal of the second stage, extracting g from below CDeF. The final stages are just as in the algorithm for Theorem 14, so A moves to R, then AB moves back to L, and the rest is recursion.
Plan (B): with .
This alternative is only available when and proceeds in a similar way, but with a few more steps.
where
, and
. The size of C is chosen to allow it to be transferred between L and P3 when P1 and P2 each hold a single disk. Now
The last stages are the same as for Plan (A).
Theorem 17.
For , let
Then .
Proof.
In Plan (A), m2 = j1 and , so
, and Cm is transferred from L to R where
as required.
In Plan (B), and
, so
, and
■
Theorem 17 yields the promised bound of , the example illustrated in . The upper bound is given by Theorem 6. Plan (B) uses
for a matching lower bound of
, since
.
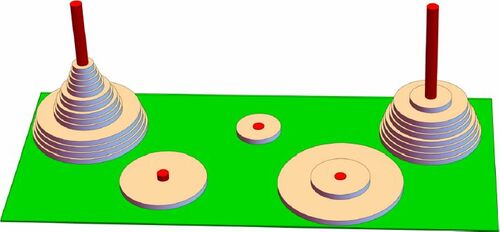
Fig. 1 A tower of 26 disks being transferred using work pegs of heights 2, 1, and 2.
Theorems 12, 14, and 17 give successive improvements to the lower bounds, but at the cost of more complicated algorithms. How much do these extra complications buy for us? As a rough indication, we show below a comparison of , and
, for the results of Theorems 12, 14, and 17, respectively.
7 Conclusion
We have begun an investigation into the space complexity of the generalized Tower of Hanoi problem, where the number of work pegs provided to transfer a set of disks from the initial peg to the final peg is increased from the single peg used in the classic problem.
We pay little attention to the time complexity, the number of moves, in our algorithms. As may be expected from even our first example, transferring five disks using two unit pegs and 25 moves, the time complexity is large compared with that for unbounded pegs, where only 13 moves are needed. Lemma 7 shows that 25 disks can be transferred using two work pegs of height three. With unbounded pegs this requires precisely 577 moves [Citation5], but our algorithm takes over 2,000,000 moves, as estimated by a simple Mathematica program. It remains to be seen whether there are interesting trade-offs between time complexity and space complexity results for Hanoi problems.
We have exact results for when
, for
, i.e., k pegs of height 1, and for the case where all the pegs are tight (defined in (
) in the previous section). Theorem 14 gives a fairly close bound for
, but we know this is not exact. Indeed, Theorem 17 gives better lower bounds in the case of k = 3, and the algorithm given there could even be optimal.
There are some very small cases for the general problem where gaps remain. By ad hoc methods, we know exact values for all cases where the total work space is at most six. However, Theorem 17 shows only that , while our best upper bound so far invokes Theorem 6 to prove that
. Surely this gap can be closed!
Table 1 Lower bounds for from Theorems 12, 14, and 17.
Acknowledgment
We thank the reviewers for their valuable suggestions. The research of Kazuo Iwama is supported by KAKENHI, Ministry of Education, Japan. The research of Mike Paterson is supported by the Centre for Discrete Mathematics and its Applications (DIMAP).
Additional information
Notes on contributors
Kazuo Iwama
KAZUO IWAMA received his B.E., M.E., and Ph.D. degrees from Kyoto University. After retirement from the School of Informatics at Kyoto, he was with the Research Institute for Mathematical Sciences and the Academic Center for Computing and Media Studies, Kyoto University, and is currently with NTHU in Taiwan. Most of this work was done when he was with the Faculty of Mathematics and Physics, Charles University, Prague, Czech Republic, from February to June 2020.
Mike Paterson
MIKE PATERSON (Ph.D., FRS) took degrees in mathematics at Cambridge and rose to fame as the co-inventor of Sprouts with John Conway. He evolved from president of the Trinity Mathematical Society to president of the European Association for Theoretical Computer Science, and migrated from MIT to the University of Warwick, where he has been in the Computer Science department for 50 years.
References
- Bousch, T. (2014). La quatrième tour de Hanoï. Bull. Belg. Math. Soc. Simon Stevin. 21(5): 895–912.
- Bousch, T., Hinz, A. M., Klavzar, S., Parisse, D., Petr, C., Stockmeyer, P. K. (2019). A note on the Frame–Stewart conjecture. Discrete Math. Algorithms Appl. 11(4): 1950049, 4 pp.
- Chen, X., Shen, J. (2004). Explorations in 4-peg tower of Hanoi. Tech. Rep. TR–04–10. Ottawa, Canada: Carleton University.
- Chen, X., Shen, J. (2012). On the Frame–Stewart conjecture about the towers of Hanoi. SIAM J. Comput. 33(3): 584–589.
- Korf, R. E., Felner, A. (2007). Recent progress in heuristic search: A case study of the four-peg towers of Hanoi problem. In: Sangal, R., Mehta, H., Bagga, R. K., eds. Proceedings of the 20th International Joint Conference on Artificial Intelligence (IJCAI’07). San Francisco, CA: Morgan Kaufmann Publishers Inc., pp. 2324–2329.
- Lucas, É. (1893). Récréations Mathématiques, 2nd ed. Paris, France: Gauthier-Villars. Reprinted several times by Albert Blanchard, 2, 1893.
- Lunnon, W. F. (1986). Correspondence: The Reve’s puzzle. Computer J. 29(5): 478. DOI: https://doi.org/10.1093/comjnl/29.5.478.
- Stewart, B. M. (1939). Problem 3918 (k-peg tower of Hanoi). Amer. Math. Monthly. 46(363): 216–217.
- Stewart, B. M., Frame, J. S. (1941). Solution to advanced problem 3819. Amer. Math. Monthly. 48(3): 216–219. DOI: https://doi.org/10.2307/2304268.