Abstract
As nuclear power plants age, the likelihood of failures in the small bore piping used in those plants caused by exposure to mechanical vibrations during plant operations increases. While small bore piping failures rarely cause plant shutdown, the management of small piping has been a keen area of interest since their repair or maintenance requires a reactor trip. Steam generator (SG) drain pipe socket welds are small diameter piping connections (nominal pipe schedule 3–4 inches) susceptible to mechanical vibration. SG drain pipe socket weld failures have caused coolant leakage. Therefore, more reliable inspection technologies for small bore piping need to be developed to detect problems at an early stage and prevent pipe failures. This research aims to improve the reliability and accuracy of small bore piping inspections through the design, manufacture and application of a new phased array ultrasonic testing technique and inspection system for SG drain line socket welds.
1. Introduction
Within the pressure boundary of a nuclear power plant (NPP), there are 140–1500 small bore pipes installed for temperature or pressure sensing, draining or sampling. These small bore pipes measure 2 inches or less in external diameter and are mostly made of carbon steel, stainless steel or Cr–Mo alloy materials. Socket welding is used to branch out from the main line or change the direction of the piping. Since these small bore lines are susceptible to vibrations caused by nearby pumps, high-cycle fatigue cracks are a common cause of failure. Although the failure of small bore piping socket welds has no impact on the safety of NPP operations, it does add burden on the plant owner due to loss of productivity and disruption of electricity supply caused by the unplanned shutdown of the reactor for repair purposes [Citation1,2].
After a leakage was found on a steam generator (SG) drain piping socket weld at Kori unit 3 in 2008, a comprehensive management program for small bore piping socket welds in NPPs was established and volumetric examination was added to the surface examination already required by ASME Section XI for assessing the integrity of small bore piping. Currently, Korean NPPs carry out both conventional manual and automatic ultrasonic testing for small bore piping socket welds, but the reliability of the inspection is decreased because there are limitations in terms of accessible areas [Citation3,4].
To address the limited accessibility issue, an advanced phased array ultrasonic testing (PAUT) technology was attempted for the inspection of SG small bore drain piping socket welds. In particular, a new PAUT transducer and a manual-encoded scanner were designed and manufactured for use in the inspection of the small bore piping socket welds of the SG drain line. The PAUT probe was tested on flawed specimens with fabricated fatigue cracks to determine its defect detection capability based on which a more reliable inspection technique for small bore piping socket welds could be developed.
2. Development of the inspection technique
2.1. Phased array ultrasonic testing
While conventional ultrasonic testing examines the test piece using a fixed-angle beam with one piezoelectric element, phased array ultrasonic technology uses multiple piezoelectric elements and modulates the time delay of the pulses applied to each element, thus electronically controlling the characteristics of the ultrasonic beams.
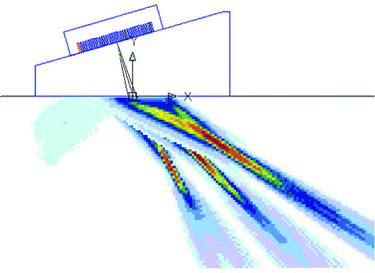
In phased array ultrasonic technology, each of the piezoelectric elements is excitedby an electrical pulse in a time-delayed manner for phase control, and the sound waves emanated from the piezoelectric elements are allowed to interfere or interact with one another before focusing on a certain direction or depth. The ultrasonic beam incidents reflected by a defect or a reflector are received at each piezoelectric element, and the received signals are time shifted (in-phased) considering the time delay applied to the respective transducer element when transmitting the waves before being summed together [Citation5]. shows an example of beams generated at different angles in PAUT.
2.2. Small bore piping socket weld
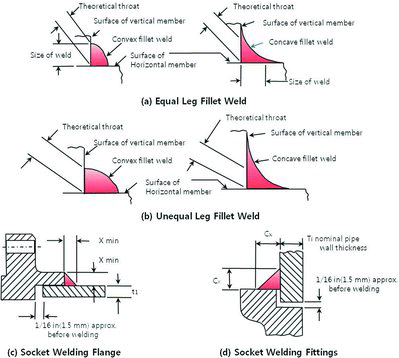
A socket weld is used to branch out small bore piping or connect it to the main pipeline. As these thin pipes are susceptible to vibration from nearby pumps, high-cycle fatigue cracks are the most frequently observed failure mechanism of the pipes. ASME Section III 4542.9-1 (2010 edition) describes the socket welding of small bore piping with nominal pipe schedule of 2 inches or smaller. The code requires a 1.5-mm gap on socket welding, but there is no requirement for verifying the gap after welding work. shows the configuration of the socket weld defined in the ASME code.
2.3. Design of phased array ultrasonic transducer
To design a phased array ultrasonic transducer for socket weld inspections, various design parameters were considered. The intention of this research was to develop an ultrasonic phased array transducer with an array of 16 piezoelectric elements for use in inspecting the socket welds of stainless steel small bore piping. The operating frequency of the transducer was decided at 3.5 MHz, which is widely considered the appropriate frequency level for stainless steel inspection in general. After determining the number of piezoelectric elements and the frequency of the transducer, the most important variable in determining the characteristics of the phased array ultrasonic transducer was the element pitch, i.e. the distance between the centers of two adjacent elements [Citation6,7]. Caution was exercised in deciding the pitch size since it determines whether the wave interference effect gives rise to side lobes or grating lobes. Ultrasonic modeling was performed on the ultrasound beams coming from the piezoelectric elements at varying pitch sizes to determine an appropriate element pitch size. CIVA of CEA, a French firm, was used for modeling and the Kirchhoff approximation solution was applied. With the designed shear wave phased array ultrasonic transducer maintaining direct contact with the stainless steel test body, shear waves were created from the test material at angles between 0° and 80°, and the sound field around the main beam was mapped. shows the calculated ultrasound field modeling results at a 0.4-mm pitch and at beam refraction angles of 45° and 80°.
Figure 3. Ultrasonic sound field modeling results at (a) 45° and (b) 80° refraction angles at a 0.4-mm pitch.
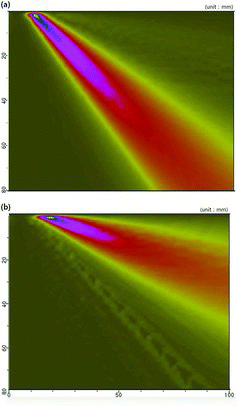
The modeling results showed no side lobes or grating lobes other than the main beam that could affect the inspection, confirming the validity of the selected design parameter values of the phased array ultrasonic transducer. shows the design specifications for the ultrasonic transducer and wedge determined based on the modeling results.
Table 1. Phased array probe and wedge specifications.
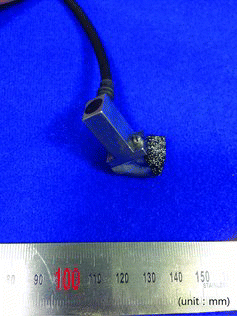
These design specifications verified through modeling were used to manufacture the ultrasonic transducer. shows the phased array ultrasonic transducer and wedge manufactured in this research.
2.4. Manually operated ring-type encoded scanner
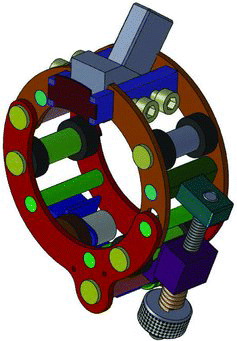
Since the socket weld area of a drain pipe at the bottom of a SG is very thin and the space around the weld extremely narrow, it is difficult for the inspector to keep the ultrasonic transducer in steady contact with the piping while scanning and verifying the reflected signals, without reducing the reliability of the inspection. This research addresses such inspection difficulties through the development of a manually operated ring-type encoded scanner that enables firm contact between the probe and the small bore piping under inspection. shows the three-dimensional design geometry as well as the manufactured manual scanner.
3. Experimental specimen and system
3.1. Flawed specimen
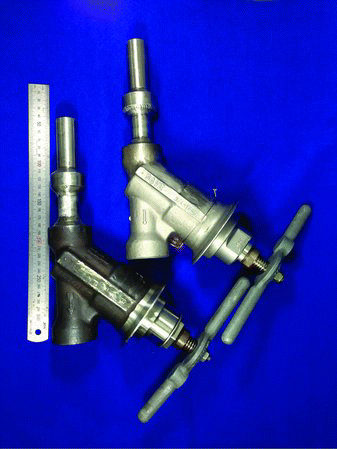
Experimental specimens of SG drain line socket weld pipes with fabricated flaws were introduced into the research in order to develop a more reliable inspection technique. Fatigue crack specimens were made of 304 stainless steel materials and one end of their piping was welded with a coupler and the other with a valve. Considering the required leg length of the welds, two specimens were developed with weld leg length ratios of 1:1 and 1:2, respectively. shows manufactured flawed specimen of SG drain line socket weld.
The most frequent types of flaws found on socket welds were introduced to the experimental specimens. Specifically, each specimen had six fabricated flaws: three flaws on the piping side of the weld and three on the valve side. Flaw types included fatigue crack initiated at the triple point where the base metal, coupler and weld materials meet; horizontal lack of fusion (HLOF) growing at the boundary between the base and weld materials and vertical lack of fusion (VLOF) caused by poor adhesion of the weld bead to the coupler material. The details of such flaws are shown in .
Table 2. Flaws introduced to specimens (unit: mm).
3.2. Experimental system
The phased array ultrasonic system used in this research was ZETEC's Omniscan, a portable, 16-channel device easily carried to field inspections. The acquired signals from the Omniscan were stored in a laptop via transmission control protocol/internet protocol connection, and Ultravision version 1.1Q6 was used to evaluate the stored signals. The configuration of the experimental system is shown in .
First, the newly developed scanner was attached to a flawed specimen and the reference point was established. The scanner was then rotated circumferentially a full 360° to acquire and evaluate reflected signals. The setting parameters of the phased array ultrasonic system used in the experiment are shown in . After input of the setting parameters for the probe operation, ultrasound beams were generated at multiple angles ranging from 35° to 80°.
Table 3. Phased array system parameters for experimental.
4. Experimental results
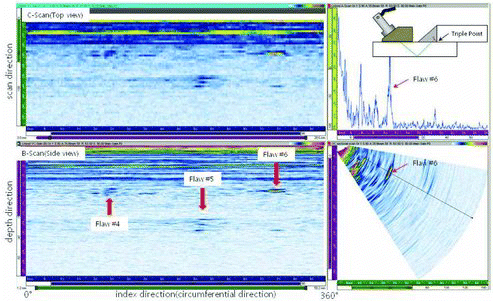
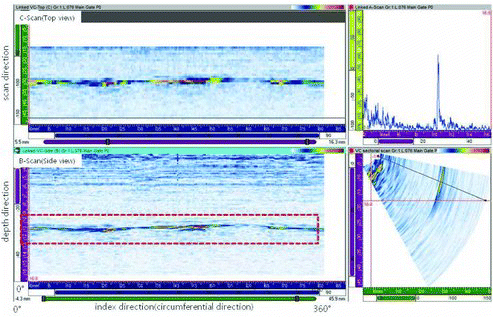
Flaw detection experiments were performed on the socket weld specimens embedded with fatigue cracks and LOF defects using the new inspection system designed in this research. For the socket weld specimens with fatigue cracks, signal acquisition was made on both the coupler and valve sides with the scanner attached to the pipe side since the valve body is made of cast stainless steel making probe contact more difficult. The signals from the valve side of the flawed weld specimens with leg length ratio of 1:1 are shown in . The signal display is divided by four panes. The upper left is C-scan (top view), upper right is A-scan and lower left is 90° skew-applied B-scan (side view). These signals are all dependent S-scan (sectorial view) which is located on lower right side of window. If the data cursor of S-scan is moved to specific refracted angle, all the signals show the specific refracted angle.
As shown in the figure, three flaws including the LOF and fatigue cracks were detected at around 63.5° among the refraction angles ranging from 35° to 80°. Afterwards, the lengths of the detected flaws were measured from the B-scan image. In this experiment, the length sizing is performed by 12 dB drop method. Flaw depths could not be measured because the crack tip signal was unidentifiable from the acquired data.
As shown in , Flaw #6 is a fatigue-induced crack which was initiated at the triple point and grew towards the inner diameter of the piping. Since the fatigue crack was growing vertical to the direction of the traveling sound waves, the signal amplitude was relatively high.
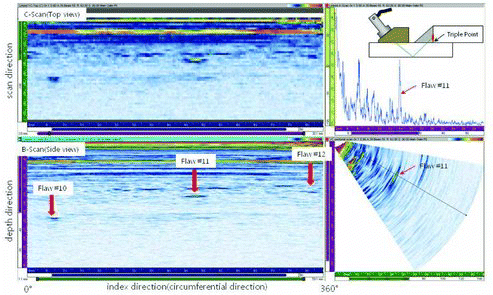
The experimental result of the flawed specimen with a weld leg length ratio of 1:2 is shown in . As shown in the figure, one LOF and two fatigue cracks were detected and the length of those flaws measured from B-scan signals.
shows the sizing results of the 12 flaws inserted and detected on the specimens. The root mean square error (RMSE) of all the flaws was 1.1 mm. The length measurements revealed that deviations are more prone to shallow height flaws that grow in the same direction as the ultrasound wave propagation. Specially, the crack no. 7 which propagates to coupler material side shows a large deviation because the ultrasonic beam is parallel to the crack orientation.
Table 4. Flaw length sizing results of flawed specimens (unit: mm).
5. Field application
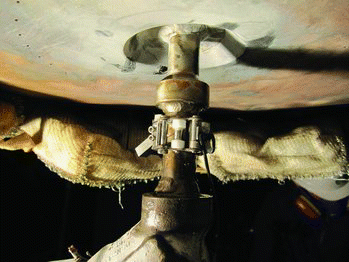
The inspection system developed in this research is applied for flaw detection in the drain piping of actual SGs “A,” “B,” and “C” installed at an NPP. The inspection system composed of an encoded ring scanner fitted with a phased array ultrasonic transducer was attached to the drain line socket weld piping of a SG. shows how the scanner with a phased array ultrasonic transducer was attached to the SG drain pipe. With the scanner thus attached, the inspector moved the ring scanner circumferentially a full 360° and the phased array ultrasonic inspection system collected and saved the reflected signals coming from the pipe. At this point, the small encoder mounted in the inspection system provided the specific circumferential locations corresponding to the sound wave signals picked up by the inspection system. Each received ultrasound signal identified with an encoder location was then saved in the system.
As PAUT enables inspections with multiple ultrasonic signals at multiple steering angles, the number of signal modes for analysis is high. shows the inspection results of the SG “A” drain line socket weld joint. The figure shows a range of signals to be evaluated. The S-scan signals on the bottom right of the screen show the entire range of inspection angles from 35° to 80°. The top and bottom left signals represent C-scan and B-scan signals for a specific angle selected from the S-scan. When the inspector selects a certain location on the B-scan or C-scan, the corresponding signal is displayed on the A-scan screen.
As with the case shown in , a triple point signal (TPS) was identified on the B-scan. Though SG “A” had a history of weld leak repairs, no abnormal signals existed to indicate any flaw around the TPS. Inspections were also conducted on the SG “B” and “C” socket weld connections and as both were found free of cracks or weld flaws they were determined sound.
6. Conclusion
This research aimed to increase the reliability of inspections of the drain line socket welds of SGs at NPPs through the design and manufacture of a 3.5-MHz phased array ultrasonic transducer that composed of 16 piezoelectric elements that can create multiple ultrasonic beams at multiple angles ranging from 35° to 80°. Also developed was a manual operating scanner fitted with the aforementioned phased array ultrasonic transducer and an encoder that provided location signals as the scanner moved circumferentially around the small bore piping while maintaining good contact with the test piece.
Experimental testing was carried out using the developed phased array ultrasonic probe and a manually operated ring-type encoded scanner on specimens with embedded flaws such as fatigue cracks. All the 12 inserted defects were detected and the accuracy of flaw length measurement was verified, confirming satisfactory performance of the new system for inspecting small bore piping socket weld connections. This phased array ultrasonic inspection system was then applied for inspecting real SG drain line socket welds at an NPP in Korea to confirm its applicability in field conditions. Compared to the conventional automatic ultrasonic testing methodology, the new phased array ultrasonic inspection system completed the inspection in one pass rotation, significantly reducing the inspection time. In addition, the new phased array inspection system was able to acquire multiple data at one inspection. In conclusion, the application of the PAUT inspection system developed in this research for use in inspecting SG drain line socket welds at NPPs not only saves time and reduces the dose rate during inspections, but also enables greater reliability and accuracy in the inspection of small bore socket weld joints.
References
- Lara P. Nondestructive evaluation: volumetric examination of small-bore piping welds. Charlotte (NC): Electric Power Research Institute (EPRI); 2008. (TR-1016671).
- Gosselin SR. Vibration fatigue of small bore Socket-Weld pipe joint. Charlotte (NC): Electric Power Research Institute (EPRI); 1997. (TR-1016671).
- Lee JK, Park MH, Park KS. [Development of the automated ultrasonic testing system for inspection of the flaw in the socket element]. J Korean Soc Nondestructive Test. 2004;24: 275–281. Korean.
- Lee DM, Park MS, Kim KS. [Development of the ultrasonic inspection system for socket weld]. KSNT Spring Conference; 2007; Daejeon, Korea; p.135–139. Korean.
- RD-Tech. Introduction of phased array ultrasonic technology applications. Quebec, Canada:RD-Tech Inc. 2006; p. 37–39.
- Choi SW, Lee JH. [Analysis of the ultrasonic beam profile due to variation of the Inter-Element spacing for the phased array transducer]. Korean Soc Mech Eng. 2000;24: 972–981. Korean.
- Wooh S-C, Shi Y. Optimum beam steering of linear phased arrays. J Wave Motion. 1999;29: 245–265,

