Abstract
Here, I describe a new design of pliers which makes colour ringing with plastic rings more practical. I evaluate the effectiveness of these pliers under field conditions and discuss the advantages and disadvantages of the design.
Wild birds are marked when individual identification is necessary in order to study various aspects of the bird's life. Individual marking of birds is conducted using a variety of techniques and materials such as metal rings, colour rings, patagial tags (wing tags), flipper bands, leg flags, paint or dyes, radio or satellite transmitters, and passive integrated transponder (PIT) tags, etc (Sutherland Citation2000, Citation2006, Stroud & Davidson Citation2003, Sutherland et al Citation2004). Of these, bird ringing is the technique of attaching small, individually numbered or marked, metal or plastic, tags or rings to the legs or wings of birds.
Metal rings are supplied open and are attached and closed using specially designed pliers, whereas plastic colour rings are generally opened by hand or with strong circlip pliers before being closed on the leg (Sutherland et al Citation2004). However, the shape of most colour rings is cylindrical; they have “butt-end” edges or edges that are overlapping to various degrees and hence the rings are very stiff and/or too small to be opened easily by hand or circlip pliers. In addition, it is difficult to keep the opposite edges of the ring open in parallel, independent of whether you use a pair of traditional circlip pliers or your hand. When using your hand, the stiffness of the ring usually restricts the ringer to open only one end of the cylinder-shaped ring first and to place it over the tarsus of a bird, momentarily creating pressure and squeezing the tarsus, in order to be able to open the other end of the ring. When using circlip pliers, the presence of the gripping jaws inside the cylinder of the ring may squeeze the tarsus of the bird. These difficulties not only increase the time spent during ringing but can also create extra stress to birds. In extreme cases, it may even result in injury to the bird. A better method of colour ringing is therefore needed. Here, I describe a pair of pliers specially designed for use during colour ringing, evaluate its effectiveness in field conditions and discuss its advantages and disadvantages.
Construction of the new colour-ringing pliers
I produced two different-sized pliers: one for larger-sized birds (eg storks, Ciconiidae, and flamingos, Phoenicopteridae) and one for medium-sized birds (eg gulls, Laridae). Here I describe only the construction of ringing pliers for larger birds. The procedure for medium-sized birds follows the same steps and the only difference is in the size of the parts used.
Construction of colour-ringing pliers initially requires a sprung, straight-jaw, bent-nose circlip plier and a thin single-walled chromium stainless steel cylinder – open at both ends. Traditional circlip pliers used during colour ringing are straight-jaw, straight-nose circlip pliers and are not adequate for this purpose. It is crucial to choose appropriate-sized circlip pliers. Firstly, the opening size of the circlip (the maximum distance that can be opened by pliers) should at least be approximately double the tarsus thickness of the target species (or c 1.5 times larger than the diameter of the ring). Secondly, the size of the handles of the pliers should also fit well to the size of the ringer's hand. The total length of the pliers and opening size of the circlips are generally given on plier specifications, but I recommend measuring the opening size with calipers and testing the fit of the pliers to your hand before buying. The maximum opening size of the circlip pliers required is about 20–25 mm for smaller birds (from smaller terns to larger gulls) and 35–40 mm for larger birds (from smaller egrets to larger herons, storks and flamingos).
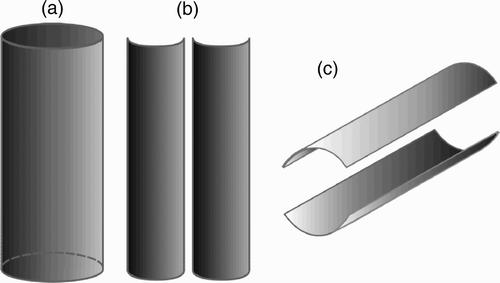
Chromium cylinders can best be found from an ironmonger or shop that sells staircase and railing materials. The diameter of the chromium cylinder should be chosen with respect to the target species of the ringing study. In general, I recommend choosing a cylinder with a diameter of 16 mm and wall thickness of 1 mm. This size of the cylinder is expected to cover a range of species having body sizes ranging from small terns (eg Little Tern Sternula albifrons) up to storks (eg White Stork Ciconia ciconia) and even larger. The cylinder should be 1.5 cm longer than the height of the ring used and this excess length will be needed for welding. The cylinder is then longitudinally sectioned into three equal-sized and slightly curved metal plates. Only two of these curved metal plates are needed (). The cylinder can be cut using various metal-cutting tools. Once the sectioning is finished, any burrs should be removed from the edges by either polishing or grinding. It is important that the edges of the curved plates should be identical and parallel to each other. The curved metal plates are then welded consecutively onto the jaws of the pliers. The desired position and orientation can be achieved by fixing one of the jaws of the pliers with one of the curved metal plates by using a clamp.
Figure 1. (a) A thin single-walled chromium stainless steel cylinder open at both ends. (b) Equally shaped, slightly curved metal plates are obtained after longitudinal sectioning of the cylinder. (c) After the sectioning process, opposite edges of the metal plates should be parallel to each other.

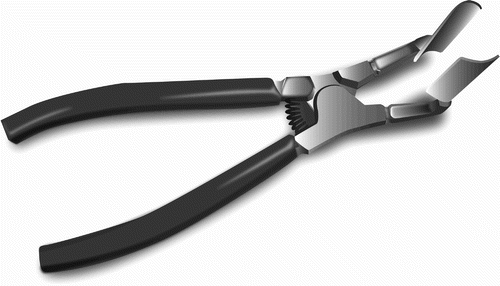
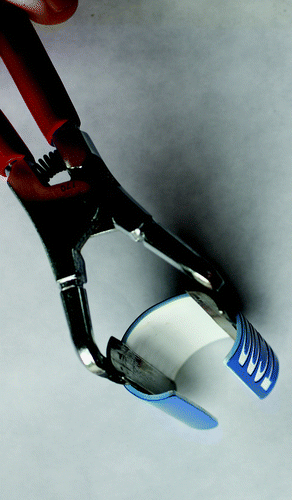
Expert assistance with welding is recommended to ensure maximum durability and long life. There are four critical issues during welding. First, the spring of the pliers should be taken out before the welding process since the heat produced during welding might damage the elasticity of the spring. Second, the welding process should be precise and the inner side of the jaws must be welded on the outer side of the curved plates. Third, the curved metal plates should properly be aligned to each other during welding. Fourth, the direction of the metal plates after welding should be parallel to the bent jaws. After the welding process, all the edges, the inner part of the curved metal plates and sharp corners should carefully be ground and polished to obtain fine and smooth surfaces. shows the final appearance of the tool. The way the pliers open a colour ring is shown in . Construction of one pair of pliers took about two hours including all the details (buying pliers and a chromium cylinder, sectioning, grinding, polishing, welding, further grinding etc).
Using the pliers to apply colour rings
I ringed 504 White Storks, 88 Greater Flamingos (Phoenicopterus roseus), and 62 Mediterranean Gulls (Larus melanocephalus) in Turkey between 2010 and 2012 to test the suitability and efficiency of the colour-ringing pliers. In total, 654 individuals birds were colour ringed with these pliers. I used colour rings made up of PMMA acrylic materials. The old ‘Darvic’ colour rings are made up of Vynalast material and are more flexible than PMMA acrylic materials. PMMA is stiffer and harder, but more durable against abrasion and outdoor conditions (Marcin Faber, Interrex, pers comm). Use of the pliers was very simple and no problems or no injuries were observed.
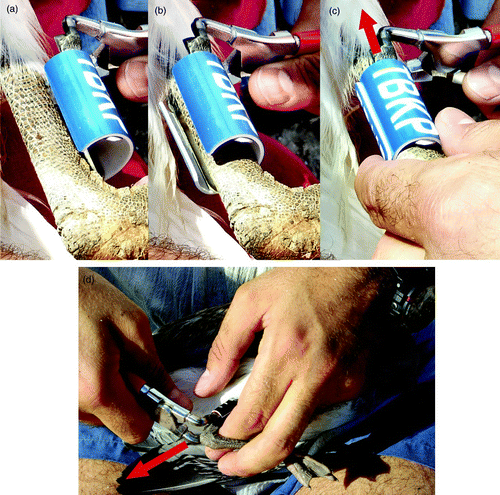
The use of the pliers is explained as follows. First, open the ring with the pliers (. Second, slide the ring and pliers over the tarsus and close the ring until the edges touch (. The amount of force necessary to keep the pliers open will decrease as the ring nears its ideal closure point. Third, while gently gripping both the ring and the leg of the bird to ensure that only the pliers (and not the ring) move, slowly slide the pliers (in the directions shown by the arrows in and because the slide direction depends on the tarsus length) parallel to the tarsus of the bird. The slide direction should be to the proximal end of the tarsus bone for species having long tarsi (eg storks; , while it should be to the distal end of the tarsus bone for smaller species such as gulls (. Some birds have larger intertarsal joint bones than tarsus thickness and therefore the slide direction to the distal end of the tarsus bone might be difficult. For birds having very short tarsi and very wide intertarsal joints, the length of the curved metal plates may need to be shortened so the jaws can be slid to the proximal end of the tarsus. The slide directions of the pliers are indicated with an arrow in and . I measured the time required to put a colour ring with and without my pliers to a bird and found that these new pliers were better than anything available at the moment and significantly reduce bird handling time.
Figure 4. Application of the pliers during ringing a White Stork (a–c) and a Mediterranean Gull (d). The red arrows indicate the sliding direction of the pliers after the ring is closed.

Since the use of the tool is very simple, only a few trials on a dummy bird (even on wooden material having similar thickness) before applying to a living bird is sufficient to gain enough experience to use it efficiently and appropriately.
It is also easy to take a ring off. With other colour ringing procedures, some mis-ringed birds might be released without correcting ring placement as it might be considered too difficult to take the ring off without inducing further significant disturbance.
There are two disadvantages to these new pliers: firstly, the production, especially the welding, may be difficult for novices; and, secondly, fixing the jaws restricts the capabilities of the pliers. Nevertheless, since most colour ringers work on only one species or a group of similarly sized species, this disadvantage is not a major one. Pliers of average jaw length can be chosen, suiting a range of bird sizes, or two different sizes of pliers can be constructed.
In conclusion, these pliers not only decreased the time required for ringing but also stopped any unwanted injuries and casualties. As I have found these pliers simple and effective tools, my aim with this note is to share this improvement with the colour-ringing community.
ACKNOWLEDGEMENTS
I acknowledge Bülent Turker for helping me draw .
REFERENCES
- Stroud, D.A. & Davidson, N.C. (eds) 2003) Catching and handling birds, and data: practical papers published in the Wader Study Group Bulletin, Wader Study Group Bulletin 69, Special Issue. International Wader Studies 6.
- Sutherland , W. J. 2000 . The Conservation Handbook: research, management and policy , USA : Blackwell Publishing Company .
- Sutherland , W. J. 2006 . A Handbook: ecological census techniques , Cambridge : Cambridge University Press .
- Sutherland , W. J. , Newton , I. and Green , R. 2004 . Bird Ecology and Conservation: a handbook of techniques , Oxford : Oxford University Press .

