
 ?Mathematical formulae have been encoded as MathML and are displayed in this HTML version using MathJax in order to improve their display. Uncheck the box to turn MathJax off. This feature requires Javascript. Click on a formula to zoom.
ABSTRACT
Monte Carlo simulations (MCSs) provide important information about statistical phenomena that would be impossible to assess otherwise. This article introduces MCS methods and their applications to research and statistical pedagogy using a novel software package for the R Project for Statistical Computing constructed to lessen the often steep learning curve when organizing simulation code. A primary goal of this article is to demonstrate how well-suited MCS designs are to classroom demonstrations, and how they provide a hands-on method for students to become acquainted with complex statistical concepts. In this article, essential programming aspects for writing MCS code in R are overviewed, multiple applied examples with relevant code are provided, and the benefits of using a generate–analyze–summarize coding structure over the typical “for-loop” strategy are discussed.
Teaching statistics with applied numerical examples and computer-driven activities is an effective way to help students crystallize their knowledge about abstract statistical concepts (Hodgson and Burke Citation2000; Gelman and Nolan Citation2002; Braun, White, and Craig Citation2014). Studies have shown that providing hands-on applications where students can interact with results, rather than relying on theorems and memorization, improves knowledge retention and promotes an enjoyable atmosphere for learning (Garfield Citation1995; Garfield and Ben-Zvi Citation2007). For instance, the nuances of complicated theoretical concepts such as the central limit theorem (CLT), Type I error rates and power, coverage and confidence intervals (CIs), efficiency and bias, and so on, can be illuminated using in-class computer applications, as will be showcased in this article.
Further, it is of paramount importance for students to grasp some of the more esoteric yet highly important statistical concepts that are required for data analysis, such as understanding whether a statistic is generally robust to assumption violations; whether a statistic becomes more liberal or conservative under particular circumstances (i.e., when focusing on -values for inferences, demonstrating bias in the direction of failing to reject or rejecting the null hypothesis, respectively); what it means for an estimator to be more efficient or less biased than another; and so on. These concepts are critically important in practice because, when it comes time to analyze real-world data, students must make important decisions that can drastically alter how the data will be modeled, how the results can and should be interpreted, and how to understand the subsequent inferences about the population from which their data were obtained.
The mandatory statistical theory taught at the undergraduate level is typically just that — theoretical. Real-world statistical applications involving “noisy” datasets, as well as smaller sample sizes, are often subject to varying degrees of model violations and issues relating to power. The tough question students will often have to answer is how effective will their chosen statistical method(s) be in light of the characteristics of their data? Without having a firm and practical understanding of robustness, efficiency, power, and so on for their statistical methods, students will be faced with great difficulty in determining what the most optimal analysis options are. In practice, the “most optimal” statistical approach is often impossible to determine, particularly in small samples. However, what is more important is that students should be able to reason out the worst possible approaches and be sure to avoid those. Reasoning out suboptimal analyses is a necessary and important step toward becoming a good data analyst and scientist.
One approach useful for assessing issues relating to statistical applications is to use Monte Carlo simulation (MCS) experiments. These studies use modern computational resources to simulate data based upon set parameters, which are then used to evaluate the behavior of statistical methods across a variety of design conditions (Mooney Citation1997; Paxton et al. Citation2001; Ross Citation2013). Being able to conduct such a simulation is intricately tied to another important skill that should be encouraged during undergraduate statistical training, namely how to utilize (at least one) general purpose computer programming language. While it is somewhat unrealistic to expect statistics students to be able to program all of their own functions or subroutines, learning a programming language is quickly becoming a necessary skill for modern data analysis. The flexibility that general-purpose programming languages provide allows students to carefully and methodologically deal with the central aspects of applied research, namely (a) data manipulation, (b) statistical analyses, (c) interpretation, and (d) presentation (e.g., permitting the production of graphics, tables, marginal results), possibly all within a single script file.
The focus of this article is to demonstrate how statistical theory, computer programming, and MCSs can be intertwined for the benefit of statistical pedagogy (Everton Citation1984; Mills Citation2002; Raffle and Brooks Citation2005; Hagtvedt, Jones, and Jones Citation2007, Citation2008; Diez, Barr, and Cetinkaya-Rundel Citation2014). To accomplish this, we will first examine the underlying theory and basic implementation of MCS-based investigations, which traditionally have been difficult for students to understand and for professors to teach (Wood Citation2005; Lane Citation2015). Second, a worked example using rudimentary code and a specialized package within the R software environment (R Core Team Citation2016) will be provided to demonstrate how this approach can be used within the classroom environment. Finally, three comprehensive examples will be provided to showcase how this approach can be applied to specific statistical topics that are of particular interest to undergraduate statistical theory. While this article will not be exhaustive in terms of exhibiting statistical phenomena, it is our hope that these salient examples will serve as inspiration for investigations into other topics.
1. What are Monte Carlo Simulations?
MCS studies are computer-driven experimental investigations in which certain parameters, such as population means and standard deviations that are known a priori, are used to generate random (but plausible) sample data (Mooney Citation1997). These generated data are then used to evaluate the sampling behavior of one or more statistics of interest. This process of generating and analyzing data is repeated over many iterations and differing conditions that are thought to influence the sampling behavior of the statistic of interest (e.g., through increasing sample size, mean differences, variability).
What is most notable about simulation studies is how they can be harnessed to teach students about fundamental statistical concepts. For example, say we were interested in teaching the properties of the standard error of the mean (with ) for a given sample with
data points and a sample standard deviation of
. We know from standard statistical theory that
, therefore
. However, presenting
as a mechanical formula to be evaluated by plugging in values entirely misses the importance of the concept; primarily, how the variability and sample size are interrelated, and how they summarize the sampling distribution of that statistic. Furthermore, expressing the meaning of
verbally as “the standard deviation of the mean under an infinite number of random samples” is equally problematic because the concept is inherently abstract and loaded with other difficult terminology.
After being introduced to the CLT,Footnote1 a curious student may be wondering that what is meant by random sampling? How can you sample data an infinite number of times? What kinds of numbers does this apply to? For instance, what if we use whole numbers, such as number of cigarettes smoked per day or degrees Celsius instead of Fahrenheit as a measure of temperature? Would smaller population mean values make a difference? Or what if the numbers are bounded rather than truly continuous (e.g., scores on a statistics quiz only range from 0 to 10)? How large must my sample size be for this to apply? Does this idea apply if the data is being generated by a nonnormal sampling distribution? What is meant by the standard deviation of a statistic; we only learned about standard deviations of sample data two weeks ago? What if different combinations of these factors make a difference? And so on. It is to address questions like these where MCSs become exceedingly pertinent because they allow students to explore the realm of possibilities not easily attained through abstract presentations, and to learn by literally doing-it-themselves.
1.1. The Mechanics of Monte Carlo Simulations
The organization of MCSs generally mirrors that of traditional research studies: a sample of data must first be gathered (or in simulation studies, generated by some probability density function), analyzed using one or more statistical methods and data operations, and summarized for dissemination. Hence, constructing MCSs is simply a matter of organizing a “generate–analyze–summarize” scheme so that particular datasets and analysis procedures can be emulated and studied over a wide number of random replications.
MCSs are extremely flexible primarily because they utilize the power of the CLT directly. More specifically, given some population parameter of interest , let
be the associated sample estimate which is a function of data input
. Under the usual understanding of the CLT, we know that if we were to obtain an infinite number of randomly sampled datasets
then the true parameter value could be recovered as the average of all
values. However, because drawing an infinite number of random samples is infeasible, MCSs only generate a finite number of datasets to obtain a sample estimate of the complete population data. Therefore, instead of obtaining
, we use
(1)
(1) as a suitable approximation, where
is some large number of replications (typically 1,000 or more). The fascinating aspect of Equation (Equation1
(1)
(1) ) is that it is true for virtually any statistic and data-generating mechanism that can be imagined (Mooney Citation1997). Furthermore, the sampling error of
can be approximated by finding the standard deviation of all
sets
(2)
(2) which is interpreted as the standard deviation of a statistic under a large number of random samples—an empirically obtained estimate of the standard error that does not require an infinite number of samples.
These concepts presented in isolation may sound rather daunting but can be illuminated by returning to the previous example regarding the standard error of the mean. The MCS steps required to address any query about the behavior of the standard error of the mean are as follows:
Generate a dataset with
values according to some probability density function (e.g., normal, log-normal, binomial,
Analyze the generated data by finding the mean of the sampled data, and store this value for later use;
Repeat Steps 1 and 2
The standard deviation of the collection of R mean estimates is, by definition, an estimate of the standard error of the mean. Note that any of the students questions previously raised simply require the manipulation of the properties of the generated data. For example, questions regarding sample size can be investigated by changing the size of ; the properties of integer/whole numbers can be investigated by generating data either via a binomial distribution or by rounding the values generated from other distributions; bounded variables can be explored by drawing data from a probability distribution under the condition that only values within a particular range can be sampled; and so on, ad nauseam. Clearly, the flexibility of MCS has substantial usefulness when applied to these hard-to-answer questions.
Unfortunately, what is required for students to write their own MCSs is a high level of proficiency in general statistical programming to (1) organize the necessary elements for the generation, analysis, and summary steps, and (2) control the flow of MCSs to collect the required information using some statistical programming software. As it turns out, it is the second property that is often the most difficult to explain, as well as to implement, because it is here where coding can become esoteric, situation specific, difficult to read, inefficient, error prone, and so on. In the next section, we focus on how to use the general-purpose R programming language (R Core Team Citation2016) to teach students how to write code for MCSs. This will culminate with the presentation of an R package specifically designed to aid researchers in writing efficient and effective MCS code.
2. Designing Monte Carlo Simulations in R
2.1. Basics in R for Running Simulations
While many of the intricacies of R programming are outside the scope of the present article,Footnote2 a few of the fundamentals will be provided to ensure that the examples are understandable. The most essential symbol is the assignment operator (<-), which assigns anything on the right-hand side to the object name on the left. For example, x <- 11 creates a new object called x, which contains the scalar 11, whereas y[1] <- 11 assigns the value 11 to the first element of the object y (where y is a type of vector storage object).
Functions are actions that can use information from previously defined objects, and their names are always followed by round parentheses. Functions often take a particular input and produce some form of output (e.g., mean(), sd(), and matrix() take numeric inputs and calculate the mean, standard deviation, and organize the input into a matrix object, respectively). The c() function is used to concatenate or combine scalars into a vector, for example, x <- c(1,5,3) produces a vector of length three with the elements 1, 5, and 3, respectively.
Finally, “repeating operations” in R often are written in the form of for() loops, where each function call defined within a set of curly braces is repeated along the length of some input vector (e.g., for(i in c(1,2,3,4,5)){ print(i) } will print the numbers 1 through 5 in the R console, as i takes on each of these values across the iterations). While the problematic aspects of such loops will be subsequently discussed, this function provides a skeletal framework from which a student could conceivably construct their first simulation.
To illustrate, here is one approach an interested student may take to running an MCS in R to investigate the sampling properties of the mean. In this study, data are generated from a normal distribution across three different sample sizes (5, 30, and 60). The following code blocks contain exactly the same code to run the MCS, with the exception that the second block does not contain comments about the operations being performed.
Readers with less familiarity with R code, or computer programming in general, should inspect the following code block to understand each line in detail.
#- - - - - - - - - - - - - - - - - - - - - - - - - - - - - - - - - - - - - - - - - - -
# Monte Carlo Simulation with comments
R <- 5000 # set 5,000 replications
mu <- 10 # set mu to 10
sdev <- 2 # set standard deviation to 2
N <- c ( 5 , 30 , 60 ) # define 3 sample size conditions
res <- matrix ( 0 , R, 3 ) # create a null matrix (with R rows, and
# 3 columns, which only contains zeroes)
# to store output
colnames (res) <- N # name the columns (5, 30, 60)
set.seed ( 77 ) # Set the random generator seed to make analysis replicable
for (i in N){ # As N is a vector, i will take on values # 5, 30, and 60, across the 3 iterations for (r in 1 : R){ # 1:R creates a vector 1,2,3,...,R dat <- rnorm ( n = i, mean = mu, sd = sdev) # generate random data # from a normal distribution with set mean and sd res [r, as.character (i)] <- mean (dat) # analyse, returning the # mean of dat and placing it in the results matrix # on row r and in either column 5, 30, or 60 } }
apply (res, 2, mean) # summarise by calculating the mean for
# each column
apply (res, 2, sd) # summarise by calculating the standard
# deviation for each column
After understanding the above code block, the following code block will appear less cluttered and generally represents how a typical simulation script file is written. In general, comments should not be used to highlight what the operations are doing, but should be used to provide extra information that is not obvious from inspecting the code alone (Wickham Citation2014).
#----------------------------------------------------------------------
# Monte Carlo Simulation without comments
R <- 5000
mu <- 10
sdev <- 2
N <- c ( 5, 30, 60 )
res <- matrix (0, R, 3)
colnames (res) <- N
set.seed ( 77 )
for (i in N){ for (r in 1 : R){ dat <- rnorm ( n = i, mean = mu, sd = sdev) res [r, as.character (i)] <- mean (dat) } }
apply (res, 2, mean)
apply (res, 2, sd)
The above approach uses a for-loop strategy to conduct the simulation. As in all R codes, each line in the script is run sequentially, and anything appearing after a # symbol is treated by the parser as a comment. The above script will run 5000 replications (r in 1:R, where : is used to construct a sequence vector of the form c(1, 2, ..., R)) for each of the 3 sample size conditions (i in N). During each loop, rnorm() is called to generate random normal data, and the mean of these data is stored in the res matrix object. We could then look at the results from each iteration by inspecting the full 5000 by 3 res object, or a summary across columnsFootnote3 using the apply() function; for instance, apply(res, 2, mean) and apply(res, 2, sd), which provide the average of the parameter estimates and their respective standard errors for each sample size condition (e.g., 10.002, 10.001, and 10.002; and 0.899, 0.368, and 0.258 for N= 5, 30, and 60, respectively).
As should be expected for samples drawn from an underlying normal distribution, the population mean is recovered well for all three conditions, and the sampling variability of these estimates decrease as the sample size increases. Recall from Equation (Equation2(2)
(2) ) that these standard errors are empirically derived, and can be compared against the true standard errors,
, which are practically equivalent (0.894, 0.365, and 0.258, respectively). Hence, the MCS code adequately approximates the CLT behavior without relying on a plug-in formula. This should give students a better understanding of what is meant by the concept of the standard error of the mean.
2.2. Dangers and Pitfalls of Using For-Loops
While conceptually simple at first, the above coding approach is wrought with dangers and pitfalls that students are likely to encounter in their first (and subsequent) coding attempts. First, the for-loop structure will become increasingly complicated as the design expands; for instance, incorporating additional distributional shapes or modifying the standard deviation to take on multiple values would necessitate loops be nested within loops (see the Appendix, discussed later, for an example of this issue), while investigating other statistics (such as the median, trimmed mean, mode) will increase the complexity of the innermost loop. Even worse, extending a previously conducted simulation study to include other factors may produce unwanted organizational consequences because objects can accidentally and easily be overwritten if the same symbol is used within the nested loops (e.g., for 1:n appears in multiple places), the original objects may need restructuring to store new results and statistics of interest (e.g., the use of lists may be required to understand the nesting of the for-loop results), more object names will need to be tracked and properly documented (which often negatively impacts the readability of the code), and so on.
3. A Safer Approach to Writing Monte Carlo Simulations
Due to these negative observations, it is highly recommended to use an R package designed to aid in the implementation of MCS instead of for-loops. We recommend using the code structure implemented in the SimDesign package (Chalmers Citation2016), which can be installed in the typical fashion from the Comprehensive R Archive Network (CRAN) by running install.packages(”SimDesign”) in the R console, and then making it available with library(”SimDesign”). The package controls the structure and back-end of the MCSs with functions that oversee common simulation issues such as the resimulation of nonconvergent results, support for parallel computation, provides safety features so that many simple errors are avoided (e.g., preventing output files from being overwritten accidentally, or terminating simulations early if too many of R's error messages occur), allows for the saving and restoring of temporary files, the aggregation of results from independent computers, and provides explicit tools for debugging. The majority of these features are not explored in this article, but are left to the interested reader to explore the package documentation to better understand these features.
The core elements of the package make explicit reference to the reasonable generate–analyze–summarize paradigm through the use of the following structure of functions:
Design <- data.frame (...)
Generate <- function ( ... ) ...
Analyse <- function ( ... ) ...
Summarise <- function ( ... ) ...
results <- runSimulation (...)
The Generate(), Analyse(), and Summarise() functions provide the skeleton form of the simulation and will perform the required steps to complete an MCS. The Design object contains the fixed conditions that are to be investigated in the simulation (e.g., sample size, generating distribution). runSimulation() starts the simulation after the other functions have been defined. More information on each of these required functions are provided in the following sections, and additional information can be found in the associated package documentation files (for instance, help files can be accessed by typing ?runSimulation in the R console or by downloading the package manual from https://cran.r-project.org/web/packages/SimDesign/SimDesign.pdf). This overarching structure is illustrated in , where each element is briefly described and some useful R functions typically used in each section are suggested.Footnote4 As we work through each of these functions, it is important to note that all four previously discussed components must be defined and runSimulation() must be called with each included as arguments before anything is actually produced to analyze.
Figure 1. The underlying framework for simulation studies revolves around the following three primary areas: generating data, analyzing results, and then summarizing the findings.
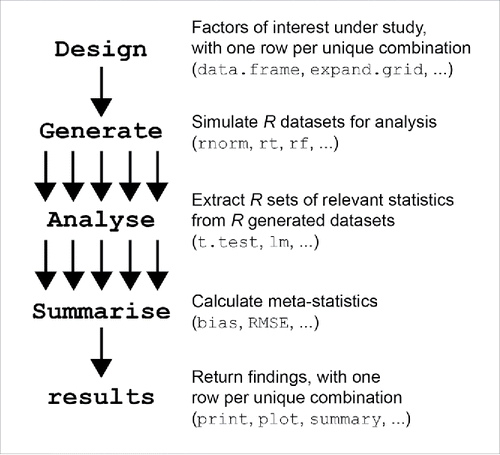
Figure 2. Histogram of the median estimator for the second Monte Carlo simulation condition.
Before beginning, it should be noted that because the structure above is the same for all simulation studies, the SimDesign package provides a convenient function to generate a template that can be easily edited without the need to change any default arguments in the functions. The template is constructed by running SimFunctions() from the R console, which produces the following output:
#--------------------------------------------------------------
library (SimDesign)
Design <- expand.grid (condition1 = NA ,
condition2 = NA )
#--------------------------------------------------------------
Generate <- function (condition, fixed_objects = NULL) {
dat <- data.frame ()
dat
}
Analyse <- function ( condition, dat, fixed_objects = NULL) {
ret <- c ( stat1 = NaN, stat2 = NaN )
ret
}
Summarise <- function ( condition, results , fixed_objects = NULL) {
ret <- c ( bias = NaN, RMSE = NaN)
ret
}
#--------------------------------------------------------------
results <- runSimulation (design = Design, replications = 1000,
generate = Generate, analyse = Analyse, summarise = Summarise, edit = ’none’)
The template is useful for students, as well as researchers and instructors, because it quickly generates the functional arguments and work-flow required to effectively control the flow of MCSs. The factors under investigation (the conditions) are crossed using expand.grid(). As will be demonstrated, additional factors can be added by simply naming them and their levels on new lines. Further, placeholders in the template are designated with special characters (e.g., NA, which represents missing values, and NaN, which stands for “not a number”) and should be modified based upon the studies at hand.
The purpose of the SimDesign package itself is to organize all of the lower level and distracting components when writing simulation code in R so that students, researchers, and instructors can focus on the content of the simulation design rather than how to organize how the code should be executed.Footnote5 From a practical perspective, we strongly believe that this approach is important because it minimizes many common coding errors; from a didactic point of view, this helps guide students into thinking about the more interesting aspects of simulations rather than the more tedious topics of data storage and language-specific coding issues.
3.1. Design
Perhaps the most important step in conducting an MCS is in the choice of relevant design factors to manipulate and investigate. This should be steeped in either genuine curiosity or, more typically, previous research. The main issue to consider is that if too many factors are chosen then a simulation can take extreme amounts of time to run, often with diminishing returns in regard to actual illumination.
In the previous example, the structure of the design factors was handled via nested-for loops, which become increasingly unwieldy when there are multiple factors of interest. In contrast, SimDesign uses a data.frame object,Footnote6 with columns pertaining to the design factors and each row indicating a unique combination of the factors. Once the factors of interest (and their relevant levels) are chosen, it is straightforward to create the Design objectFootnote7:
Design <- data.frame ( sample_size = c ( 5 , 30 , 60 ))
Design
## sample_size
## 1 5
## 2 30
## 3 60
When the simulation is executed, each row of this object will be run sequentially; hence, the first set of generate–analyze–summarize conditions produced in this example would pertain to a sample size of 5, then 30, and so on. Further, since the Design object is just a data.frame, if any particular row combination is unnecessary then it can be removed from the simulation by using logical operators in a call to subset(). For example, including Design <- subset(Design, sample_size != 5) after the initial statement would remove the first simulation condition (where n= 5) using the not-equal-to operator (!=). Being able to remove conditions in this manner can be very useful, especially if the procedure under investigation is time-consuming or if there are redundant simulation conditions.
3.2. Generate
The Generate() function only takes one necessary argument (condition),Footnote8 which is a single row from Design, and is used to control the data generation for subsequent analysis. R has many functions for generating random dataFootnote9 that can be called using the parameters from Design to simulate realistic data to address the problem at hand. For example, if a student is interested in an independent -test-type problem, then this could return a data.frame with the dependent variable in one column and group information in another. However, if interest is only in one particular vector (say, for making inferences about unconditional means and variances), then Generate() need only return a numeric vector object instead.
More concretely, if we were interested in generating data solely based upon sample size (with a set mean and standard deviation), a relevant Generate() function might look something like:
Generate <- function ( condition , fixed_objects = NULL ) {
dat <- rnorm (n = condition $ sample_size, mean = 10 , sd = 2)
dat
}
This function relies on extracting the contents of a single row of the Design object (condition; using the $ notation or, alternatively, accessing the object via with(condition, sample_size)) in order for the values to be passed to rnorm().Footnote10 Again, it should be stressed that we are defining the structure of the simulation—this function will not actually generate any data until it is called by runSimulation(). Further, it is straightforward to expand this template to include more design factors or levels as necessary because the only restriction is that some data object is returned from the function. For instance, if we wished to also sample from the distribution, we could include a suitable if() statement to sample from rnorm() or rchisq(); this is demonstrated in a subsequent example.
3.3. Analyze
Once the data have been generated, the next step is to analyze it by calculating and storing all of the statistics of interest. The primary arguments for Analyse() are condition and dat. In this example, we are only concerned with the estimates of the mean:
Analyse <- function ( condition, dat, fixed_objects = NULL) {
ret <- mean (dat)
ret
}
For each iteration of the simulation, Analyse() will return a vector with a single entry: the mean of the dataset. This will be called Rtimes for each row of the Design matrix. As we will see in later examples, it is common to use this function to return multiple values that are of interest; however, when multiple objects are returned, the elements must be uniquely named to properly track the obtained statistics.
3.4. Summarize
As the generate–analyze steps only pertain to a single instantiation of a particular Design condition, resulting in datasets which have been analyzed, we require a function that can concisely summarize the results across the independent replications. This is where computing metastatistics such as means, standard deviations, bias, root mean-square error (RMSE), detection rates, and so on are of primary importance. Bias, RMSE, and detection rates will be more formally defined and demonstrated in later examples.
For the present example, however, we are interested in the mean of the means (i.e., the estimate of the population parameter) and its respective sampling variability (i.e., the standard error). This information is found using Summarise(), which is passed a given row from Design (i.e., condition), and the set of values containing the results from the returned independent Analyse() calls, named results. Accordingly, we will remove the calls to bias() and RMSE() from the template, and instead include mean() and sd() below, to find the mean and standard deviation, respectively. These two results are each stored in a named vector object (c_mean and c_se) and returned by Summarise().
Summarise <- function(condition , results , fixed_objects = NULL) {
c_mean <- mean (results)
c_se <- sd (results)
ret <- c (mu = c_mean, se = c_se) # create a named vector
ret
}
A named vector is returned (ret) by Summarise() so that there is no confusion about what the resulting objects refer to.Footnote11 For each row of the Design matrix, SimDesign will return the requested mean and standard error of the replications created from the generate–analyze pairing, as well as automatically report the number of replications, amount of time the row took to execute each condition, and, if applicable, provides information about any warnings or errors that may have occurred during the computations.
3.5. runSimulation
With Design, Generate, Analyse, and Summarise all defined, the final step is to actually run the simulation. This is invoked by calling runSimulation() with the desired number of replications and saving the output to an object, as follows:
results <- runSimulation ( design = Design, replications = 5000, generate = Generate, analyse = Analyse, summarise = Summarise, edit = ‘none’)
This produces a data.frame object named results in the current environment containing all of the requested statistics metastatistics for each respective design condition.Footnote12 With a few minor adjustments,Footnote13 this output will look something like that found in .
Table 1. Simulation results on the effect of sample size and the standard error.
For this design, visually inspecting the simulation table is enough to understand what is occurring, though for more complicated MCSs the use of ANOVAs, marginalized tables, and graphics should be encouraged to identify the underlying phenomena hidden in the results. In this particular simulation, it is quite clear that the predefined population mean () is recovered from the mean of the sampling distribution across all conditions. The precision also increases with sample size, which is indicated by the decreasing standard error statistics. The results perfectly mirror those obtained using the previously discussed “for-loop” approach.
Earlier in this article, we discussed how MCSs can be used to answer students’ questions about how abstract statistical concepts behave under a variety of circumstances. In this section, we provided two such examples, derived using MCS code: the recovery of the underlying population mean, and the narrowing of the standard error. Further, students now have a template pertaining to the CLT that they can modify and play with to suit their own interests. In the next section, we demonstrate how these coding frameworks may be extended to explore further interesting and complex statistical questions.
4. Worked Examples
This section demonstrates the use of SimDesign and its applicability to three statistical areas that are generally difficult to understand intimately: bias and efficiency, Type I error rates and power in the presence of assumption violations, and the construction of CIs and coverage. These are presented with an emphasis on how such studies can be organized, and how the teaching of these topics can be enhanced through the use of MCS.
4.1. Bias and Efficiency
Up until now, we have implicitly assumed that the estimate is an unbiased estimate of the population parameter
. Bias refers to differences between a parameter estimate and the known parameter, represented as
. In MCS, bias is estimated as
(3)
(3) with
still referring to the number of replications,
the true population parameter, and
the sample estimate for the
th dataset analyzed.Footnote14 Good estimators should be unbiased to indicate that they are not returning estimates which are systematically too high or too low; hence,
estimates should be close to 0 in MCSs.
Similarly, good estimators should demonstrate minimal sampling error when used to recover their population values. This is intimately related to the concept of bias; it is customarily evaluated using the RMSE measure defined as follows:(4)
(4) Smaller RMSE values are preferable because they indicate better recovery of the population parameters; squaring the RMSE yields the mean-squared error (MSE). In relation to the sampling error, it can be demonstrated that
; therefore, RMSE values will be larger than the associated
when the estimator is biased.
Because MSE values are interpretable as variance terms, a final method that is often useful for comparing the sampling efficiency between different estimators (distinguished using the subscript ) is the relative efficiency (RE) statistic:
(5)
(5) In this statistic, one estimator is treated as the reference statistic (in this case, the first
value,
) and all other
s are evaluated in reference to it. Naturally, when
then
, but for all other estimators values greater than 1 indicate less efficiency (i.e., more variability) than the reference statistic, while values less than 1 indicate greater efficiency and therefore greater precision in recovering
.
While studying the previous simulation regarding the properties of the CLT, students may wonder about the behavior of the sampling distribution when the generating distribution is not normal, if trimming or using the median as a proxy for alters these properties, and if there are other ways of quantifying the simulation results. The following expanded example incorporates another factor (generating distribution), two other types of statistical analysis (a 20% symmetric trimmed mean, as well as using the median as a proxy for the mean), and three additional methods for assessing the output: bias, RMSE, and RE. As seen below, all three of these summary measures can be automatically generated through calling the built-in bias(), RMSE(), and RE() functions within SimDesign's Summarise() function, respectively, in the same place where mean(results) and sd(results) were previously used.
Combining all of the above ideas into one simulation involves a relatively straightforward expansion of the previous work:
library(SimDesign)
# SimFunctions()
Design <- expand.grid(sample_size = c (30,60, 120),
distribution = c('norm', 'chi'))
# expand.grid() takes a set of named vectors and
# constructs a data.frame where each row pertains
# to a unique combination of the factor levels
#------------------------------------------------------------------
Generate <- function(condition, fixed_objects = NULL){
N <- with(condition, sample_size)
# Alternatively, N <- condition$sample_size
dist <- with(condition, distribution)
if (dist == 'norm'){
dat <- rnorm(N, mean = 3)
} else if(dist == 'chi'){
dat <- rchisq(N, df = 3)
}
dat
}
Analyse <- function(condition, dat, fixed_objects = NULL) {
M0 <- mean(dat)
M2 <- mean(dat, trim = .2) # mean() will do a 20% symmetric trim
med <- median(dat)
ret <- c(mean_no_trim=M0, mean_trim.2=M2, median=med)
ret
}
Summarise <- function(condition, results, fixed_objects = NULL) {
obs_bias <- biasresults, parameter = 3)
obs_RMSE <- RMSEresults, parameter = 3)
obs_RE <- RE(obs_RMSE)
ret <- c(bias=obs_bias, RMSE=obs_RMSE, RE =obs_RE)
ret
}
#-----------------------------------------------------------------------
results <- runSimulation(Design, replications = 1000, seed=77:82,
generate=Generate, analyse=Analyse, summarise=Summarise)
Compared to the previous example with SimDesign, the new Design object contains a total of six rows and two columns to be investigated, where each unique sample size and distribution combination has been constructed with expand.grid() (in the MCS literature, this is commonly known as a completely-crossed design). As well, the Generate() function now contains two if() statements—if condition$distribution is ”norm”, data will be generated using rnorm(), but if it is equal to ”chi”, then rchisq() will be called instead. Note that the degrees of freedom are specified instead of the mean for the distribution because the mean of the distribution is equal to the degrees of freedom. Similarly, Analyse() has been expanded to return the untrimmed mean, a 20% trimmed mean, and the median in a named vector. Finally, Summarise() now returns bias, RMSE, and RE, also as a named vector. The results from this simulation can be viewed by simply calling the object results in the console, or by using the print() function (which supports other display characteristics, such as rounding to significant digits):
print (results, digits = 2 )
## sample_size distribution bias.mean_no_trim bias.mean_trim.2 bias.median
## 1 30 norm -0.0019 -0.0037 -0.00093
## 2 60 norm 0.0070 0.0079 0.00814
## 3 120 norm 0.0031 0.0055 0.00224
## 4 30 chi 0.0211 -0.4581 -0.59464
## 5 60 chi -0.0046 -0.4898 -0.63406
## 6 120 chi -0.0028 -0.4850 -0.62219
## RMSE.mean_no_trim RMSE.mean_trim.2 RMSE.median RE.mean_no_trim
## 1 0.0351 0.0383 0.049 1
## 2 0.0161 0.0190 0.025 1
## 3 0.0086 0.0097 0.013 1
## 4 0.2034 0.3988 0.592 1
## 5 0.1030 0.3326 0.523 1
## 6 0.0504 0.2829 0.450 1
## RE.mean_trim.2 RE.median REPLICATIONS SIM_TIME SEED
## 1 1.2 1.9 1000 0.38 77
## 2 1.4 2.4 1000 0.39 78
## 3 1.3 2.4 1000 0.38 79
## 4 3.8 8.5 1000 0.40 80
## 5 10.4 25.8 1000 0.42 81
## 6 31.5 79.8 1000 0.45 82
It is apparent from this output that SimDesign has calculated bias, RMSE, and RE for each estimator, differentiating them using a period based upon what they were labeled in the object returned by Analyse(). Hence, the often arduous task of tracking and labeling results is managed automatically by the package, thereby minimizing user coding errors and avoiding the often difficult task of properly labeling and tracking R container objects.
Looking at the results, a more nuanced picture emerges: bias is negligible for data generated from a normal distribution, whether the untrimmed, 20% trimmed, or median is used as the measure of . However, this relationship does not hold for data generated from the
distribution—only the population mean is recovered in the untrimmed set. This is because the trimmed mean is being used to make inference about the population trimmed mean, and the median is making inferences about the population median, neither of which are symmetrically distributed or centered at the mean when the sample is drawn from a skewed distribution. Only when the distributions under investigation are symmetric will the statistics make suitable inferences about the population mean.
Additionally, precision still increases with sample size, which is indicated by the decreasing RMSE statistics; however, the distribution estimates are higher overall than those from the normal data. Further, it appears trimming is slightly less efficient than using the untrimmed estimate, and using the median to estimate the mean is the least efficient method to recover
. This can be seen by looking at the consistent pattern across the RMSE and RE values.
Overall, SimDesign makes conducting such a simulation straightforward in a way that solidifies abstract concepts for students. Adding additional distribution shapes only requires a suitable if() statement to be passed to the Generate() function, whereas alternate statistics can be added to Analyse() by simply returning a slightly longer vector object that includes the new statistics of interest. In horrifying contrast, see Appendix A for an example of what this exact design might look like if it had been conducted only using for loops. It is hoped that when comparing the for-loop approach to the approach described above, the clarity and power of SimDesign will truly shine.
4.1.1. Obtaining Complete Analysis Results
When first learning about simulations, it is common to be weary of having results summarized “behind the scenes” (e.g., following the above simulation, a data frame of summarized statistics is returned, rather than the results from every iteration of the simulation). It may be useful or of interest to inspect all generate–analyze results without applying a summarize operation. This approach requires that, for each unique condition in design, a matrix or data.frame with
rows is returned in the R console so that further analyses can be applied afterward. To obtain such objects in the SimDesign package, there are generally two approaches: omit the summarise function so that runSimulation() only performs the generate–analyze steps, or to pass a save_results = TRUE argument to runSimulation(). The former step will return a list with
elements, where each element contains a matrix with
rows of analysis results, whereas the second approach applies the usual three steps but saves the analysis results to external .rds files (i.e., R binary files which can be read in individually with analysis_results <- readRDS(’path/to/file.rds’)). For teaching purposes, the first approach is likely sufficient, whereas the latter approach is recommended when performing real-world MCSs because there will be fewer RAM-related memory issues.
Continuing with the previous example, if instructors are interested in presenting the full analysis results for, say, the second simulation condition in design (where N equals 60 and the generating distribution is normal), then the following definition would return the appropriate elements:
analysis_results <- runSimulation (Design, replications = 1000 , seed = 77 : 82 ,
generate = Generate, analyse = Analyse)
head (analysis_results[[2]])
## mean_no_trim mean_trim.2 median
## [1,] 2.891482 2.925431 2.846963
## [2,] 3.015553 3.029811 3.045328
## [3,] 2.852345 2.910210 2.987543
## [4,] 3.231708 3.303440 3.299224
## [5,] 3.060851 3.110668 3.161641
## [6,] 2.901916 2.872716 2.779007
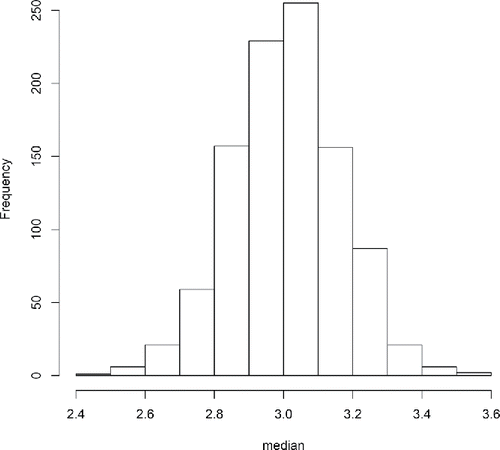
The above code indexes the second element of the analysis_results list and prints only the first 6 of the 1000 rows to the R console with the head() function. Each of the rows in this output is associated with a randomly generated dataset (created with Generate()) which has been analyzed with the user-defined Analyse() function. Given these matrices of results, it is straightforward to generate plots and summary statistics directly rather than requiring runSimulation() to apply the summarise() function and aggregate the results into a data.frame. For instance, it is possible to use the bias() function directly on the matrix objects, compute the standard deviation of each estimator (i.e., standard error estimate), or simply plot the results of a given estimator. The following code demonstrates these three post-hoc tools and produced a histogram of the median estimates (see ).
bias (analysis_results[[2]], parameter = 3 )
## mean_no_trim mean_trim.2 median
## 0.007042179 0.007925737 0.008142993
apply (analysis_results[[2]], 2, sd)
## mean_no_trim mean_trim.2 median
## 0.1268192 0.1375405 0.1577566
hist (analysis_results[[2 ]][,’median’], xlab = ’median’ , main = ” )
4.2. Type I Error Rates and Power
The MCS mechanism in Equation (Equation1(1)
(1) ) applies not only to the specific parameters but also to detection-based statistical tools such as
-values and CIs as well. For instance, if
were to return a
-value estimate based on the input dataset, then an estimate of the true detection rate (often referred to as the empirical detection rate, EDR) can be approximated by
(6)
(6)
where is an indicator function that returns 1 if the
-value from
is less than a chosen
rate, and returns 0 if p is greater than
. If in fact
is a suitable statistic for drawing inferences about the population, then under Type I error rate conditions
will approximately equal the nominal
.
While that might seem technical, it is intricately linked to questions students naturally have when learning introductory statistics, such as follows: To what degree do violations of assumptions affect our conclusions? For instance, when teaching about independent sample -tests, students are expected to learn three primary assumptions:
the observations within each sample must be independent;
the populations from which the samples are obtained must be normally distributed;
the populations from which the samples are obtained must have equal variances (Gravetter and Wallnau Citation2012, p. 337).
The third assumption in particular is often only tenuously supported in real-world applications, and so it is entirely justifiable to ask: How robust is the independent groups t-test to the violation of equal variances? How is it affected by discrepant sample sizes across groups? And, does the popular Welch correction (Welch Citation1947) adequately deal with the issue of unequal variances?
To address such questions, an MCS can be run with the following design conditions: group sample size (30, 60, 120), group size ratio (equally sized, or a 2:1 ratio), various standard deviation ratios between groups (1:4 size, equivalent, and 4:1), and various mean differences (no mean difference, to test for Type I error rates; and a true mean difference of 0.5, to test for power). The function expand.grid() again is used to create the completely crossed simulation design:
Design <- expand.grid ( sample_size = c ( 30, 60, 120),
group_size_ratio = c ( 1, 2),
standard_deviation_ratio = c (1/4, 1, 4),
mean_difference = c ( 0 , 0.5 ))
head (Design)
## sample_size group_size_ratio standard_deviation_ratio mean_difference
## 1 30 1 0.25 0
## 2 60 1 0.25 0
## 3 120 1 0.25 0
## 4 30 2 0.25 0
## 5 60 2 0.25 0
## 6 120 2 0.25 0
The full Design object has 36 rows, pertaining to all possible combinations of the four design factors (). The remainder of the simulation code follows the same structure as the previous examples, and is presented in full in the Appendix. What is of note is that, as before, the data.frame for each design combination is simulated in the Generate() function, whereas Analyse() now conducts two
-tests and returns
-values (from the traditional test that assumes homogeneity of variances, and the Welch version of the
-test) instead of returning means and medians. Finally, Summarise() now uses the built-in EDR() function to compute and return the EDR for each statistic, instead of bias, RMSE, and RE.
After executing the simulation, we have a data.frame with our condition variables and EDRs which have been labeled welch and independent. The first 6 (of 36) rows contains the following:
## sample_size group_size_ratio standard_deviation_ratio mean_difference
## 1 30 1 0.25 0
## 2 60 1 0.25 0
## 3 120 1 0.25 0
## 4 30 2 0.25 0
## 5 60 2 0.25 0
## 6 120 2 0.25 0
## welch independent REPLICATIONS SIM_TIME
## 1 0.049 0.051 1000 0.517
## 2 0.049 0.053 1000 0.596
## 3 0.052 0.053 1000 0.640
## 4 0.047 0.180 1000 0.605
## 5 0.043 0.155 1000 0.624
## 6 0.045 0.141 1000 0.676
While we could again attempt to garner insight from simply visually inspecting this table, a better approach would be to separate the Type I error rate conditions from the power conditions, and analyze them independently. This can be accomplished using subset():
TypeI <- subset (results, mean_difference == 0 ) # m_d equal to 0
Power <- subset (results, mean_difference != 0 ) # m_d not equal to 0
Once the results are in this format, we can compute marginal (average) summaries across the simulation conditions, such as computing the average or range of the -values with
round ( apply (TypeI[, c ( ”welch”, ”independent” )], 2 , mean), 3 )
## welch independent
## 0.049 0.063
rng <- apply(TypeI[, c(”welch”,”independent”)], 2, range)
rownames (rng) <- c ( ’min’ , ’max’ )
round (rng, 3 )
## welch independent
## min 0.043 0.007
## max 0.061 0.180
Further, we can construct tables that demonstrate the interaction between the standard deviation and group size ratios by using aggregate() to average over total sample size (which generally should not be a factor when investigating Type I error rates)Footnote15:
with (TypeI, aggregate (welch,
list (standard_deviation_ratio, group_size_ratio), mean))
with (TypeI, aggregate (independent,
list (standard_deviation_ratio, group_size_ratio), mean))
After constructing these tables, a cleaned and merged version of this output yields the numeric trends found in . Note that the bolded elements represent error rates that are clearly very discrepant from the nominal .
Table 2. Simulation results comparing EDRs from the standard t-test with those conducted with the Welch correction, manipulating the standard deviation and group size ratios. Bold-faced elements highlight error rates that are clearly discrepant from the nominal α = 0.05.
More importantly, however, is the ability to visualize these results. One possible approach is to generate box-plots for the two conditions, and look for anything unusual. We use ggplot2 (Wickham Citation2009) to generate these plots because SimDesign always returns a data.frame object which, incidentally, is the type of data input that ggplot2 requires. The aes() function indicates that we want to plot the standard deviation ratio factor on the x-axis, the continuous EDR rates on the y-axis, and requests separate boxes by group size ratio using the fill argument:
library (ggplot2)
ggplot (TypeI, aes (standard_deviation_ratio, independent,
fill = group_size_ratio)) +
geom_boxplot () + ylim ( c ( 0 , .2 ))
ggplot (TypeI, aes (standard_deviation_ratio, welch,
fill = group_size_ratio)) +
geom_boxplot () + ylim ( c ( 0, .2 ))
shows the EDRs for -tests conducted with and without the Welch correction. For EDRs based on the Welch correction, it is apparent that most of the EDRs hover around the nominal
value of 0.05. On the other hand, the independent
-test demonstrates widely discrepant behavior depending on the combination of simulation factors; hence, there is an interaction effect present between the simulation design factors.
Figure 3. Type I error rate estimates for the independent sample -test, with (right) and without (left) the Welch correction. Red boxplots indicate that the group sizes were equal, while teal boxplots indicate that the second group had twice as many data points as the first group.
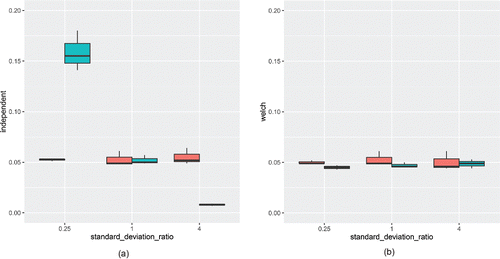
When the standard deviations were equal (center boxes in each figure), the independent -test appeared to perform well, which is not surprising because the assumption of homogeneity of variance was met. However, when the second group contained both a larger standard deviation and a larger sample size than the first group (far right teal box in the left figure), the detection rates became more conservative. The converse was true when larger standard deviations were paired with smaller sample sizes compared to the first group; in that case, detection rates became progressively more liberal. Based on these simulation results, we could conclude that the Welch test perform well in all conditions studied, whereas the independent
-test only behaves well when groups sizes are equal or the standard deviations are equal in the population.
By performing the MCS, applying summary statistics, constructing tables, and preparing graphics, students are able to see exactly what happens when the homogeneity of variance assumption is violated. They are able to gain a more nuanced and concrete understanding than the simple observation that results can become imprecise depending on sample size and standard deviation pairings. Following the presentation of this simulation, instructors could further explain why this pattern of liberal and conservative detection rates occurs by inspecting the formula for the independent -test. A similar approach to visualization and analysis can be taken with the power results, but this is left as an exercise for the reader.Footnote16
4.3. Confidence Intervals and Coverage
The final example presented in this article deals with two associated concepts: CIs and coverage. Coverage pertains to how well a proposed CI captures the intended population parameter under repeated sampling conditions. This is similar to the previous example for obtaining detection rates and is important to determine how well a given CI estimator behaves in practice. Although it is often claimed that CIs will contain the population parameter of the time under repeated sampling, this may not be true under all empirical conditions and should be evaluated using MCSs.
Using an analogous approach demonstrated in Equation (Equation6(6)
(6) ), estimates of coverage can be obtained by determining the proportion of times the population value falls within the sample-generated CI, given
. In other words, if a 95% CI is constructed in each sample, then the population parameter should fall within the respective CIs approximately 95% of the time. Intervals that are too narrow (e.g., cover less than the nominal coverage rate) are considered “liberal” because they claim to have more precise information about the location of the population parameter when in fact they do not, whereas intervals that are too wide (e.g., greater than the nominal coverage rate) are considered “conservative” and have the opposite interpretation.
For example, students are taught to use the -distribution when drawing inferences about
estimates, especially in smaller sample sizes, instead of using the more liberal
-distribution because the sample variance must be estimated as well (whereas the
-distribution treats it as known a priori). Common and related questions on this topic might be as follows: Do the
or
CIs truly capture the population mean
of the time? Are these CIs influenced by sample size? How improper would the inferences be if
were used instead of
?
To illustrate how these questions can be inspected with MCS methods, we create an MCS using three different values for the mean ( = 0, 5, and 10) and three different sample sizes (
= 10, 20, and 30). The primary values of interest are the CIs for the two distributions, which are captured in the Analyse() block, and then passed to a function that calculates the empirical coverage rate (ECR), ECR(), to compute the proportion of times the CIs contain the population estimate.Footnote17 The full code for this study is provided in the Appendix and is executed using parallel computing architecture by supplying the argument parallel = TRUE to reduce the amount of time it takes to complete the simulation. The results from this simulation are presented in .
Table 3. Simulation results comparing confidence intervals when based upon the t- and Z-distributions.
As is clear from the results in , the -distribution gives appropriate coverage rates (i.e., close to 1
or 0.95) for all conditions investigated. However, when
is used, the CI is too liberal in the smaller sample sizes, meaning that it fails to contain the population mean as often as it should because the CIs are too narrow. With a sample size of 30, however, both distributions behave reasonably well. Note that the statistical properties in this simulation demonstrate one reason why the “magic number 30” has appeared in the statistics literature as a recommendation for the minimum sample size in a given study (e.g., see Cohen Citation1990).
5. Discussion
A primary goal of this article was to demonstrate how integrating MCS-based analyses into the curricula can allow students to grapple with the realities of statistical phenomena. This foray integrates many skills and characteristics that are critical for modern data analysis: promoting curiosity, familiarity with programming, recognition of the modeling assumptions required for inferential statistics, and the ability to derive meaning from numerical results. Further, we hope that this article and the accompanying package serve as inspiration for researchers and students to explore areas that they may not understand fully in a hands-on manner.
Another goal of this article was to introduce the SimDesign package while describing the general coding framework which students, instructors, or applied researchers can use to construct their MCSs. Using SimDesign as a back-end for this discussion provides an essential support as it standardizes the format and structure of what might otherwise be a very messy and confusing jumble of code. This framework promotes clear, reproducible, and safe coding practices for both teaching and real-world MCS work. Additionally, by operating in the R environment, students and users alike are able to leverage all of the data analysis and visualization power that the software provides. Example 2 demonstrated the use of ggplot2 in this regard, but other approaches can be even more impressive. For example, it is relatively easy to create an interactive dashboard to produce dynamic plots or explore output using the shiny package (Chang et al. Citation2016), and work is currently underway on a complementary package, SimDisplay, to provide convenience functions for visualizing SimDesign results.
Due to the simplicity in the generate–analyze–summarize work-flow, this coding methodology can readily be adopted for a classroom setting. For lower-level undergraduate courses, sample simulations such as the examples described here could be incorporated into lectures, with the code provided to the students, and worked through as part of the lecture. This kind of live demonstration would bring something new and exciting to the classroom environment and, since R is freely available for all major platforms, if students are keen there is nothing to prevent them from replicating the work on their personal computers on their own time. Fortunately, however, if instructors believe that the coding aspects are too daunting for more elementary statistics courses, then they may hide the working internals of SimDesign by constructing interactive applets with packages such as shiny, thereby capitalizing on the SimDesign coding framework's flexibility while hiding the underlying details. Although we believe that teaching the coding aspect of MCSs is important to students, the package may be used for other related purposes as well, giving the instructor more flexibility to choose what is appropriate to present.
For upper-level undergraduate courses with a laboratory component, or in graduate-level classes, students could be asked to work alone or in groups to assess and present upon a statistical concept using simulation methods as a requirement of their curriculum. For example, students could be required to prepare hypotheses about specific situations that might break the assumptions of a particular statistic and then conduct a simulation to see what happens under those predefined circumstances. This form of active learning promotes both statistical and programming literacy, which are skills that will prepare students to handle the demands of graduate-level education. Acquiring these skills gives students access to an important methodology and research paradigm that can take them far. This is bolstered by having gained experience with practical tools (via R and SimDesign), the former widely used across disciplines and applications. While we firmly believe that incorporating such activities would be beneficial for almost any upper-level statistics course, no empirical work has been conducted using SimDesign to ascertain its actual effect, and this topic is ripe for future study.
A possible limitation of this approach in the classroom environment is the computing power required. While all of the simulations presented here can generally be executed within seconds, models that require iterative estimation methods will take substantially longer, and it may not be feasible to run them live. However, it is still possible to run the simulation prior to class and simply read in the results instead, thereby avoiding this issue. As well, it is important to keep in mind that as the number of conditions (both in terms of levels and quantity) expands, the number of MCS conditions to be evaluated grows exponentially. As such, we caution researchers and teachers to be careful not to choose too many factors at first, especially if some can be deemed irrelevant a priori.
5.1. The Benefits of SimDesign and General Recommendations
Due to the inherent simplicity and flexibility of the generate–analyze–summarize work-flow, SimDesign may be used for a wide variety of MCS designs often found in statistical literature. However, while flexibility is one highly desirable attribute, several other features should be considered as well to ensure that the MCS coding environment is safe, friendly, and rich with optional features that more advanced users may desire. One such feature provided by the package is runSimulation's argument edit, which by default is set to ”none”. This parameter can be used to step into a simulation as it runs, by using ”generate”, ”analyse”, or ”summarise”, which initiates R's debugging environment within the desired step of the simulation. During such a session, users can see exactly what is in the current working environment (e.g., to see variables have been created and what they look like), and step through the code line-by-line, which is very useful for debugging purposes (see Wickham Citation2014, Chap. 9).
Further, it is desirable to allow for the saving/resuming of temporary simulation states in case of power-outages or crashes, to automatically redraw data if a particular run of an analysis fails,Footnote18 to produce output files that save the simulation results, to make efficient use of RAM (e.g., discarding data objects, avoiding large empty storage objects), and to allow for parallel computation support (which distributes the stress of running the simulation across multiple CPU cores and decreases the amount of time it takes for a simulation to complete). SimDesign addresses these and many other features by passing additional commands either to the runSimulation() function or by using other functions available in the package (e.g., aggregate_simulations()).Footnote19 Hence, in addition to serving as a useful didactic tool for in-class settings, SimDesign readily generalizes to real-world MCS work and provides researchers with a platform for conducting replicable, well-organized, and publishable results.
When initially preparing MCSs for whatever the intended purpose, we recommend to (1) begin with a small number of replications and conditions to ensure that the code runs correctly, and increase these values only when the majority of the bugs have been worked out; (2) always document strange aspects of your simulation or code that you are likely to forget; and (3) save the state of your simulation in case of power failure or other mechanical failures. Fortunately, if you are using SimDesign, these steps can be accomplished by supplying a design object with fewer rows and using a smaller replications, by passing the argument save = TRUE or save_results = TRUE to runSimulation(), and by using the edit argument for native debugging within a desired function, respectively. Finally, further demonstrations, learning material, and examples using the SimDesign package are located on the associated Github wiki.Footnote20
5.2. Monte Carlo Simulations in the Wild
In addition to being a useful didactic and education tool, familiarity with designing MCSs is an extremely valuable skill to have for modern-day research. MCS is a fundamental cornerstone for work in applied statistics fields, such as quantitative psychology and sociology, medical science, political science, and economics (Zickar Citation2005). It can be used to address many complex and interesting problems, and is routinely applied in forefront research published in the best statistical journals—especially when new methods or estimators are proposed and compared. Beyond the above examples, MCSs have allowed researchers to do the following tasks:
evaluate the performance or characteristics of various statistical estimators (e.g., Schönbrodt and Perugini Citation2013; Chalmers and Flora Citation2014; Chalmers Citation2015; Kenny, Kaniskan, and McCoach Citation2015);
investigate the performance of a statistic under various assumption violations (e.g., Arnau et al. Citation2013), particularly to study coverage and the robustness of different estimators (e.g., Sass et al. Citation2014; Tofighi and MacKinnon Citation2016; Chalmers, Pek, and Liu Citationsubmitted);
generate data from a variety of sampling distributions (e.g., Arnholt Citation1999);
determine power or Type I error rates for various designs (e.g., Ramsey and Ramsey Citation2009; Chalmers, Counsell, and Flora Citation2016);
simulate “realistic” data to address hard to sample phenomena (e.g., Goldman and McKenzie Citation2009; Sayegh et al. Citation2010; Noland, Klein, and Tulach Citation2013);
determine the behavior of model fit statistics in complex multivariate systems of equations (e.g., Heene et al. Citation2012; Bollen et al. Citation2014).
This list is obviously not exhaustive, but showcases the breadth of topics that MCSs can address.
MCS research provides a rich source of tools for students and researchers to utilize, has the additional benefit of not requiring ethics approval, and is limited only in terms of the user's imagination and computing power. Overall, we believe that teaching students how to effectively construct MCSs is an extremely fruitful exercise to bring into the classroom, and can imagine soliciting students to prepare MCS-based analyses as part of the lab component in upper undergraduate and graduate-level coursework. We believe that computer-driven tools such as these can not only can improve one's inherent understanding of statistical methodology, but also help students grow into competent, effective, and knowledgeable researchers and instructors.
Appendix A: Example 1 Using a For-Loop Paradigm
The following contains code for Example 1 written with the for-loop paradigm instead of the generate–analyze–summarize tools from SimDesign. Note that this is just one example approach because many other ways are possible with the for-loop strategy. Incidentally, the fact that there are a number of other ways to write this MCS is the exact problem with general-purpose programming languages for MCSs; there is often too much freedom regarding how to approach the task. Because of the extreme flexibility of general-purpose programming languages, it is easy and quite common for novice statistical programmers to write inefficient, error-prone, and difficult to extend and comprehend script files.
R <- 1000
N <- c ( 30 , 60 , 120 )
dist <- c ( ’norm’ , ’chi’ )
res <- matrix ( 0 , R, 3 )
colnames (res) <- N
reslist <- vector ( ’list’ , 2 )
names (reslist) <- dist
reslist2 <- vector ( ’list’ , 3 )
names (reslist2) <- c ( ’mean’ , ’trim.2’ , ’median’ )
for (i in 1 : 3 ) reslist2[[i]] <- res
for (i in 1 : 2 ) reslist[[i]] <- reslist2
for (n in N){ for (d in dist){ for (r in 1 : R){ if (d == ’norm’ ){ dat <- rnorm ( n = n, mean = 3 ) } else if (d == ’chi’ ){ dat <- rchisq ( n = n, df = 3 ) } cn <- as.character (n) reslist[[d]][[ ’mean’ ]][r, cn] <- mean (dat) reslist[[d]][[ ’trim.2’ ]][r, cn] <- mean (dat, trim = .2 ) reslist[[d]][[ ’median’ ]][r, cn] <- median (dat) } } }
bias <- lapply (reslist, function ( x ) lapply (x, function ( y ) colMeans (y) - 3 ))
RMSE <- lapply (reslist, function ( x )
lapply (x, function ( y ) sqrt ( colMeans ((y - 3 ) ^ 2 ))))
ref <- RMSE $ norm $ mean
RE <- lapply (RMSE, function ( x ) lapply (x, function ( y ) y ^ 2 / ref ^ 2 ))
Appendix B: Full Simulation Code for Example 2
The following is the full simulation script for Example 2, pertaining to the study of Type I error and power rates for the independent groups -test under violations of homogeneity of variance.
library (SimDesign)
# SimFunctions()
Design <- expand.grid ( sample_size = c ( 30 , 60 , 120 ),
group_size_ratio = c ( 1 , 2 ),
standard_deviation_ratio = c ( 1 / 4 , 1 , 4 ),
mean_difference = c ( 0 , 0.5 ))
head (Design)
#- - - - - - - - - - - - - - - - - - - - - - - - - - - - - - - - - - - - - - - - - - - - - - - - - - - - - - - -
Generate <- function ( condition , fixed_objects = NULL ){
# Attach() makes the variables in condition directly accesible
Attach (condition)
N1 <- sample_size / (group_size_ratio + 1 )
N2 <- sample_size - N1
group1 <- rnorm (N1)
group2 <- rnorm (N2, mean =mean_difference,
sd =standard_deviation_ratio)
dat <- data.frame (group = c ( rep ( ’g1’ , N1), rep ( ’g2’ , N2)),
DV = c (group1, group2))
dat
}
Analyse <- function ( condition , dat , fixed_objects = NULL ){
welch <- t.test (DV ~ group, dat)
ind <- t.test (DV ~ group, dat, var.equal = TRUE )
ret <- c ( welch =welch $ p.value, independent =ind $ p.value)
ret
}
Summarise <- function ( condition , results , fixed_objects = NULL ){
ret <- EDR (results, alpha = .05 )
ret
}
#- - - - - - - - - - - - - - - - - - - - - - - - - - - - - - - - - - - - - - - - - - - - - - - - - - - - - - - -
results <- runSimulation ( design = Design,
replications = 1000 ,
parallel = TRUE ,
generate = Generate,
analyse = Analyse,
summarise = Summarise)
head (results)
TypeI <- subset (results, mean_difference == 0 )
Power <- subset (results, mean_difference != 0 )
print (TypeI, reps = FALSE , time = FALSE )
library (ggplot2)
ggplot (TypeI, aes (standard_deviation_ratio, welch,
fill = group_size_ratio)) +
geom_boxplot () + ylim ( c ( 0 , .2 ))
ggplot (TypeI, aes (standard_deviation_ratio, independent,
fill = group_size_ratio)) +
geom_boxplot () + ylim ( c ( 0 , .2 ))
Appendix C: Full Simulation Code for Example 3
The following is the full simulation script for Example Equation3(3)
(3) , pertaining to the study of coverage and CIs. Note that while R's function for conducting
-tests, t.test(), returns the CI, there is no base function that works similarly for
. As such, we have created our own function z.CI() below, which captures and returns the CI for us.
library (SimDesign)
z.CI <- function ( dat , alpha = .05 ){
xbar <- mean (dat)
SE <- sd (dat) / sqrt ( length (dat))
z <- abs ( qnorm (alpha / 2 ))
CI <- c (xbar - z * SE, xbar + z * SE)
CI
}
Design <- expand.grid ( mu = c ( 0 , 5 , 10 ),
sample_size = c ( 10 , 20 , 30 ))
#- - - - - - - - - - - - - - - - - - - - - - - - - - - - - - - - - - - - - - - - - - - - - - - - - - - - -
Generate <- function ( condition , fixed_objects = NULL ) {
dat <- with (condition, rnorm (sample_size, mu))
dat
}
Analyse <- function ( condition , dat , fixed_objects = NULL ) {
t_test <- t.test (dat)
t_CI <- t_test $ conf.int
z_CI <- z.CI (dat)
ret <- c ( t_CI = ECR (t_CI, parameter = condition $ mu),
z_CI = ECR (z_CI, parameter = condition $ mu))
ret
}
Summarise <- function ( condition , results , fixed_objects = NULL ) {
ret <- apply (results, 2 , mean)
ret
}
# - - - - - - - - - - - - - - - - - - - - - - - - - - - - - - - - - - - - - - - - - - - - - - - - - - - - - - -
results <- runSimulation (Design, replications = 10000 , parallel = TRUE ,
generate =Generate, analyse =Analyse,
summarise =Summarise, edit = ’none’ )
print (results, reps = FALSE , time = FALSE )
Notes
1. As a refresher, the CLT is typically taught as follows: “For any population with mean and standard deviation
, the distribution of sample means for sample size n will have a mean of
and a standard deviation of
and will approach a normal distribution as n approaches infinity.” (Gravetter and Wallnau Citation2012, p. 205).
2. See Wickham (Citation2014) and Matloff (Citation2011) for introductions to programming in R, and Fox and Weisberg (Citation2010) and Teetor (Citation2011) to learn about conducting basic statistical analyses. While it does not use the functions presented in this article, for a detailed introduction to programming simulation studies in R, see Jones, Maillardet, and Robinson (Citation2009).
3. When calling apply(), the second argument refers to the margin to apply the function to. Passing a 1 here indicates that the function should be applied to each row, while a 2 pertains to each column.
4. As a reminder, the italicized R in and the remainder of the text refers to the number of replications in the current study.
5. If one is starting a new simulation, an alternative method to set-up the project is to use the convenience function, SimFunctions(’my-simulation’), with a desired simulation name placed within the quotations. Once this has been run in the R console, two Rscript files will be automatically generated (one for the design and execution elements, and the other for the generate, analyze, and summarize functions) and placed in the current working directory.
6. A data.frame is analogous to a matrix with information stored in and referenced to by rows and columns. However, in R, matrices have the restriction that every cell must be the same data type (e.g., numeric); data.frame objects do not have this property, so the first column may be numeric and the second text, for example. They are most often used to store rectangular datasets, with each row pertaining to a case and each column a variable.
7. The creation of a Design object with more than one factor using expand.grid() will be demonstrated in a subsequent example.
8. An optional argument fixed_objects is also present, which passes an object (usually a list) that contains additional user-defined objects that should remain fixed across conditions. However, this is not commonly used, and is not employed in any of the following examples. For further details regarding this input, please refer to the help file by running ?runSimulation.
9. See the probability distributions task view on CRAN at https://cran.r-project.org/web/views/Distributions.html.
10. Alternatively, it is possible to use the built-in Attach() function in SimDesign to allow all variables in the condition object to be accessed directly. However, this approach is a matter of preference, and is therefore not demonstrated in the in-text examples.
11. If the vector is not named, then SimDesign will report an error in the console stating that the results are ambiguous. These are the types of built-in safety features that we believe are of paramount importance in developing good MCS coding practices for students and researchers alike.
12. It is important to note that to make a simulation exactly reproducible, one can include a vector of seeds to the seed argument in runSimulation() or by saving the internal .Random.seed states to external text files by passing save_seeds = TRUE.
13. The resulting data.frame object was converted to a LaTeX table using the xtable package.
14. It is easy to verify this equation of bias from the definition . However, bias is presented in this form to show the connection to RMSE.
15. An alternate approach for calculating these summary statistics is to use the more elegant functions provided in the plyr, dplyr, or data.table packages.
16. As well, comparing power rates becomes more difficult when Type I error rates do not perform optimally. Therefore, power rates generally cannot be interpreted independent of their respective Type I error rates when the -values are deemed too liberal or conservative.
17. It is often easier to use ECR()on individual samples, and to return a value of 1 or 0 which indicates whether the population parameter was contained in the CI or not. Then, in the summarise function, the mean of these 1's and 0's can be found to represent the estimated ECR. However, ECR()can also be used directly in the summarise step given the obtained CIs. It is simply a matter of preference regarding how the user wants these values to be organized.
18. This is usual for simulations involving iterative methods, such as those using maximum-likelihood estimation. In these situations, nonconvergent models are common, especially when testing smaller sample sizes, and it is important to resample the required datasets to maintain an equivalent number of simulations across design cells. In these cases, one should report not only the simulations that converged to a proper solution, but also how many models failed to converge.
19. It should be noted that there are other packages available for conducting MCSs, both inside and outside of R. However, SimDesign is the only available package that explicitly features the Generate–Analyze–Summarize foundation, as well as previously mentioned convenience features. Further, this package can be used to assess any statistical phenomena, while other options (such as online applets) are almost necessarily hardcoded to only show a particular finding.
References
- Arnau, J., Bendayan, R., Blanca, M. J., and Bono, R. (2013), “The Effects of Skewness and Kurtosis on the Robustness of Linear Mixed Models,” Behavioural Research, 45, 873–879.
- Arnholt, A. T. (1999), “Simulating Sampling Distributions,” Teaching Statistics, 21, 14–16.
- Bollen, K. A., Harden, J. J., Ray, S., and Zavisca, J. (2014), “BIC and Alternative Bayesian Information Criteria in the Selection of Structural Equation Models,” Structural Equation Modeling, 21, 1–19.
- Braun, J. W., White, B. J., and Craig, G. (2014), “R Tricks for Kids,” Teaching Statistics, 36, 7–12.
- Chalmers, R. P. (2015), “Extended Mixed-Effects Item Response Models With the MH-RM Algorithm,” Journal of Educational Measurement, 52, 200–222.
- ——— (2016), SimDesign: Structure for Organizing Monte Carlo Simulation Designs, R package version 1.1.
- Chalmers, R. P., Counsell, A., and Flora, D. B. (2016), “It Might Not Make a Big DIF: Improved Differential Test Functioning Statistics That Account for Sampling Variability,” Educational and Psychological Measurement, 76, 114–140.
- Chalmers, R. P., and Flora, D. B. (2014), “Maximum-Likelihood Estimation of Noncompensatory IRT Models With the MH-RM Algorithm,” Applied Psychological Measurement, 38, 339–358.
- Chalmers, R. P., Pek, J., and Liu, Y. (submitted), “Profile-Likelihood Confidence Intervals in Item Response Theory Models,” Multivariate Behavioral Research.
- Chang, W., Cheng, J., Allaire, J., Xie, Y., and McPherson, J. (2016), shiny: Web Application Framework for R, R package version 0.13.2.
- Cohen, J. (1990), “Things I Have Learned (so Far),” American Psychologist, 45, 1304–1312.
- Diez, D. D., Barr, C. D., and Cetinkaya-Rundel, M. (2014), Introductory Statistics With Randomization and Simulation (1st ed.), OpenIntro Publishing.
- Everton, T. (1984), “Probalistic Simulation in the Classroom,” Teaching Statistics, 6, 2–5.
- Fox, J., and Weisberg, H. S. (2010), An R companion to Applied Regression (2nd ed.), Thousand Oaks, CA: Sage Publications.
- Garfield, J. (1995), “How Students Learn Statistics,” International Statistical Review, 63, 25–34.
- Garfield, J., and Ben-Zvi, D. (2007), “How Students Learn Statistics Revisited: A Current Review of Research on Teaching and Learning Statistics,” International Statistical Review, 75, 372–396.
- Gelman, A., and Nolan, D. (2002), Teaching Statistics: A Bag of Tricks (1st ed.), New York, NY: Oxford University Press.
- Goldman, R. N., and McKenzie, J. D. J. (2009), “Creating Realistic Data Sets With Specified Properties via Simulation,” Teaching Statistics, 31, 7–11.
- Gravetter, F. J., and Wallnau, L. B. (2012), Statistics for the Behavioral Sciences (9th ed.), Belmont, CA: Wadsworth/Cengage Learning.
- Hagtvedt, R., Jones, G. T., and Jones, K. (2007), “Pedagogical Simulation of Sampling Distributions and the Central Limit Theorem,” Teaching Statistics, 29, 94–97.
- Hagtvedt, R., Jones, G. T., and Jones, K. (2008), “Teaching Confidence Intervals Using Simulation,” Teaching Statistics, 30, 53–56.
- Heene, M., Hilbert, S., Freudenthaler, H. H., and Bühner, M. (2012), “Sensitivity of SEM Fit Indexes With Respect to Violations of Uncorrelated Errors,” Structural Equation Modeling, 19, 36–50.
- Hodgson, T., and Burke, M. (2000), “On Simulation and the Teaching of Statistics,” Teaching Statistics, 22, 91–96.
- Jones, O., Maillardet, R., and Robinson, A. (2009), Scientific Programming and Simulation Using R, Boca Raton, FL: Chapman and Hall/CRC.
- Kenny, D. A., Kaniskan, B., and McCoach, D. B. (2015), “The Performance of RMSEA in Models With Small Degrees of Freedom,” Sociological Methods & Research, 44, 486–507.
- Lane, D. M. (2015), “Simulations of the Sampling Distribution of the Mean Do Not Necessarily Mislead and Can Facilitate Learning,” Journal of Statistics Education, 23, 1–7.
- Matloff, N. (2011), The Art of R Programming: A Tour of Statistical Software Design, San Francisco, CA: No Starch Press.
- Mills, J. D. (2002), “Using Computer Simulation Methods to Teach Statistics: A Review of the Literature,” Journal of Statistics Education, 10, 1–21.
- Mooney, C. Z. (1997), Monte Carlo Simulations, Thousand Oaks, CA: Sage.
- Noland, R. B., Klein, N. J., and Tulach, N. K. (2013), “Do Lower Income Areas Have More Pedestrian Casualties?” Accident Analysis and Prevention, 59, 377–345.
- Paxton, P., Curran, P., Bollen, K. A., Kirby, J., and Chen, F. (2001), “Monte Carlo Experiments: Design and Implementation,” Structural Equation Modeling, 8, 287–312.
- R Core Team (2016), R: A Language and Environment for Statistical Computing, Vienna, Austria: R Foundation for Statistical Computing.
- Raffle, H., and Brooks, G. P. (2005), “Using Monte Carlo Software to Teach Abstract Statistical Concepts: A Case Study,” Teaching of Psychology, 32, 193–195.
- Ramsey, P. H., and Ramsey, P. P. (2009), “Power and Type I Errors for Pairwise Comparisons of Means in the Unequal Variances Case,” British Journal of Mathematical and Statistical Psychology, 62, 263–281.
- Ross, S. M. (2013), Simulation (5th ed.), San Diego, CA: Academic Press.
- Sass, D. A., Schmitt, T. A., and Marsh, H. W. (2014), “Evaluating Model Fit With Ordered Categorical Data Within a Measurement Invariance Framework: A Comparison of Estimators,” Structural Equation Modeling, 21, 167–180.
- Sayegh, M. A., Castrucci, B. C., Lewis, K., and Hobbs-Lopez, A. (2010), “Teen Pregnancy in Texas: 2005 to 2015,” Maternal and Child Health Journal, 14, 94–101.
- Schönbrodt, F. D., and Perugini, M. (2013), “At What Sample Size do Correlations Stabilize?” Journal of Research in Personality, 47, 609–612.
- Teetor, P. (2011), R cookbook, Sebastopol, CA: O’Reilly Media.
- Tofighi, D., and MacKinnon, D. P. (2016), “Monte Carlo Confidence Intervals for Complex Functions of Indirect Effects,” Structural Equation Modeling, 23, 194–205.
- Welch, B. L. (1947), “The Generalization of ‘Student's’ Problem When Several Different Population Variances are Involved,” Biometrika, 34, 28–35.
- Wickham, H. (2009), ggplot2: Elegant Graphics for Data Analysis (2nd ed.), New York, NY: Springer.
- Wickham, H. (2014), Advanced R, Boca Raton, FL: Chapman and Hall/CRC.
- Wood, M. (2005), “The Role of Simulation Approaches in Statistics,” Journal of Statistics Education, 13, 1–11.
- Zickar, M. J. (2005), The Psychology Research Handbook: A Guide for Graduate Students and Research Assistants (2nd ed.), chapter Computational Modeling. Thousand Oaks, CA: Sage Publications.