
Abstract
Over the years macroautophagy (hereafter autophagy) has been depicted artistically through painting, music, dance, videos, and poetry. A unifying idea behind these different aesthetic approaches is that people learn in different ways. Thus, some learners may be engaged by a detailed, but static, painting, whereas others may find insight through the dynamic visualization provided by a dance. While each of these formats has advantages, they also have a common weakness—whether delivered through watercolor on a canvas, words on a paper, or movement captured in a video, they are all 2-dimensional. Yet, some people are tactile learners. In this paper, a quilter describes a project she created with the goal of demonstrating autophagy using a 3-dimensional approach, in which different fiber textures could be used to elaborate certain parts of the process.
Introduction
Autophagy, artophagy, quiltophagy. At first it is tempting to think that depicting autophagy as a quilt would be straightforward. In starting to actually work on the project, however, several problems immediately come to the forefront. For example, just which fabric can be used to illustrate the cytoplasm (let alone a phagophore)? What colors are the most appropriate? Are particular textures better than others? Let's back up a bit and consider how this began.
Several months ago Dan Klionsky asked if I would design a fabric representation of autophagy. He knows of my quilting work and has seen some of my pieces, including those I have made for the Western North Carolina Quilters Guild annual challenge project. That particular project involves creating a quilt based on a designated theme as well as using some of a preselected challenge fabric (for example, a piece of fabric with an unusual color or pattern). It was perhaps this experience with the challenge project that suggested I might be a good candidate for yet another designated theme—autophagy.
When Dan made this request, I did, indeed, feel challenged. I doubted my ability to design, create, and complete a quilt that would meet his (and my) expectations. But he was most encouraging. Dan showed me a few 8½ × 11 inch prints of an artist's rendition of cells,Citation1 all greatly enlarged. These artistic renderings had been embellished with bright colors.
Dan and I discussed the possibility of this project when we met in Ann Arbor. He introduced me to the cell structure, its components, and the process of auto-phagy. His explanations were excellent; however, with my limited science background (high school biology, decades ago), it was difficult initially for me to gain a clear understanding of it. But he was very patient, and gradually I began to comprehend and formulate ideas for how to depict this process using fabrics and a variety of sewing techniques.
Results and Discussion
The basic goal was to create a quilt that represented the process of macroauto-phagy. Thus, although many people have seen quilts, it is important to understand the definition of a quilt. Essentially, a quilt is a bed covering or wall hanging comprised of 3 pieces: a top that is generally decorative (pieced or appliqued); a middle batting that provides warmth and texture; and a backing. These layers are sewn together—either by hand or machine; the quilting stitches may be done with a particular design or pattern to enhance the appearance, but this is not strictly necessary.
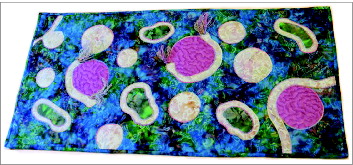
Part of the reason for producing “Quiltophagy” () was to generate a 3-dimensional object that would enhance the ability of nonscientists to grasp the basic concept of the process of macroautophagy. It is not simple to objectively determine the ultimate success of the project in terms of these learning goals. However, there is no question that both scientist and quilter learned as we were forced to consider the best way to depict an intracellular process through a textile medium.
Figure 1. Quiltophagy.
The autophagy quilt challenge proved enjoyable; I needed to think more creatively, decide how to use fabrics to interpret/explain the autophagy process, and attempt a few different techniques. I also learned about autophagy, a term that I wonder if even existed in 1950 when I took biology.
If I were to make a similar project, I would use mostly the same materials and follow many of the same steps. However, I would applique either by hand or machine, instead of using fusible webbing. Additionally, it might be better to avoid a linear shape (square/rectangle). A circular shape—not necessarily a precise circle but a free form shape with curving lines—might be more appropriate to represent a cell with its components. Now, when I think about the autophagy process, it might have been more accurate if I had placed the open-ended membranes on the middle-sized vesicles to indicate that these were still expanding phagophores; the largest membranes would then be shown completely encircling the cytoplasm to depict nonselective autophagy.
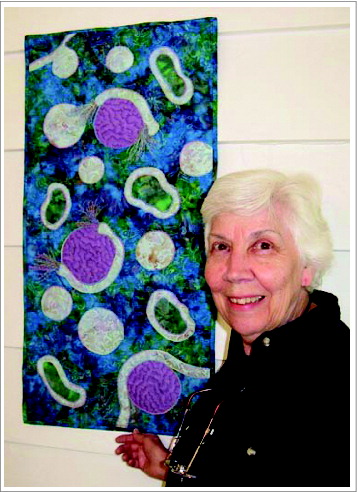
Lately we have been reading and hearing more about the importance of exercising one's brain. There is no question that this project was stimulating and helped stretch my brain (). Clearly, this piece can be characterized as an example of macroquiltophagy—the possibility is still open for the first example of microquiltophagy (perhaps embroidery?).
Figure 2. The quilter, Barbara M. Crumrine, displaying the final quilt as a wall hanging.
Materials and Methods
Pattern design and fabric selection
After arriving back in North Carolina following my meeting with Dan, I looked frequently at the prints he gave me while thinking of ideas regarding how to proceed. Because I did not want to be overly influenced by the colors, I made slightly enlarged, black and white copies of the illustrations.
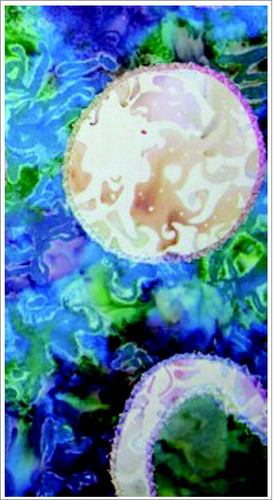
The next step was to identify and purchase appropriate 100% cotton fabrics. I thought that having the right fabrics would stimulate the design process and urge me on. The first one I bought was for the background. It had to indicate movement—a busy design, with a fluid-like appearance to represent the cytosol. When I saw a fairly dark, primarily blue/turquoise batik fabric (Beginnings Quilt Shop, Hendersonville, NC) with a variety of other colors and an indistinct pattern of small, irregular, mostly curving lines (), I thought it would be perfect. I decided 2 yards would be enough for this project, although at this point I did not have a concrete plan/idea as to size or shape.
Figure 3. Background fabric depicting the cytosol, shown here with single- and double-membrane vesicles on top.
When I studied the prints, looked at the vast array of fabrics, and thought about the autophagy process, I decided to use a variety of shapes, with different sizes and colors, to represent the various components within the cell. Fabric-wise, I thought 3 additional colors/designs would be effective. A multitoned, medium green fabric, also a batik, blended well with the background fabric, yet still offered a distinct contrast—a more serene design, yet indicative of movement or change. Since this would be used only for the middle-sized components, I bought a fat quarter of the fabric.
(For those of you who are not quilters, I will clarify. Four fat quarters are created when a yard of fabric, generally 42 to 44 inches wide, is cut in half, both vertically and horizontally, with each quarter measuring 18 inches by approximately 22 inches. Of course, a quarter yard can also be cut with dimensions of 9 × 42 to 44 inches. Quilters sometimes prefer fat quarters; this may depend on the pattern and required pieces [sizes/shapes] to be cut.)
Next I needed to find a lighter-toned fabric, with more muted colors, but not solid or plain—some kind of design to represent the activity taking place within the cell. However, the design could be neither recognizable nor representational. In other words, no well-defined flowers, bicycles, musical notes, etc. Again I found a batik, with subtle designs, some movement, and softer colors. This would work for the smaller, circular shapes—the beginning of the vesicle transformation. This could also be used to represent the membranes around both the middle-sized and larger components.
Finding a fourth fabric to represent the larger vesicles seemed difficult. It needed to work with the other fabrics, but be distinctive in its own way. It would represent a later stage in the autophagy process. I remembered a fat quarter in my collection of fabric, which I thought would work well: it offered a repetitive, subdued design, and its medium purple color was similar to that in the background fabric. I now had the required materials, including batting and threads, which would enable me to start my project. The quilt design essentially evolved as it went along, with no precise pattern at this stage. I was “experimenting”—with fabrics, shapes, colors, sizes, techniques—while attempting to reach the end goal of illustrating autophagy. It continued to be a gradual, flexible process, although I was beginning to visualize it slightly.
Fabric preparation
Quilters generally pre-wash their fabrics, prior to cutting. This is done to remove sizing (typically a substance added to the yarn to increase its strength during production of the fabric) and chemicals from dyes used in the manufacturing process. Darker colors sometimes “bleed” or run when washed (reds especially can be problematic). When making quilts that will be laundered, this step is especially important. For wall quilts, which are unlikely to be washed, it may not be done. Since my amounts of fabric were quite small, I handwashed them, although machine washing is acceptable. Another reason for washing is that some fabrics will shrink. When a quilt has many different fabrics with pieces of different sizes and shapes, it is best for shrinkage to occur before the fabrics are cut and pieced (sewn) together.
The next step is pressing the fabric, while not stretching it. Threads parallel to the selvages (the finished edge of the fabric that keeps it from unraveling) are most stable; threads perpendicular to the selvages have more “give” to them. This is because of the way the threads were placed on the loom during manufacturing. Fabric stretches most easily on the diagonal. Consideration of these qualities is also necessary when cutting the pieces, especially triangles.
Pattern templates
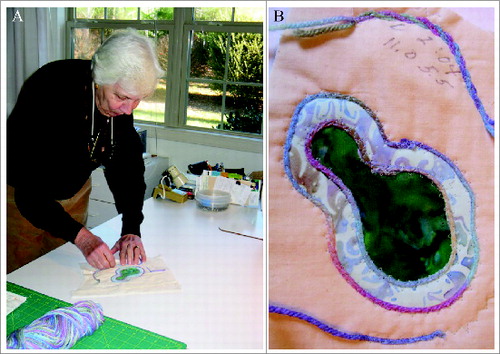
Because I was not working from a commercial pattern, it was necessary to make templates. The illustrated prints that Dan had given me enabled the cutting of patterns representing autophagy. Although template plastic is sold in quilt shops, I used medium-weight cardboard, since this was a one-time project. I cut a variety of shapes in different sizes (OLFA, rotary cutter and mat). I also simply cut some free form, using no pattern. As I worked, my background fabric was on my table, so I could "play" with these representational shapes. This was an ongoing part of the assembly. Eventually, I determined the best arrangement to depict autophagy (). Able now to visualize the project more clearly, I decided on the size, approximately 18 × 30 inches. I also realized there would be no right way for it to be displayed; it could be hung vertically or horizontally, with no precise top or bottom, again representative of cells.
Figure 4. Assembly of a test pattern. (A) The artist in her sewing room assembling the pattern; yarn is shown on the bottom left of the sewing table. (B) The assembled test pattern.
Assembly
Now I was beginning to consider assembly techniques. The shapes representing components within the cell would be appliquéd to the background fabric; for many years this was done by hand or machine. Now quilters have another option by using a product called fusible webbing (805 Wonder-Under), available in sewing/quilting shops. This choice appealed to me.
My idea was to surround each of the medium-sized green vesicles with a band or ring of the lightest fabric to represent the membrane that encloses each of them (). The membranes on the larger-sized, purple components would only partly encircle them, an attempt to show the progressive stages in autophagy. To do this, I cut a larger piece of the lightest fabric for each of the components following the basic shape plus allowing for an outer band of the lightest color to indicate the exterior membrane. I would use the above-mentioned product, fusible webbing, to adhere the layers together. The fusing occurs when heat (using an iron; Black & Decker, Digital Advantage) and moisture are applied. I had only used this webbing one other time, to apply designs on heavier, sweatshirt fabric, so this was a bit of a learning process for me. It worked quite well, although the product did stiffen the fabrics slightly. This project involved 2 fusions, first to adhere the designs to the membrane fabric, and second, to adhere these to the background. The smallest components were fused directly to the background fabric, because I added no external membranes to them.
Figure 5. An intermediate stage showing (A) assembly of the autophagic components, and (B) a higher magnification demonstrating the couched stitch surrounding the membranes.
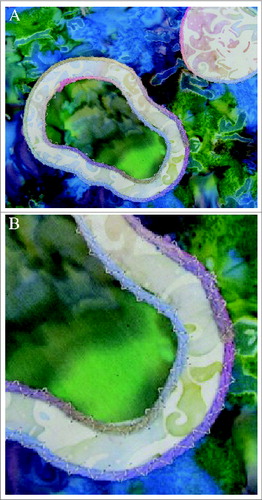
Now my quilt top was ready to become a “sandwich” with batting in the middle and backing fabric. I used a cotton batting (The Warm Company, Warm & Natural cotton batting) and the same blue/turquoise fabric for the quilt back as that which I used for the front background. Next, I pin-basted the layers together, using small safety pins, avoiding the fused appliques.
Quilting
My next consideration was how to quilt the fabric. It was not a large project, but it needed some stitching/quilting. My thoughts again went to the membranes surrounding the components. I decided to outline them by couching yarn around each of the vesicles. Couching is an embroidery technique in which yarn is positioned on a fabric and stitched into place. To do this, I used the zigzag stitch on my sewing machine (Husqvarna Viking, Sapphire 830) with variegated thread (Gutermann, 100% cotton). On components having a border of the “membrane” fabric, I couched yarn on both the interior and exterior edges (). As I considered yarn color, luck was with me. I happened to remember a skein of yarn in my inventory; it was perfect because of its variegated colors, all similar to those in the project. I held the yarn in position, while my sewing machine zigzagged back and forth across it, thus stitching it in place. As I had not done this before, I practiced the technique prior to working on the quilt. I cut shapes from scraps of fabric, fused a few pieces together, and layered them with batting and backing. These became my “test” samples for practicing the couching method of adhering yarn to other materials.
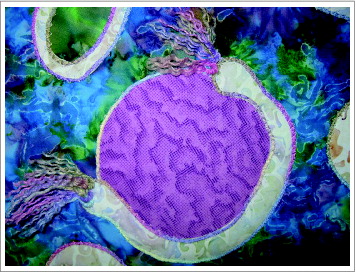
I also wanted yarn placed around the largest components, the purple ones (representing a Cvt complexCitation2), to further indicate the incomplete membranes (i.e., the phagophores), which only partially encircled the vesicles. To depict this, I separated the yarn into its individual strands, cut short pieces approximately 2 inches long, bundled them together, and sewed them onto the ends of each of these membranes (). This became my attempt to emphasize or depict them “reaching out” to complete the membrane, and to indicate the presence of associated proteins (e.g., SNAREs) at the growing edge of the phagophore.Citation3
Figure 6. Detail depicting the growing ends of the phagophore.
Binding
Finally, my project was ready for binding around the edges. For this I cut 2½ inch-wide strips of the fabric used for both the background and backing. The ends of these strips were stitched together (Coats & Clark, cotton-covered polyester thread) until they were long enough to go around the 4 sides of the quilt, with enough extra to accommodate the corners plus finishing it neatly where the 2 ends met. The lengthwise edges of the strip were then lined up evenly, wrong sides together, and pressed; the width was now 1¼ inches. Next I stitched the raw edges of the binding strip to the edges of the front of the quilt. This step was followed by turning the folded edge of the binding to the back where I then hemmed it by hand, thus encasing the 3 layers. The remaining step was to sew a fabric sleeve to the back of the quilt, enabling it to be displayed.
References
- Goodsell DS, Klionsky DJ. Artophagy: the art of auto-phagy–the Cvt pathway. Autophagy 2010; 6:3-6; PMID:20023390; http://dx.doi.org/10.4161/auto.6.1.10812
- Baba M, Osumi M, Scott SV, Klionsky DJ, Ohsumi Y. Two distinct pathways for targeting proteins from the cytoplasm to the vacuole/lysosome. J Cell Biol 1997; 139:1687-95; PMID:9412464; http://dx.doi.org/10.1083/jcb.139.7.1687
- Nair U, Jotwani A, Geng J, Gammoh N, Richerson D, Yen W-L, Griffith J, Nag S, Wang K, Moss T, et al. SNARE proteins are required for macroautophagy. Cell 2011; 146:290-302; PMID:21784249; http://dx.doi.org/10.1016/j.cell.2011.06.022