
ABSTRACT:
The equine veterinary nurse plays a crucial role in the purchase, maintenance, sterilisation and set-up of arthroscopic equipment and instrumentation. This three-part review will cover all of these aspects, and aims to serve as a practical resource for the equine surgical nurse. In Part 1, we will provide a brief introduction to the equipment and instrumentation required for arthroscopic surgery in horses.
Introduction
Arthroscopy, bursoscopy or tenoscopy is the investigation of a joint, bursa or tendon sheath, respectively, using a minimally-invasive technique (McIlwraith et al., Citation2015). These procedures involve the insertion of a rigid scope and specialised instruments into the synovial structure, using the principle of triangulation, via small incisions or ‘portals’, to diagnose and treat conditions of the joint, bursa or tendon sheath (McIlwraith et al., Citation2015). For the purpose of simplicity, these procedures will be collectively referred to as ‘arthroscopy’, as the majority of procedures and instrumentation are largely the same for each technique. Minimally invasive techniques offer a variety of advantages, including reduced soft tissue damage, post-operative pain and shortened post-operative recovery times (Martens et al., Citation2019). For these reasons, arthroscopy is now considered to be the ‘gold standard’ technique for the majority of articular surgeries, as well as the most commonly-performed minimally-invasive surgery amongst large animal surgeons worldwide (Martens et al., Citation2019). Despite the clear advantages of such minimally-invasive techniques, several disadvantages also exist, such as the requirement for, and cost of, specialised equipment (Martens et al., Citation2019). With such specialised equipment also comes the requirement for specialised training and expertise, not only for the surgeons, but also for the support staff, namely the equine surgical nurse, as well as nursing students.
The equine nurse plays an essential role in the purchase, maintenance, sterilisation and set-up of such specialised equipment. Despite being such a widely-employed technique in equine veterinary hospitals worldwide, there is a surprising scarcity of resources available to the equine nurse in this field, making these tasks even more daunting for the inexperienced. This is particularly apparent for newly-graduated veterinary nurses entering into equine practice, who are widely-assumed to have the necessary knowledge and expertise in this specialised area as a day-one ‘core’ competency. Much of the skills required for this role are gained through experience and passed along through word-of-mouth, since practical resources are largely lacking.
The purpose of this review is to provide a practical resource for veterinary nurses from all backgrounds, from students in training, to the newly-graduated and experienced nurse alike, with ‘tips and tricks’ from a surgical nurse with over 18 years of experience. In this article, Part 1, we will provide a brief introduction to the equipment and instrumentation required for arthroscopic surgery in horses. Where literature is lacking, information will be provided by the authors based on previous experience. As with many aspects of veterinary medicine, surgeon preference, caseload, and available equipment and facilities, all influence standard operating procedures in different institutions, and therefore need to be taken into account.
Although equine arthroscopy can be performed with a minimal amount of essential equipment and instrumentation (McIlwraith et al., Citation2015), a wide variety of brands are now available on the global market, with several manufacturers offering equine-specific products, including Karl Storz®, Arthrex®, Olympus® and Stryker®. As the authors are most familiar with Karl Storz® and Arthrex® brands, many examples will be given with these products in mind. However, it is important to appreciate that manufacturer guidelines may vary widely regarding recommendations for equipment care and use, and therefore individual protocols should be tailored to account for these.
Arthroscopy equipment
Arthroscopy tower
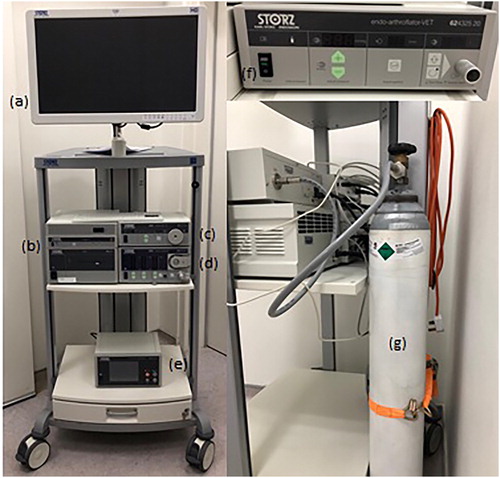
The arthroscopy tower, or trolley, as the name implies, is the structure upon which the arthroscopy consoles, including the monitor, light source, video camera, and irrigation systems etc., are housed (). It should move freely on wheels to allow it to be moved to desired locations, with locks on the wheels to fix it into position. Height is an important consideration for both surgeon and nurse alike, to allow equipment to be placed at comfortable working levels. An easy-clean design allows equipment and tower to be wiped-down after surgery. Most manufacturers provide purpose-built towers for arthroscopy equipment, with in-built channels for storage of electrical cables to provide protection from wetting during surgery.
Figure 1. Showing arthroscopy tower with monitor (a), digital image capture & storage device (b), light source (c), fluid irrigation pump (d), synovial resector machine (e), gas insufflator (f) and carbon dioxide cylinder (g).
Monitor
The monitor () displays the projected image from the videoarthroscope, which is delivered via the video camera (). Ideally the monitor should be high definition (HD), but to provide HD visual quality it must be accompanied by a HD video camera. Monitors can generally be purchased together with the arthroscopy tower, however most camera units are compatible with regular television screens, using the correct cables and adapters. Monitor position should ideally be adjustable, by means of an articulated arm, to provide comfortable viewing and ergonomic positioning during the procedure (Gasiorowski & Richardson, Citation2014; Martens et al., Citation2019).
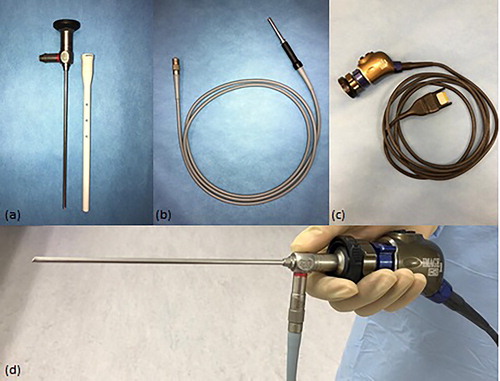
Figure 2. Showing arthroscope with protective sheath (a), light source cable (b), video camera (c) and all three connected together (d).
Video camera
The video camera () projects the image from the eyepiece, or lens, of the arthroscope () to the monitor. The video camera unit must be compatible with the eyepiece of the arthroscope, in terms of HD quality, brand and model. A variety of different options and models are available, such as the single-chip or three-chip (referred to as ‘closed couple devices’ or ‘CCDs’) video camera models. Three-chip camera heads provide better image quality, and are capable of HD (1.920 × 1.080 pixels) or ultra HD (4.096 × 2.160 pixels) quality (Martens et al., Citation2019). Since camera cable ‘plugs’ can vary between different models of the same brand, it is important to ensure that the camera head is compatible with the camera unit on the arthroscopy tower. Video cameras may contain a number of buttons to allow the surgeon to save still and video images, perform white-balancing of the image etc. (Martens et al., Citation2019). Although video cameras can be sterilised either by ethylene oxide or plasma, or immersion techniques, many prefer to use sterile camera covers to prolong their longevity (Martens et al., Citation2019). Sterile camera drapes are also commercially available. It is important to purchase good quality camera drapes, which have adhesive strips that are strong enough to create a waterproof seal, such as Vygon® brand Deluxe model. Fogging can occur with “closed” cameras (no air vents), which can be frustrating for the surgeon. Antifog solutions are generally ineffective in these cases. It is more effective to use warm fluids and ensure the lens is thoroughly dry before attachment (McIlwraith et al., Citation2015).
Light source
A continuous high-intensity light source () is necessary to illuminate structures for good image acquisition. The light source provides light via the light cable to the arthroscope, with most emitting a 300 W light power. With a variety of types available, Xenon light sources are generally considered to be superior with regard to image quality, however they are expensive and have a limited lifespan (350-500 working hours) (Martens et al., Citation2019). Therefore many choose LED light sources, as they are more economical and have a prolonged lifespan (up to 17,000 hours) (McIlwraith et al., Citation2015). An added benefit of LED light sources is their minimal heat generation, which avoids the need for fans which are necessary with xenon light sources (Martens et al., Citation2019). The majority of light sources available nowadays provide automated light intensity adjustment, thus minimising the need for manual adjustment (McIlwraith et al., Citation2015). Care must be taken to ensure that the light source cable () has compatible connections with both the light source and the arthroscope, otherwise specific adaptors will be required. The length of the light source cable should ideally be 10-12 feet.
Fluid irrigation system
Fluid distension and lavage, using sterile polyionic fluids, are required during arthroscopy in order to allow for visualisation during the procedure and to flush debris from the joint. Traditionally, manually-inflated pressure bags, available in sizes for 1 litre, 3 litre and 5 litre fluid bags, were used (McIlwraith et al., Citation2015). Although capable of providing sufficient pressure for arthroscopy to maintain synovial distension, control of pressure and fluid flow rate with this system can be difficult (McIlwraith et al., Citation2015). Therefore, motorised pumps are preferred, providing fluid irrigation through pressurised roller systems (). These pumps are available from a variety of manufacturers, provide safe levels of pressure distension, which can be easily set and accurately adjusted, as required (McIlwraith et al., Citation2015). An in-built automated sensor can detect pressure loss, as well as alert users to increased pressure through various alarm systems (McIlwraith et al., Citation2015). For the majority of procedures, pressures of up to 150 mm Hg and flow rates of at least 1.5 L/min are desirable (Martens et al., Citation2019). Brand and model-specific sterile fluid irrigation tubing is required. Single-use fluid irrigation tubing can add a significant additional cost to the procedure (Martens et al., Citation2019). Some systems require only a portion of the tubing to be replaced each time, offering a more economical alternative (Martens et al., Citation2019). Regarding the balanced electrolyte solution used, Lactated Ringers is preferable to saline, as it is considered to be more physiologic for the chondrocytes (McIlwraith et al., Citation2015). In the interest of health and safety, it is important that the theatre floor be designed in a manner to encourage the off flow of flushing fluids away from the operating table and electrical equipment, towards a drain (Lane, Citation2015). In areas with sub-optimal drainage, wipers or squeegees can be used to encourage fluids towards a drain.
Gas insufflation system
Gas insufflation () may occasionally be opted for instead of fluid irrigation, for the purpose of joint distension and visualisation, as it results in sharper images with higher contrast ( Eriksson & Sebik, Citation1982; McIlwraith et al., Citation2015). In addition to avoiding proliferative synovial villi or haemorrhage from impeding the visual field, it provides an ideal medium for placement of bone grafts and clottable biologics, performing laser procedures, and can also prevent fragments from floating away out of grasp (McIlwraith et al., Citation2015). Carbon dioxide gas is the most commonly used as it is deemed safest for the patient, having lower risk of air embolus formation (Neuhaus et al., Citation2001). However, some adverse effects do remain, such as the development of regional subcutaneous emphysema adjacent to the surgical site (McIlwraith et al., Citation2015). For gas insufflation, special systems must be used, including a gas insufflation machine (), attached to a commercial gas cylinder (), and require a specialised sterile tubing set. Gas pressures of up to 150 mm Hg may be required for arthroscopy, requiring insufflators to have flow rates of at least 20 L/min (Martens et al., Citation2019). As gas insufflation does not lavage synovial structures, gas insufflation must be followed by fluid irrigation at the end of surgery to remove any residual debris.
Synovial resector
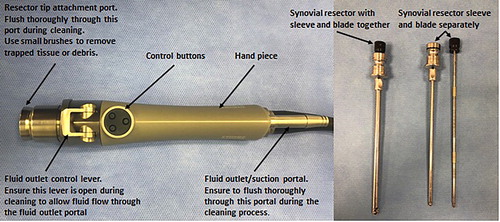
Synovial resection is locally performed either to improve visualisation, or therapeutically, and requires the use of motorised equipment known as ‘shavers’ or ‘resectors’ (McIlwraith et al., Citation2015). The handpiece ( & ) contains an adjustable rotating blade within a sheath, to which a suction system can be attached, which is attached by a cable to an electrically-powered control unit (). The handpieces can be operated either through the use of buttons or via a foot pedal attached to the control unit. Blade rotation can be adjusted either in oscillating or in continuous uni-directional shearing modes (McIlwraith et al., Citation2015). Various blade attachments are available, consisting of three basic categories: smooth-edged resectors (soft tissue) (), tooth-edged resectors (denser tissue) and bone burrs (bone exostosis), available in sizes 3.5 mm, 4.5 mm and 5.5 mm (McIlwraith et al., Citation2015). Handpieces are generally only compatible with same-brand blades. Blades are usually marketed as single-use only, however, it is common practice for these blades to be re-sterilised by ethylene oxide gas, until they lose function (McIlwraith et al., Citation2015). Handpieces are usually autoclavable, depending on manufacturer guidelines. Suction systems can be connected to the handpiece to aid the removal of resultant debris from the joint. It is important to note that ingress fluid rates must be accordingly increased to account for use of suction.
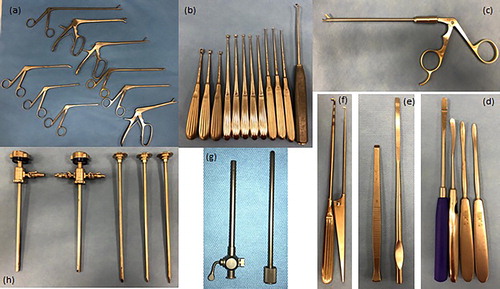
Figure 3. Showing complete arthroscopy instrument kit (a), synovial resector handpiece with variety of resusable blade attachments (b), mallet and microfracture awl (c).
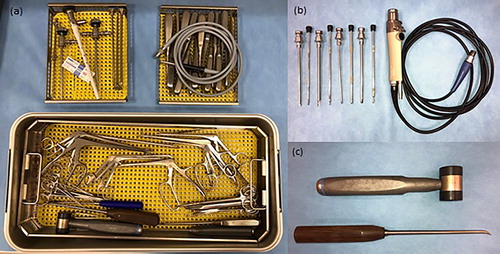
Figure 4. Showing synovial resector handpiece (left) and resector blade and sleeve (right).
Digital image capture & storage
There are many digital imaging and storage devices available on the market currently, which can be connected directly to the monitor and camera unit to capture both still images and videos (). Depending on the hospital facilities, images can then be transferred to a DVD, USB, external hard drive, printed, or sent to an online picture archiving and communication system (PACS). Depending on the unit, images can be captured during surgery by the nurse, or by the surgeon, using buttons on the video camera handpiece. Good quality imaging of joint lesions, before, during and after treatment, is important for clear documentation of the surgery, as well as for client communication and record keeping.
Electrosurgery
Monopolar electrosurgery can be used for cartilage and synovial soft tissue dissection, and vessel coagulation (McIlwraith et al., Citation2015). Commercially-available radiofrequency (RF) generators with specially-designed probes, in hook and loop shapes, are available (McIlwraith et al., Citation2015). However, a standard electrosurgery unit can also be used, by attaching a commercially available insulated arthroscopic probe to the pencil handpiece (Bouré et al., Citation1993). Grounding plates must be applied to facilitate electrical current (McIlwraith et al., Citation2015). The power output on the unit should be set to 40–90 W (Martens et al., Citation2019). When using electrosurgery, the fluid medium should be changed from Lactated Ringer’s to 1.5% Glycine solution to limit electrical dispersion within the joint, however some newer probes are now available with a Teflon-coating which precludes this requirement (Martens et al., Citation2019).
Hand instrumentation
A wide range of equine-specific instruments are available on the global market today, each tailored according to specific needs. The following list will outline a limited number of instruments considered most essential for successful arthroscopic surgeries.
Arthroscope
Various rigid arthroscopes are available on the market, discussed in detail by McIlwraith et al. (Citation2015). For the purpose of equine arthroscopy, the 4 mm diameter is most widely used (), with the 2.7 mm diameter scope reserved for smaller joint spaces. Most commonly used are scopes with a working length of 160 mm-170mm and a lens angulation of 25-30° (McIlwraith et al., Citation2015). Needle arthroscopes (1.3 mm diameter) have been reported for standing arthroscopy of the equine stifle (Gasiorowski & Richardson, Citation2014). The arthroscope is a delicate piece of equipment, as the lens and internal magnifying rod lens system can be easily damaged, if not handled appropriately. Therefore, a protective sheath should be placed on the arthroscope at all times when not in use (Martens et al., Citation2019)(). Regular servicing by manufacturer-approved companies is essential for early fault detection, and availability of rapid repair services is an important consideration when selecting arthroscope brands. Thought should always be given to the availability of extended warranties and repair exchange arrangements when purchasing such equipment.
Arthroscope cannula and obturator
Arthroscopes are inserted into synovial structures encased in a protective sheath in the form of a stainless steel cannula (). These cannulae are available in a variety of self-locking mechanisms which vary by brand, and are equipped with a variable number of stopcocks to allow fluid ingress and egress. The fluid irrigation system is attached to one of the stopcocks for ingress. A 5–6 mm cannula is required for a 4 mm arthroscope to allow fluid flow through the cannula lumen (Martens et al., Citation2019). A blunt obturator placed through the cannula lumen is used to aid insertion of the cannula into the joint. Once in place, the obturator is removed and replaced by the arthroscope. Sharp obturators are available but generally not used to avoid iatrogenic damage to structures (Goodrich & McIlwraith, Citation2008). A double stopcock allows both ingress and egress, however the extra stopcock may interfere with the surgeon, therefore single-stopcock cannulae are believed by many to be more ergonomic (Martens et al., Citation2019; McIlwraith et al., Citation2015).
Figure 5. Showing a variety of basic arthroscopy instruments, including a variety of rongeurs (a), spoon curettes (b), arthroscopic scissors (c), periosteal elevators (d), osteotomes (e), probes (f), egress cannula and obturator (g), arthroscope cannulae and obturators (h).
Egress cannula and obturator
Egress cannulae are used for the purpose of large volume lavage in order to clear visual field in the case of haemorrhage, or to remove debris (Goodrich & McIlwraith, Citation2008) (). McIlwraith et al. (Citation2015) describe it for use as a lesion probe also. These cannulae are available in both 3 mm and 4.5 mm diameters, and require a blunt obturator for insertion into the joint, particularly with the larger of the two.
Arthroscopic probe
A wide variety of blunt probes are available for arthroscopic use for palpation and manipulation of cartilage, fragments or lesions (Martens et al., Citation2019) (). Probes are available in a variety of lengths, with different handles and tips, with variable angulation and length (3-6 mm) (McIlwraith et al., Citation2015). Smaller, lighter, probes are suitable for routine cartilage assessement, while heavier duty ones with strong shafts are required for manipulation of large fragments (Martens et al., Citation2019).
Ferris-Smith rongeurs
The Ferris-Smith intervertebral disk rongeurs are a staple in any arthroscopy kit, used for removal of fracture fragments and osteochondritis dissecans (OCD) flaps (McIlwraith et al., Citation2015). They are available in a wide variety of sizes, working lengths 18–30 cm, and in various jaw strengths, design and angles, with the most frequently used cup rongeurs having a 18 cm shaft and 4- × 10 mm bite (McIlwraith et al., Citation2015)(). A 6- × 12 mm bite is also considered to be a basic requirement (Martens et al., Citation2019). Extra-long rongeurs may be used to access the suprapatellar pouch during stifle arthroscopy (Martens et al., Citation2019). Other useful forceps include basket forceps, ethmoid forceps, the McIlwraith forceps, biopsy punch suction rongeurs, arthroscopy scissors and malleable shaft forceps (McIlwraith et al., Citation2015).
Periosteal elevators and osteotomes
Periosteal elevators and osteotomes are required for a variety of procedures, including cartilage debridement, fragment dissection, lifting chip fractures or reducing intra articular fractures (McIlwraith et al., Citation2015)(). Elevators are available with blunt, round or sharp tips, and with a variety of handles, strengths and shapes. Osteotomes are also available in a variety of angles and strengths, and are used for intra-articular fracture of fragments or for exostoses.
Cutting instruments or tendon knives
Arthroscopic blades and tendon knives may be used for dissection of masses or bone chips, or for transection of the annular ligament (McIlwraith et al., Citation2015). Different shapes and sizes of blade are available, such as serrated, curved, straight, or hooked. Some are available in a sheathed cover to allow for safer insertion. Curved or straight arthroscopic scissors may also be required in certain situations requiring fine tissue dissection (McIlwraith et al., Citation2015) ().
Curettes
Closed spoon curettes are available in sizes 0–000, and are used for lesion debridement (Martens et al., Citation2019) (). They come in a combination of lengths and angles to facilitate access to poorly-accessible locations (Martens et al., Citation2019).
Microfracture bone awl
Microfracture is performed to improve the blood supply to a lesion and to facilitate healing following full thickness cartilage debridement (Martens et al., Citation2019). The bone awl has a sharp pointed tip angled at 30–45 degrees (). Quality is an important consideration when purchasing to ensure it is robust and that the tip remains sharp and does not dull with repeated use (McIlwraith et al., Citation2015).
Mallet
Mallets are required for use with the bone awl for microfracture, as well as with osteotomes for fragment dissection (). Heads can be made of nylon or stainless steel.
Magnetic probes
Although not commonly listed as an essential instrument, magnetic probes are invaluable tools when the situation requires their use. Instrument breakages, although infrequent, can present a challenge (Goodrich & McIlwraith, Citation2008). Most commonly, breakage of number 11 or 15 blades or needles, or the shafts of small angled spoon curettes, occur due to use of excessive force (Goodrich & McIlwraith, Citation2008). A magnetic probe can save a great deal of time and stress by helping with instrument retrieval within a joint. These probes are available in a simple model shaped like a probe, and also in a telescoping style where they are extendable.
Basic pack and other equipment
The arthroscopy kit should also include basic instruments such as two size 3 scalpel handles, scissors, needle holders and haemostats (). It is preferable to have a dedicated basic set for arthroscopy kits to avoid over use in less refined surgeries.
Table 1. List of basic instruments and other equipment.
Draping
Choice of draping is largely dictated by surgeon’s preference, and is heavily dictated by previous experience, cost, and the location/joint to be operated on (McIlwraith et al., Citation2015). At least the final layer must be waterproof in order to prevent surgical site contamination by strike-through. A sterile, impervious table drape is also required for the instrument table. Sterile adhesive conforming films, such as Ioban® or Opsite® are advocated to provide a wide, sterile, impervious surgical field (McIlwraith et al., Citation2015). However, their efficacy in reducing surgical site infections has been questioned, with some research showing bacterial proliferation beneath the drape (Webster & Alghamdi, Citation2015; Falk-Brynhildsen et al., Citation2013). Many surgeons prefer to perform a four-quadrant technique primary draping using reusable fabric drapes, before applying an impervious drape overtop. There are commercially-available arthroscopy specific drapes and drape packs designed for horses (McIlwraith et al., Citation2015). Although convenient, they can be cumbersome to apply and often expensive. For standing arthroscopy, single impervious layer draping is recommended for the limb and a single sterile drape for the horse to stand on (Gasiorowski & Richardson, Citation2014). Pooling of fluid around the surgical site can occur due to gravity, and needs to be considered when draping. Draping presents a high-risk time during any surgery for breaches in asepsis, therefore the surgical nurse should pay close attention at this time to alert any potential issues. Other useful draping accessories include additional sterile surgical gloves, sterile vetwrap, sterile impervious stockinettes and sterile sleeves.
Surgical attire
The surgical team should, as a minimum requirement, wear dedicated scrub suits, surgery shoes or covers, surgical caps and masks (Martens et al., Citation2019). Although some studies show there is no link between wearing facemasks and increased surgical site infections, it is difficult not to support their implementation. The surgeon’s gown is a major factor in particle and bacteria shedding (Martens et al., Citation2019). The surgeon’s gown should comply with the Association of Advancement of Medical Instrumentation or European harmonised standard regulations. The surgeons sterile gown should be impervious, AAMI Level 3 to Level 4, to avoid strike-through contamination. Thorough aseptic hand preparation followed by application of sterile gloves, is standard procedure in the prevention of bacterial transfer (Martens et al., Citation2019) Surgeons will generally double glove for arthroscopy procedures, removing the outer pair of gloves after draping. When instruments should be removed from cold sterilisation for rinsing by the surgeon, an extra pair of gloves is recommended (Martens et al., Citation2019). An extra pair of sterile gloves can also be worn by the surgeon for use when draping the hoof, in procedures such as coffin joint arthoscopy.
Conclusion
The equine nurse plays a crucial role in the purchase, maintenance, preparation and troubleshooting of the arthroscopy equipment. In today’s market, there is a wide range of ever evolving arthroscopy equipment and brands available to purchase for the modern equine practice. It is important that the equine nurse has clear knowledge of the basic equipment’s function, preparation and maintenance, in order to deliver the best service possible to the surgical team, while achieving good equipment longevity. There is a lack of information and reference material available for equine nurses in relation to arthroscopy, and further research and articles are required in the future, to develop the service that equine nurses provide to their practice. The next part of this series of articles will focus on the disinfection and sterilisation procedures, maintenance and general set up of the arthroscopy equipmet.
Disclosure statement
No conflict of interests to declare.
Correction Statement
This article has been republished with minor changes. These changes do not impact the academic content of the article.
Additional information
Notes on contributors
Jackie Ryan
Jackie Ryan
Ms Jackie Ryan has been working as a veterinary nurse for more than 19 years. She obtained her diploma in Veterinary Nursing from University College Dublin in 2009 and has since worked in equine hospitals in Ireland and Australia. She moved to Qatar in 2018 where she joined the team at the Equine Veterinary Medical Center as Head Surgery Nurse.
Jessica P. Johnson
Jessica Johnson BAgrSc, MVB, MRCVS, Dip. ECVS, DVMS
Jessica Johnson graduated with an MVB in Veterinary Medicine from University College Dublin in 2011. She is a European Specialist in Large Animal Surgery, and has completed a Doctorate of Veterinary Medical Specialization (DVMS). In 2018 she joined the Equine Veterinary Medical Centre, Qatar, as a clinician in surgery & sports medicine.
References
- Bouré, L. , Marcoux, M. , Laverty, S. , & Lepage, O. M. (1999). Use of electrocautery probes in arthroscopic removal of apical sesamoid fracture fragments in 18 Standardbred horses. Veterinary Surgery: VS , 28 (4), 226–232. https://doi.org/10.1053/jvet.1999.0226
- Eriksson, E. , & Sebik, A. (1982). Arthroscopy and arthroscopic surgery in a gas versus a fluid medium. The Orthopedic Clinics of North America , 13 (2), 293–298.
- Falk-Brynhildsen, K. , Friberg, O. , Söderquist, B. , & Nilsson, U. G. (2013). Bacterial colonization of the skin following aseptic preoperative preparation and impact of the use of plastic adhesive drapes. Biological Research for Nursing , 15 (2), 242–248. https://doi.org/10.1177/1099800411430381
- Gasiorowski, J. C. , & Richardson, D. W. (2014). Diagnostic and therapeutic arthroscopy in the standing horse. The Veterinary Clinics of North America. Equine Practice , 30 (1), 211–220. https://doi.org/10.1016/j.cveq.2013.11.011
- Goodrich, L. R. , & McIlwraith, C. W. (2008). Complications associated with equine arthroscopy. The Veterinary Clinics of North America. Equine Practice , 24 (3), 573–viii. https://doi.org/10.1016/j.cveq.2008.10.009
- Lane, C. (2015). The equine theatre suite design and implementation. Veterinary Nursing Journal , 30 (8), 232–235. https://doi.org/10.1080/17415349.2015.1058199
- McIlwraith, C. W. , Nixon, A. J. , & Wright, I. M. (2015). Instrumentation. In Diagnostic and surgical arthroscopy in the horse . 4th Ed. Elsevier.
- Martens, A. , Pader, K. , Prange, T. , Ortved, K. F. , & Richardson, D. W. (2019). Minimally invasive surgical techniques. In J. A., Auer , J. A., Stick, J. M. Kummerle , & T. Prange (Eds.), Equine surgery , 5th Ed. Elsevier.
- Neuhaus, S. , Gupta, A. , & Watson, D. (2001). Helium and other alternative insufflation gases for laparoscopy. Surgical Endoscopy , 15 (6), 553–560. https://doi.org/10.1007/s004640080060
- Webster, J. , & Alghamdi, A. A. (2015). Use of plastic adhesive drapes during surgery for preventing surgical site infection. Cochrane Database of Systematic Reviews , (4), CD006353. https://doi.org/10.1002/14651858.CD006353.pub4