

ABSTRACT
Background
In the last 7-8 years, Guided Endodontics has garnered attention in articles and lectures, yet a substantial gap persists in elucidating the creation and 3D printing of an Endo Guide. The intricacies of design software and 3D printing have confounded many, compelling speakers, and researchers to rely on third-party labs. Consequently, the potential of Endodontic Access guides is hindered by a lack of guidance on design and fabrication, impeding their widespread adoption, especially in challenging cases. The author envisions greater awareness and utilization of this method to enhance endodontic treatment outcomes, emphasizing simplicity in procedures.
Types
Articles reviewed were published in many different journals, mostly all of them are case presentations, few discuss the concept and others not at all. This deficiency in current literature led to this publication hoping to simplify the technique and explain the process.
Results
The accuracy of Guided Endodontic has been tested repeatedly and presented consistent results, the accuracy of such guides and ease of use from a novice operator to an expert, could not be more discernible.
Practical implications
Integration of Endodontic Access Guides and 3D printing holds potential for widespread use in endodontic practices, residencies, dental schools, and general dentistry. This integration facilitates training for new dentists in 3D printing and endodontic case management. Endodontists benefit from enhanced accuracy and predictability in treating challenging cases, while general practitioners can avoid mishaps like perforations and instrument separations, improving overall endodontic treatment outcomes across different dental settings.
Dental Injuries and Natural Calcification Processes can Pose a Substantial Obstacle when it comes to Achieving Effective and Successful Endodontic Therapy
The process of pulpal calcification is called obliteration or calcific metamorphosis and is associated with injury to the pulp tissues. The injury is commonly through disease processes such as carious tooth surface loss, dental alveolar trauma, or operative procedures such as pulp capping, pulpotomy, and, rarely, orthodontic treatment.Citation1 In most cases, the calcific metamorphosis appears to be severe coronally, tapering off toward the root apex, leaving the dentist with the tantalizing technical prospect of reaching the canal space through spatial and drilling skills. Many clinicians have fallen foul of the temptation to achieve apical patency in such cases, only to have been sobered by the complications of excessive and uncontrolled dentin destruction or, worse, root perforation.Citation2
Pulp canal calcification (PCC) is a challenge in day-to-day endodontics. Whether physiologic calcification or calcification secondary to dental trauma or orthodontics, PCC presents a significant obstacle in nonsurgical endodontics. Andreasen et al.Citation3 found that 15% of traumatized permanent incisors had pulp canal obliteration, which is regarded as a sign of pulp healing and does not need endodontic intervention per se, unless for cosmetic reasons such as internal bleaching or development of endodontic lesion. However, there is a risk for the pulps to become necrotic, ranging from 1% to 27%.Citation3,Citation4 Up to one-third of teeth with PCC develop apical pathology in the long term.Citation5 According to Jacobsen and Kerekes, “In the initial phase of PCC, particularly during the first three years, apical pathology is unlikely. However, the development of pulp necrosis and periapical changes may occur as a late complication after several years.”Citation6 Robertson and others stated, “Secondary pulp necrosis after PCC indicated by periapical bone lesions was reported in 7% to 27% of the cases and seemed to increase with longer observation periods.”Citation7
Endodontically treating teeth with PCC can be a very challenging task as they are considered to be a high difficulty level.Citation8 Although a histological examination of teeth with PCC usually shows a persisting narrow root canal, and although morphologic differences between the hard tissue formed after the injury and normally formed dentin are present,Citation9 determining the correct location of the root canal is difficult.Citation10 The use of CBCT scan and operating microscope is a must in these cases. Nevertheless, excessive loss of tooth structure and a high risk of perforation may considerably impair the prognosis of the affected teeth.Citation2
The operator must depend on CBCT scan and a skillful, steady hand to be able to drill into the tooth and stay centered in order to locate the canals and avoid iatrogenic damage. Van der Meer et al.Citation11 stated that “endodontic treatment of an anterior tooth with severe pulp system obliteration requires experience and skills of the clinician and can be very challenging.”Citation11 Many times, even the most skillful clinicians may not be able to find the canals without significant sacrifice and damage of essential tooth structure, which is critical to tooth survival and success rates.Citation12 Even with the use of a dental microscope, the preparation of an adequate access cavity may lead to excessive substance loss that impairs stability and thereby reduces the life and long-term prognosis of the tooth.Citation13 A virtually planned and guided minimally invasive access cavity could help preserve tooth structure and avoid perforations, which could lead to an improved long-term prognosis, especially for teeth with calcified root canals.Citation14
In late 2006 and early 2007, the idea of adapting surgical guides for endodontic procedures emerged. This concept was initially inspired by the surgical guides utilized in implant surgery. However, during that time in the United States, it was not feasible to create guides for endodontic purposes using existing software due to the limitations of FDA approval. Popular software such as Simplant, Co-diagnostics and others used for manufacturing surgical guides for implant surgery were not cleared for use in endodontics. The operator was not able to manipulate the design to accommodate endodontic purposes until the introduction of an open interface software called Blue Sky Plan (BSP) (Chicago, Illinois) in 2009.
BSP software allowed the operator to be in control of the entire design and not be dependent on software engineers and nonclinical personnel to design the guide. One more challenge was the limited availability of 3D printing machines in dentistry, as they were primarily found in large labs and were expensive. With the introduction of more affordable and compact equipment in early 2014–2015, the dentist could utilize them in office. Smaller machines such as the NextDent printers, FormLabs, and the MoonRay printer from SprintRay (Los Angeles, CA) were introduced to the dental industry, making 3D printing more accessible and cost-effective for clinicians.
The process of creating an endodontic access guide (EAG) starts with very detailed planning and preparation. The clinician acquires a high-quality CBCT scan, preferably of the full arch, and either a model of the patient’s teeth or an intraoral scan. Then, both the DICOM files and the STL file of the model are imported into the software.
When the data sets are imported into the software, an automatic merging process takes place to ensure the accuracy of the alignment of both data sets. Once the STL file is aligned with the CT scan, planning can start. In the BSP software, the operator chooses the endo mode and determines on the CT scan the location of the first entry point through the remaining canal. The operator then plans a custom implant placement as the drill path with the apex of the implant directly on top or about 0.5 mm into the residual canal. The operator can then change the inclination of the designed implant to control the access hole direction to preserve the incisal edge structure of the tooth. Or the operator can choose to have a direct line parallel to the long access of the tooth.
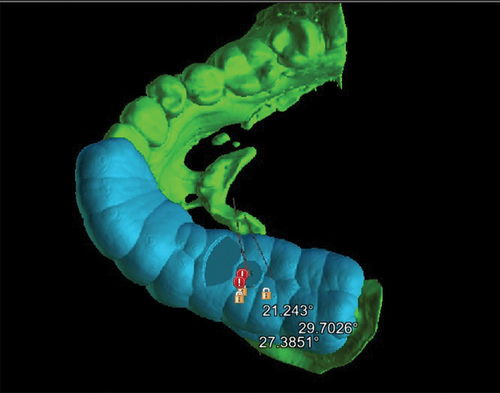
Once the plan is deemed satisfactory, the guide design begins. In the guide panel tab, the operator can begin drawing the outline of the proposed guide design. It is advisable to extend the guide across midline or at least 2–3 teeth mesially and distally to the tooth in question. This guarantees the anterior-posterior (A-P) and bucco-lingual (B-L) tilt control to create a more accurate path of drilling. With a mean angle deviation of 1.59 degrees and a mean linear deviation of 0.12–0.34 mm from the apical target point,Citation15 the procedure proves to be extremely accurate and dependable.
When weighing the costs and benefits of EAGs, the amount of time and money invested in creating the guides seems high. Hence, it may be difficult to justify the routine use of such procedures. However, the benefits likely outweigh the costs in reduced chair time and less risk of perforation and tooth loss.Citation16 Additionally, Van der Meer et al. concluded, “When using a 3D digitally designed directional endodontic guide produced with computer aided additive production techniques, the treatment of compromised cases can be performed by less specifically experienced or skilled clinicians.”Citation11 More dentists will be able to perform these treatments with enhanced predictability and success in teeth with PCC. And with advancements in the technology, the cost and ease of use will only improve with time.
Several limitations of guided endodontics have been cited in the literature. The influence of PCC on the accuracy remains unclear, the technique is only predictable in straight roots or in the straight part of a curved root, and accessibility in posterior teeth may be difficult due to limited space for the template and the drill.Citation17 Buchgreitz et al. presented a very creative case report that accomplished guided access preparation in a molar with pulp canal obliteration and limited interocclusal space. The demand for more interocclusal space was solved by transforming the virtual drill path into a composite-based intra-coronal guide. The use of digital technology and endo guides was essential in this case.Citation16
Access to the curved portion of roots, especially in molars, may be limited with this technique. Some have reported that to achieve straight-line access, “substance loss and modification of the natural root canal geometry according to the dimension of the drill must be accepted.”Citation13 However, it has been demonstrated that by changing the angulation of the drilling path in the planning phase, the operator can avoid damaging the incisal edges in anterior teeth. Using smaller drills 0.6 mm to 0.8 mm in diameter preserves tooth structure and prevents excessive tooth structure removal whether the procedure was performed with or without utilizing guided endodontics. A patented drill design for guided endodontics does exist (access guide and drill kit to be used with same for endodontic access cavity preparation and method of use, Kelliny Patent #11191616),Citation18 which allows the operator to progressively go smaller with drill sizes and diameter as drilling proceeds deeper into the roots, preserving tooth structure and minimizing apical access preparation size. The accuracy of static access guides, conservation of tooth structure, and consistency between different operators has been consistent since the inception of the concept and was demonstrated by Zehnder et al.Citation14
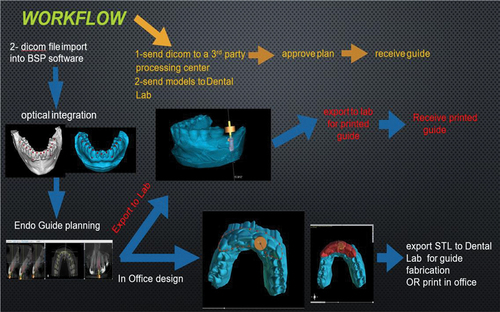
A basic flow chart of the endo guide process ():
Acquire a single full arch CBCT scan of the patient.
Acquire a digital impression of the patient.
Option 1: If the dentist does not own 3D printing equipment and/or does not want to plan the case, it can be sent to a third-party planning center. The center will plan the case and send the plan back for approval. Once it is approved, the center will print and send the endo guide ready to use.
Option 2: Start planning the case in 3D software with optical integration and merging of 3D rendering of the CBCT and the digital impression. Plan the case in the software. If the dentist does not have 3D printing equipment in the office, send the case to a planning service. The service will check the case, print the guide, and send the guide ready to use with their own drilling system or the drilling system of choice.
Option 3: If the dentist has in-office 3D printing equipment, plan the preferred guide design, create the STL file of the guide and a) print it in office or b) send it to any local lab to be printed for the dentist’s use.
Figure 1. Simple diagram demonstrating the workflow for Endo Guide.
To the author’s knowledge, no one has detailed or explained how to create an endodontic guide in published literature. The following describes a quick-start, step-by-step guide to creating an endodontic guide.
Steps to create an endo guide:
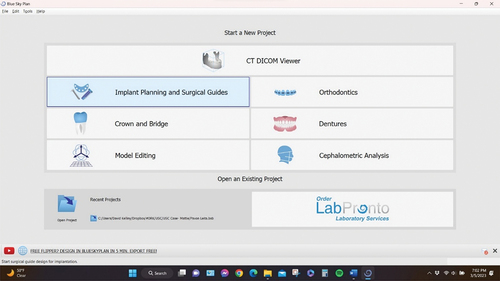
Open BSP app/software.
Choose implant planning and surgical guides ().
Figure 2. BSP software starting a case.
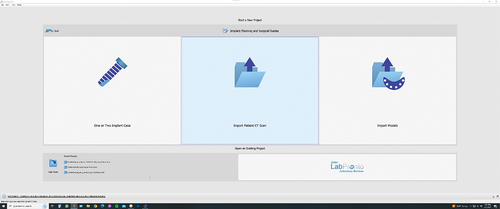
Choose import patient scan ().
Figure 3. Choosing the folder that contains the DICOM files.
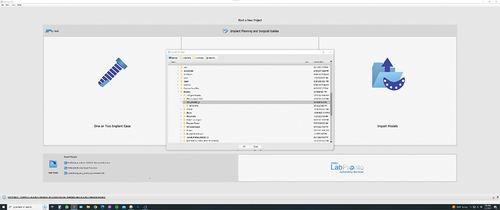
Find the DICOM folder on your computer or external drive and select it, then press OK ().
Figure 4. Locating the DICOM folder and importing it.
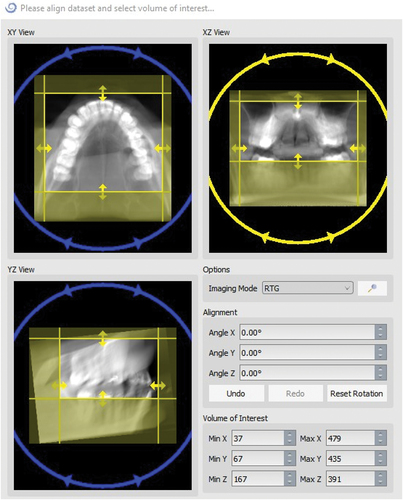
Correct axis of view if needed and field limits to reduce file size (software will work faster), then press OK ().
Figure 5. Aligning and adjusting the scan field of work.
CBCT scan will be imported into the software.
In the new pop-up window, choose import STL model.
Find the intraoral scan (in STL format) in the PC files, select it and click OK.
Verify orientation.
Alignment will start automatically.
Verify alignment for accuracy and ensure both CT scan and impressions match. Any deviation will affect accuracy of the guide. ()
Figure 6. Model imported and automatic alignment.

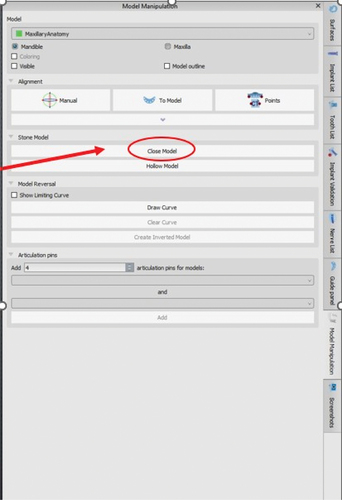
Go to model manipulation menu and choose close model ().
Figure 7. Creating a base for the Model STL file and closing the digital mesh.
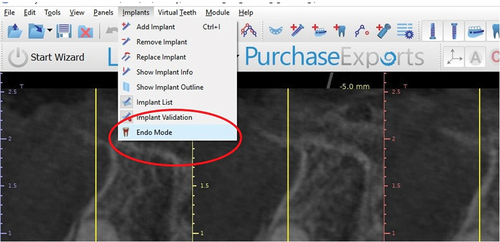
Switch to advanced mode, go to top menu and choose implant. From the drop-down menu, switch to endo mode ().
Figure 8. Choosing ENDO mode.
Ready to plan the guide.
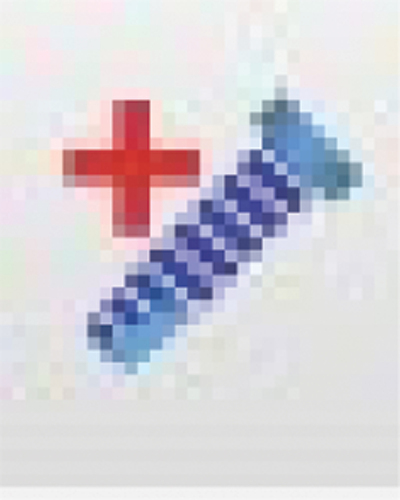
From menu bar, choose add implant ().
Figure 9. Adding an implant icon.
Choose custom implant ().
Figure 10. Creating a custom implant for endo planning.
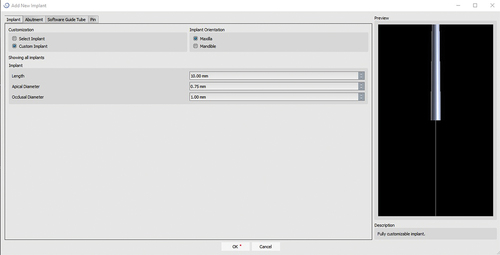
Enter length = 10 mm, apical diameter 0.75 mm and occlusal diameter 1.0 mm, then click OK.
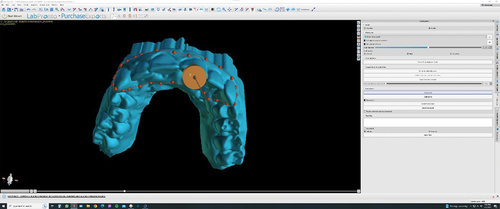
Place custom implant in any view and place apical end at first entry point of the canal ().
Figure 11. Placing and aligning the custom implant with the first entry point of the canal.
Rotate and adjust custom implant angulation and placement in multiple views to control drill depth and path of drilling (incisal edge can be avoided).
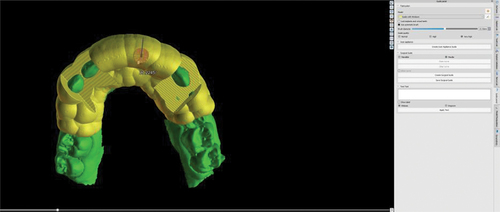
Once satisfied with implant placement, go to guide panel and choose at least “high” for guide quality.
Turn off 3D model (original) in surfaces panel and only keep “model stone” checked.
Open 3D view in full page.
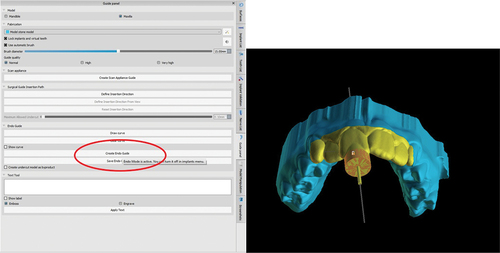
Under endo guide, choose draw curve.
Before starting to draw the desired outline of the guide, make sure the implant is locked, so it does not move while designing the guide ().
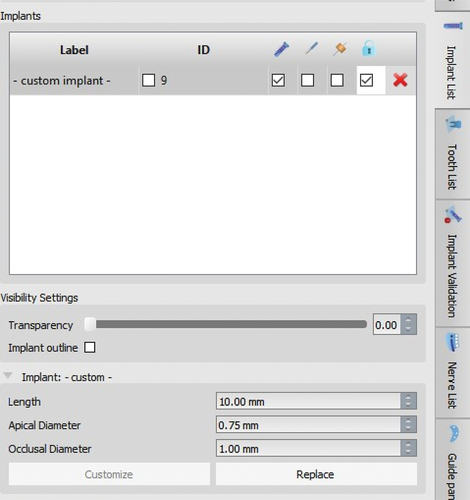
Figure 12. Measurements for a custom implant and locking it.
In guide settings, choose guide hole tube diameter to match the diameter of the desired drill system. Add 0.05 to allow room for the drill to move in and out (a lot more is involved in this measurement, but it is not the scope of this article to discuss it at this time) ().
Figure 13. View of guide hole tube and model with base.
In implant panel, choose custom drill kit.
In implant panel, set the measurements for the guide hole tube diameter. Height is usually 3 mm-4 mm and offset distance can be changed depending on the depth needed to drill into the tooth.
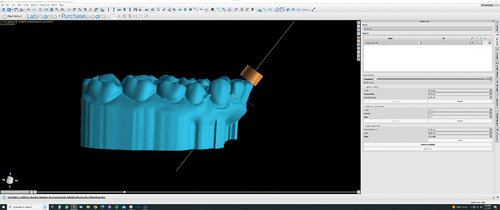
Go back to guide panel and choose draw curve; then start drawing the outline of the proposed guide ().
Figure 14. Designing the Endo guide outline and extension.
Once done, adjust the node as needed to create smooth edges and smooth design.
Click create endo guide. This may take 1–2 minutes depending on the speed of the PC video card and processor ().
Figure 15. Creating the final endo guide.
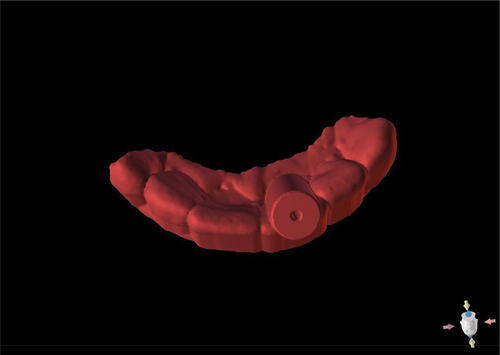
After guide is created, export guide out of the BSP software for printing.
In main drop-down menu, choose file, export data; only select/check surgical guide and then press export. An STL file of the designed endo guide will remain on the PC. One export will be charged at this time ().
Figure 16. How to export the endo guide STL file.

At this point, the guide is ready to print on any 3D printer, preferably under 75 microns accuracy ().
Figure 17. Final guide STL file view.
Clinical Cases: Case 1
A 35-year-old female presented in slight pain and discomfort on upper anterior tooth No. 9. A general dentist had started her on a course of Amoxicillin, 500 mg for 5 days, and she felt better. The patient had a history of trauma when she was 7 years old, but she was never told anything was wrong with the tooth.
On the day of examination, teeth Nos. 6, 7, 8, 10 and 11 all tested normal vital to dry ice test and electric pulp tester (EPT) and were normal on all other tests as well. Tooth No. 9 tested negative to dry ice test and had slight pain to percussion and moderate pain to palpation at apex region of No. 9. Periodontal examination was normal with 2 mm-3 mm probing depth and no mobility.
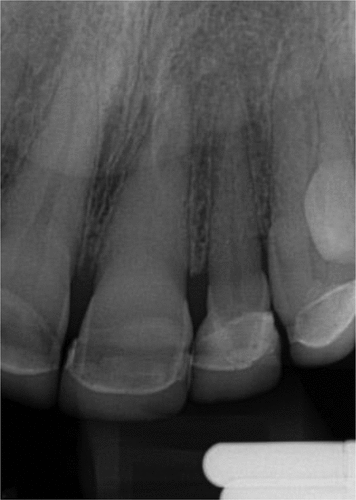
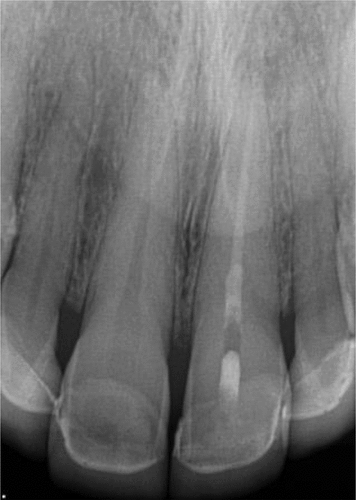
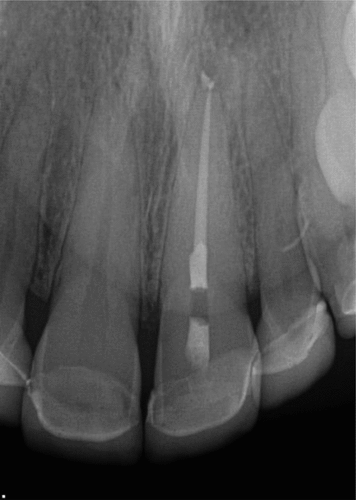
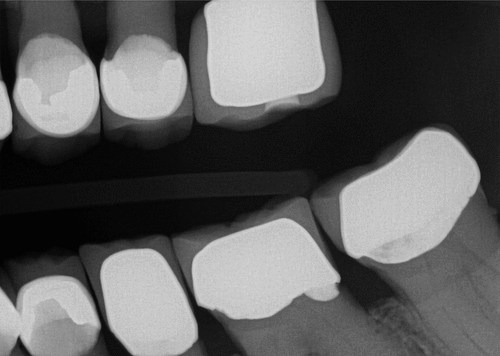
Radiographic examination revealed complete calcification of chamber and canal, minor apical changes (widening of apical PDL), and no sign of crack or root fracture. ()
Figure 18. Clinical case 1 pre-op radiograph.
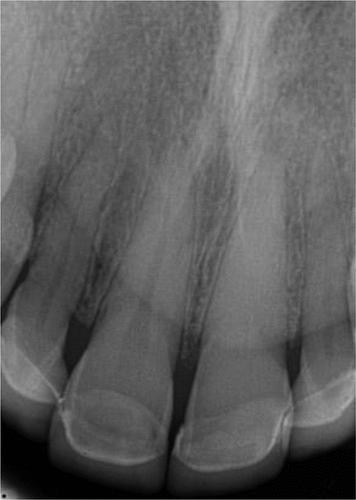
Figure 19. Case 1 2nd pre-op radiograph.
Apical diagnosis: symptomatic apical periodontitis (SAP).
Pulpal diagnosis: non-vital pulp was reached.
During the consultation visit, the issue of calcification and the difficulty finding the canal in a case like this was discussed with the patient. The decision was made with the patient to use guided endo to access the tooth and find the canal conservatively.
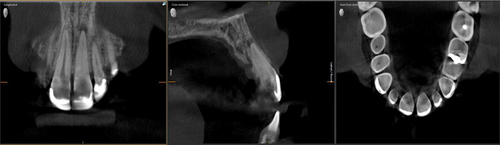
A CBCT scan and impressions were taken the same day for endo access guide fabrication. The scan confirmed severe calcification of the case and showed complete calcification of the chamber and severe calcification of the canal. The first sign of a canal or possible entry point was 6 mm from apex. Also, a definitive periapical radiolucency was clear on the CBCT scan ().
Figure 20. CBCT scan showing severe calcification and an apical lesion.
The case was planned in Blue Sky Plan software (Chicago, Illinois) and printed on Sprintray Pro55 3D printer (Los Angeles, CA) ().
Figure 21. Planning the case in BSP.
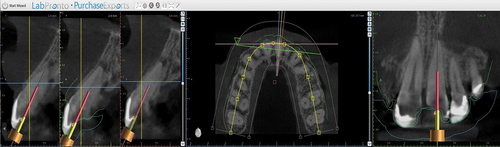
Figure 22. Creating the endo guide.
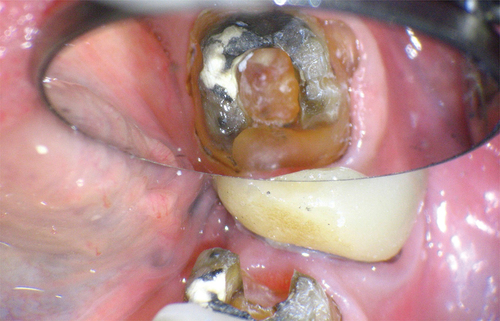
On the day of treatment, the endo guide was used as planned (), and the canal was located easily within 6–8 minutes. Please note the size (0.8 mm in diameter) of the access hole created using the endo guide and a prototype drill from “Kelliny Guided Access Drill Kit” (). Routine endodontic treatment was started using Protaper Gold Files from Dentsply Sirona (Charlotte, North Carolina). But the tooth was severely infected, as indicated by a foul smell that emitted when the canal was accessed, so a decision was made to perform treatment across two visits and use calcium hydroxide intracanal medication from Ultradent (South Jordan, Utah) () to help eliminate and kill intracanal bacteria.
Figure 23. Intra operative view of endo guide in patient’s mouth.
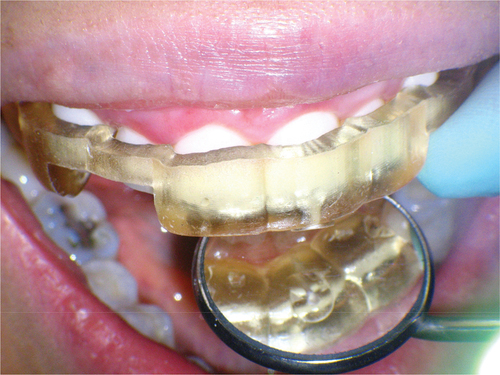
Figure 24. Intra oral picture of 0.8 mm diameter access hole.
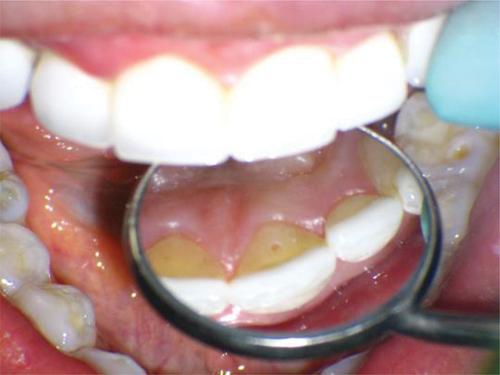
Figure 25. Intra canal medication of calcium hydroxide in place at the end of first visit.
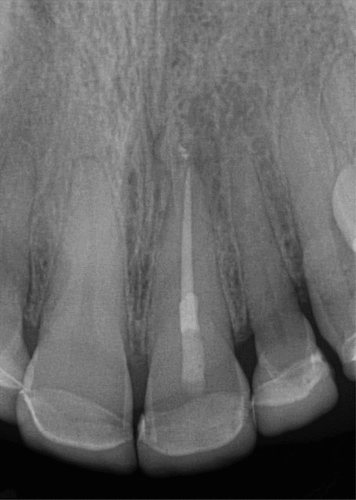
Two weeks later, the patient returned to finish treatment. She was completely asymptomatic and functional with no pain to percussion or palpation. Obturation was completed using matching gutta-percha points from Dentsply/Sirona and BC Sealer from Brasseler (Savannah, Georgia, USA). The continuous wave obturation technique was used. Finally, an endo sponge and Tempit interim restoration (Shelton, CT) were placed in the chamber after the cementoenamel junction (CEJ) was sealed with 3 mm of composite ().
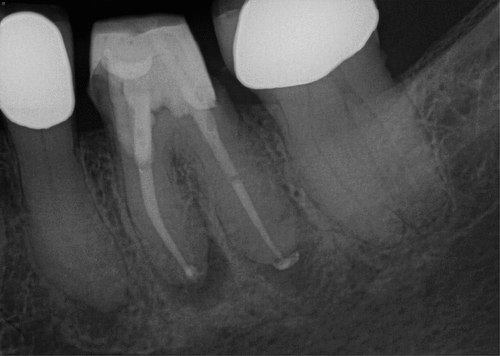
Figure 26. Final radiograph.
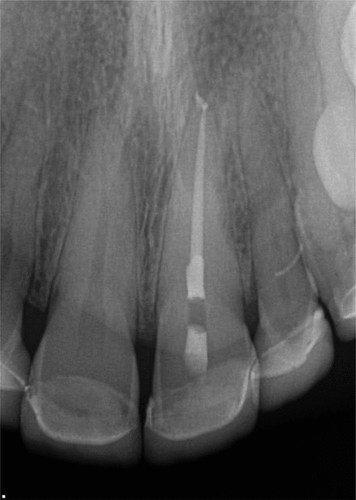
Figure 27. 2nd final radiograph.
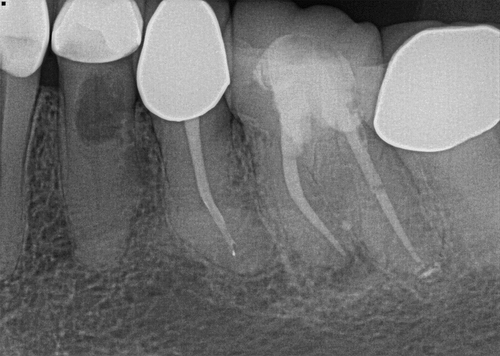
Six months later, the patient presented for follow-up on treatment and was completely asymptomatic and functional. Access was restored by the referring general dentist. She had no pain to percussion or palpation, and periodontal probing was normal. Radiographic healing was significant and almost complete ().
Figure 28. 6mo follow up showing access restored and complete apical healing.
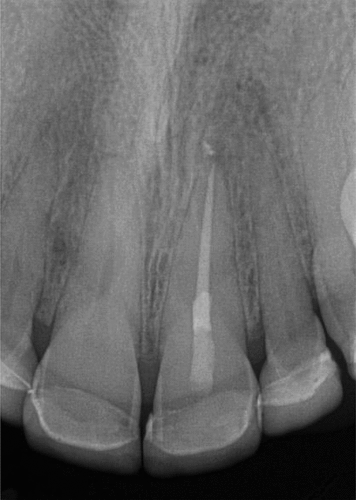
Figure 29. 2nd view of 6mo follow up and complete apical healing.
Clinical Cases: Case 2
A 94-year-old female presented with moderate pain in the lower left quadrant, pointing at tooth No. 19. Other than a minor heart attack in 2016 with no residual effect, her medical history was insignificant, and she was otherwise healthy. Teeth Nos. 18 and 20 tested normal vital at the time. No. 19 had slight pain to percussion and no pain to palpation. Periodontal probing was normal with minor bleeding on probing. Dry ice test had a negative response, indicating tooth was non-vital. Radiograph showed large periapical radiolucency with severe calcification ().
Figure 30. Case 2 pre-operative radiograph showing severe calcification and apical lesion (PARL).
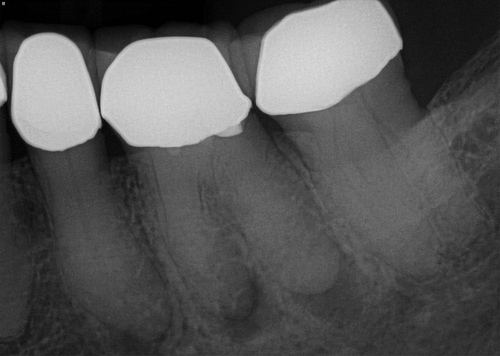
Figure 31. Pre-operative bitewing showing coronal calcification and restoration marginal integrity.
An apical diagnosis of symptomatic apical periodontitis and a pulpal diagnosis of non-vital, severely calcified were reached. Treatment was initially started through the existing crown to save the crown, but complete calcification of chamber and canals was noted. The crown was then sectioned and removed, and access was attempted for an additional 1 hour with no trace of any canals ().
Figure 32. Intra operative pic after crown removed, showing complete calcification of the tooth.
Treatment was paused, and the difficulty of treating such a tooth due to complete clinical calcification was discussed with the patient. Three options were discussed with her:
Attempt guided endo access
Apical surgery
Extraction and grafting for a future implant
The patient was informed that all three options would require a CBCT scan, so a scan was taken to evaluate the best course of treatment. The scan showed it was possible to attempt guided endodontic access to aid in locating canal entry points. The case was planned in Blue Sky Plan software (Chicago, Illinois) and printed on Sprintray Pro55 3D printer (Los Angeles, CA) ().
Figure 33. Endo guide planning in BSP cross sectional view.
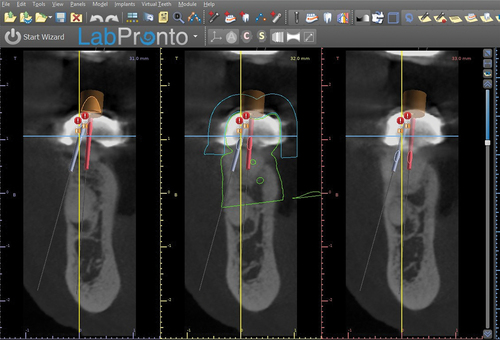
Figure 34. Endo guide planning in BSP tangential view.
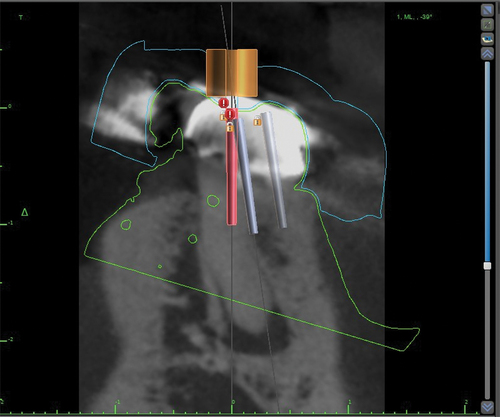
Figure 35. Guide created.
A week later, the patient came back to continue treatment using the 3D printed custom endodontic access guide using two endo access guides to drill for canals – one guide for the mesio-lingual (ML) and distal (D) canals, the other for the mesio-buccal (MB) canal (). D and ML canals were located and negotiated to patency (). Even though the guide helped to reach a point on the MB canal so that the original calcified canal could be visualized, the canal could not be negotiated due to extreme and complete calcification. After a second discussion with the patient, it was decided to continue with treatment, save the tooth and watch for healing. Instrumentation was completed with EDTA, NaOCl, and RCprep as lubricants. Obturation was completed with GP and Endosequence BC Sealer HiFlow from Brasseler (Savannah, Georgia, USA). No. 3 C-fiber post and Rebuilda (Voco) dual-cured composite buildup (Indian Land, South Carolina) was placed, and the patient was referred to her general dentist for final crown restoration ().
Figure 36. 2 guides were created on for MB and D canals, the other for ML canal.
Figure 37. 2 canals found using the endo guide.
Figure 38. Post op 1 radiograph showing final outcome.
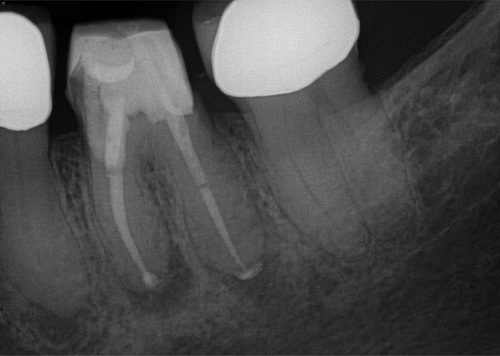
Figure 39. Post op 2 radiograph showing a different view of final outcome.
Unfortunately, due to her age and difficulty in mobility, the patient was unable to return for a follow-up visit. But the general dentist took a radiograph at an 8-month recall and confirmed the patient was asymptomatic, functional and doing well. Radiograph showed significant healing and reduction of lesion size on the distal root and about 50% reduction in lesion size on the mesial root (). A large invasive cervical resorption lesion was noticed on tooth No. 21, but the general dentist stated the patient felt she was too old to do anything about it.
Figure 40. 8 months recall by general dentist, showing signs of healing and noticeable invasive cervical resorption on tooth #21.
Acknowledgments
The author would like to acknowledge Dr. Keith Boyer for his assistance with this article.
Disclosure Statement
Dr. Kelliny has no finanacial interest in any of the mentioned companies, but he is a Key Opinion Leader for DentsplySirona, Sprintray and BlueSky Bio.
Correction Statement
This article has been corrected with minor changes. These changes do not impact the academic content of the article.
References
- Langeland K, Dowden WE, Tronstad L, Langeland LK. Human pulp changes of iatrogenic origin. Oral Surg Oral Med Oral Pathol. 1971;32(6):943–15. doi:10.1016/0030-4220(71)90183-6.
- Cvek M, Granath L, Lundberg M. Failures and healing in endodontically treated non-vital anterior teeth with post traumatically reduced pulpal lumen. Acta Odontol Scand. 1982;40(4):223–228. doi:10.3109/00016358209019816.
- Andreasen FM, Zhijie Y, Thomsen BL, et al. Occurrence of pulp canal obliteration after luxation injuries in the permanent dentition. Endod Dent Traumatol. 1987;3(3):103–115. doi:10.1111/j.1600-9657.1987.tb00611.x.
- Holcomb JB, Gregory WB Jr. Calcific metamorphosis of the pulp: its incidence and treatment. Oral Surg Oral Med Oral Pathol. 1967;24(6):825–830. doi:10.1016/0030-4220(67)90521-X.
- Oginni AO, Adekoya-Sofowora CA, Kolawole KA. Evaluation of radiographs, clinical signs and symptoms associated with pulp canal obliteration: an aid to treatment decision. Dent Traumatol. 2009;25(6):620–625. doi:10.1111/j.1600-9657.2009.00819.x.
- Jacobsen I, Kerekes K. Long-term prognosis of traumatized permanent anterior teeth showing calcifying processes in the pulp cavity. Scand J Dent Res. 1977;85(7):588–598. doi:10.1111/j.1600-0722.1977.tb02119.x.
- Robertson A, Andreasen FM, Bergenholtz G, Andreasen JO, Norén JG. Incidence of pulp necrosis subsequent to pulp canal obliteration from trauma of permanent incisors. J Endod. 1996;22(10):557–560. doi:10.1016/S0099-2399(96)80018-5.
- American Association of Endodontists. AAE case difficulty assessment and referral 2005. https://www.aae.org/specialty/newsletter/endodontic-case-difficulty-assessment-referral/. Accessed February 10, 2023.
- Kuyk JK, Walton RE. Comparison of the radiographic appearance of root canal size to its actual diameter. J Endod. 1990;16(11):528–533. doi:10.1016/S0099-2399(07)80215-9.
- Amir FA, Gutmann JL, Witherspoon DE. Calcific metamorphosis: a challenge in endodontic diagnosis and treatment. Quintessence Int. 2001;32:447–455.
- van der Meer WJ, Vissink A, Ng YL, Gulabivala K. 3D computer aided treatment planning in endodontics. J Dent. 2016;45:67–72. doi:10.1016/j.jdent.2015.11.007.
- Clark D, Khademi J. Modern molar endodontic access and directed dentin conservation. Dent Clin North Am. 2010;54(2):249–273. doi:10.1016/j.cden.2010.01.001.
- Lang H, Korkmaz Y, Schneider K, Raab WH. Impact of endodontic treatments on the rigidity of the root. J Dent Res. 2006;85(4):364–368. doi:10.1177/154405910608500416.
- Zehnder MS, Connert T, Weiger R, Krastl G, Kühl S. Guided endodontics: accuracy of a novel method for guided access cavity preparation and root canal location. Int Endod J. 2016;49(10):966–972. doi:10.1111/iej.12544.
- Connert T, Zehnder MS, Weiger R, Kühl S, Krastl G. Microguided endodontics: accuracy of a miniaturized technique for apically extended access cavity preparation in anterior teeth. J Endod. 2017;43(5):787–790. doi:10.1016/j.joen.2016.12.016.
- Buchgreitz J, Buchgreitz M, Bjørndal L. Guided endodontics modified for treating molars by using an intracoronal guide technique. J Endod. 2019;45(6):818–823. doi:10.1016/j.joen.2019.03.010.
- Krastl G, Zehnder MS, Connert T, Weiger R, Kühl S. Guided endodontics: a novel treatment approach for teeth with pulp canal calcification and apical pathology. Dent Traumatol. 2016;32(3):240–246. doi:10.1111/edt.12235.
- Kelliny patent design and method use. https://patents.justia.com/patent/11191616.