
Abstract
In general, the 3 D printed medical models are made based on virtual digital models obtained from machines such as the computed tomography scanner. However, due to the limited accuracy of CT scanning technology, which is usually 1 millimeter, there are differences between scanned results and the real structure. Besides, the collected data can hardly be printed directly because of some errors in the model. In this paper, we present a general and efficient procedure to process the digital skull data to make the printed structures meet the requirements of anatomy education, which combines the use of five 3 D manipulation tools and the procedure can be finished within 6 hours. Then the model is printed and compared with the cadaveric skull from frontal, left, right and anterior views respectively. The printed model can describe the correct structure and details of the skull clearly, which can be considered as a good alternative to the cadaveric skull. The manipulation procedure presented in this study is an easily available and cost-effective way to obtain a printed skull model from the original CT data, which has a considerable economic and social benefit for the medical education. The steps of the data processing can be performed easily. The cost for the 3 D printed model is also low. Outcomes of this study can be applied widely in processing skull data.
Keywords:
Introduction
The 3 D printing technology is booming, thanks to its advantages such as customization, rapid manufacturing, high accuracy and relatively low cost. We can print as many models as the demand [Citation1].
There have been various applications on the combination of 3 D printing technology and medical science [Citation2]. Waran et al. presented a procedure of making accurate 3 D spatial models of the nasal cavity, paranasal sinuses (sphenoid sinus in particular), and intrasellar/pituitary pathology, according to the data of an individual patient [Citation3]. Lee and his teammates obtained the pathology images of the maxillofacial defect through the CT scanner and input the data into a computer to reconstruct the 3 D model and evaluated the degree of defect. The process played an important part in the maxillofacial defect repair operation, which shows the advantages of the combination of CT, the 3 D technology and clinical medicine application [Citation4]. Matthew and his colleagues made use of similar methods to print the scapular osteochondroma model of a 6-year-old girl. The visualization of the model helped the doctor to analyse the pathology and the situation [Citation5]. Debarre et al. took the examples of the osteotomy for epiphyseal malunion, shoulder arthroplasty and femoral tracheoplasty to show that the 3 D printing technology can help make hidden or ambiguous details apparent and make sense in orthopaedic and trauma surgery. Their work showed that the 3 D printing can be applied in the reconstruction of lesion and defect area and the results are better than using only the CT 3 D visual reconstruction [Citation6]. The Sectra Inc. offers a set of solutions to improve the quality of complex 3 D images such as multiple fragment traumas. With the solution, it is easy to visualize trauma structure and diagnose a fracture. Sectra’s 3 D Core solution enables manual or semi-automatic bone segmentation [Citation7]. Nowadays, the technology of making medical models through 3 D printing is developing rapidly. Various materials with different colours and hardness are ready to choose. The 3 D model is easier to understand than the 2 D and 3 D image shown on the computer since the model is touchable and does not require the change of viewing angle in 2 D screen. In this case, the 3 D printed model has become a significant tool in medical education and surgery training.
Anatomy is fundamental to modern medical education. The traditional teaching methods mainly include using virtual 3 D images, 2 D atlases, and cadaveric skulls. The virtual 3 D images cannot be touched so its effects in the surgery education is limited. The 2 D atlases require that students have good spatial imagination. Cadaveric skulls are good tools for the anatomy teaching as they are real parts from human bodies. Compared with those methods, cadavers provide better teaching efficiency. However, due to the high cost of maintaining, a limited number of donors and the ethical concerns, the opportunity for students to use the cadaveric skull is limited [Citation8–10]. New methods are desirable.
The complex anatomy structure is one of the challenges for medical students. An accurate and touchable 3 D model can show all the details about the anatomy, and it can help lay a solid foundation for novices to learn the surgery.
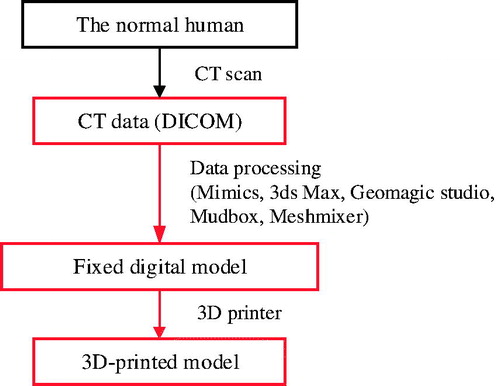
In this paper, we present a procedure of using computer software and equipment to make a skull model. This procedure includes the computer-assisted image processing, which fixes the model data to make the digital model accurate and ready to print. Then we choose the proper materials for the printing. To help medical students comprehend the model better, we paint the model according to the atlas. The procedure is shown in . The novelty of our study is that we make a 3D-printed model for anatomy education by solving the inaccuracy and errors of the data obtained from the CT scanner. The procedure focuses on the cadaveric skull and it can be done by the surgeons or lecturers individually. Compared with other professional medical image processing platforms or systems, like Sectra’s 3 D Core [Citation7] and Synapse 3 D [Citation11], this study provides a low-cost, customized and flexible solution.
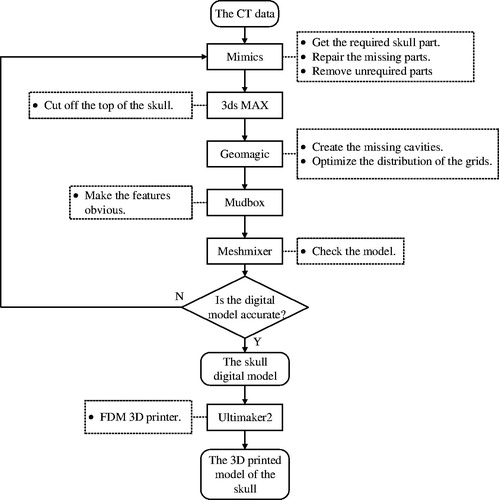
Figure 1. The model manufacture process. We collect CT data (DICOM files) and then process it with several software including Mimics, 3ds Max, Geomagic Studio, Mudbox, and Meshmixer to obtain the fixed digital model. Finally, we use a 3 D printer to print the model.
Materials and methods
Overview
We use Siemens SOMATOM Force CT scanner (horizon scan, 1 mm) to scan a normal male’s head to collect the data in the axial plane, with a slice width of 1 mm, a helical pitch of 0.9, and an image production interval of 1 mm.
The accurate structure of the skull model is the most significant element for a medical model. However, the procedure of collecting the digital data and format transformation may cause some mistakes or missing of the structure. In this case, repairing the digital model is the most important and difficult step during the whole process. has summarized the main problems and corresponding solutions in this study.
Table 1. Summary of main problems and corresponding solutions.
As the real procedure, the detailed operation and results are described in the order of using 3 D manipulation tools in the following parts.
Initial segmentation and repairing
The scan data is exported to a digital imaging and communications in medicine (DICOM) file and converted to STereoLithography (STL) file by the Mimics 17.0.
The CT result contains all the human organs and body structure. We have to obtain the required part of the skull by setting the thresholding value. Since not all the body structures are required during the skull anatomy education, such as the muscle, cartilaginous skeletons, and some CT equipment hardware, we edit the mask and delete them in and .
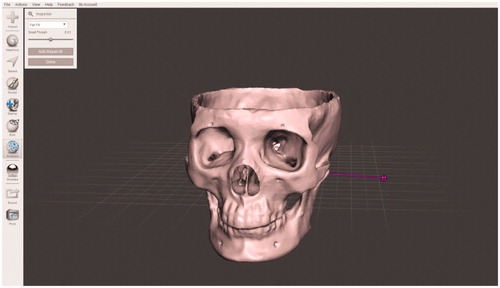
Figure 2. Set the thresholding value. When the CT scan file is uploaded, we select Menu bar > Segmentation > Thresholding, and, for the data, we set the minimum value as 226 (Bone(CT)) to get the required part of the skull model. The thresholding result is saved as a new mask automatically.
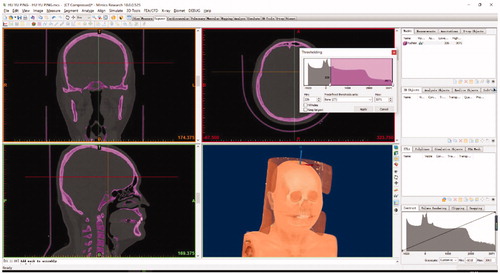
Figure 3. Delete the unwanted part of the model. We select Menu bar > Segment > Edit Mask in 3 D and use the “Lasso” to choose the unrequired parts, such as the vertebra. Then, we select “Remove” to delete it.

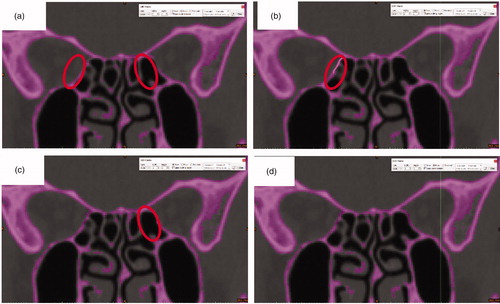
Figure 4. Repair the holes. a) The purple parts in the red circle should be connected. The CT scanning and thresholding value setting may cause some missing parts of the digital model. b) Using Menu bar > Segment > Edit Masks and selecting “Circle” with reasonable size and selecting “Draw” to connect the part on the left. c) Using the same steps as b) to repair the part on the right. d) the complete slice. Since the skull is stereoscopic, we have to “Draw” the missing parts slice by slice.
Meanwhile, the vertebra is a solid, which is unrequired and difficult to remove in Edit Mask tool. In this case, we use the Edit Mask in 3 D > Erase to remove them.
As we can see, the operations of adding required and removing unrequired parts are easy and quick in the Mimics ().
Slicing
Since there may be several missing, damaged or excess structures after accomplishing the above procedure, we have to delete the excess parts and repair the damaged and missing parts to make sure that the model is unbroken so that we can print it. Here, we use the 3ds MAX (2014) to process the model.
In the 3ds Max, we use the “slice” function to delete the skull cap ().
Figure 5. Cut the top part. a) Select the “Slice” tool; Move the cursor to a suitable place; b) Selecting “Remove the top” to delete the skull cap.
The holes filling
After removing the top skull, the skull is not an enclosure, which can cause difficulties when printing. We use Geomagic Studio (13.0) to repair it ().
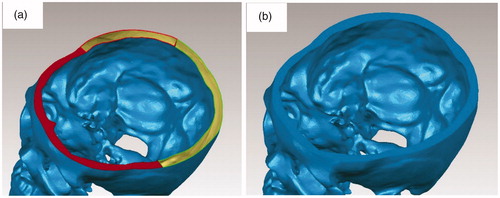
Figure 6. Repair the top. a) Use Fill Holes > Bridge in the edge of the skull cap, then use the Fill Holes > Fill All to repair; b) the surface is level now.
The Fill Holes tool of Mimics performs well in fixing the missing structures.
It is difficult to use a single thresholding value to distinguish compact bone and cancellous bone, so there may be some small holes in the surface of the skull. Then, we fix these holes ().
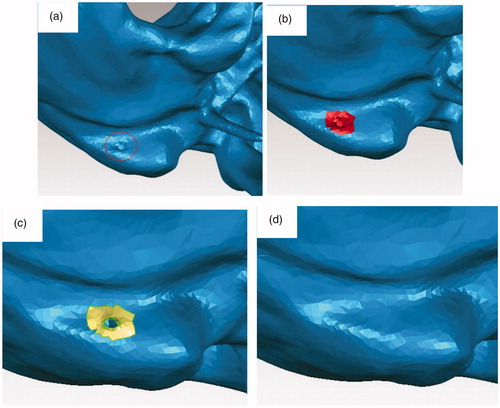
Figure 7. Repair the hole in the surface. a) There is a hole in the red circle; b) We select the hole and the surroundings; c) We delete the hole and make it a bigger hole; d) We select Fill Holes > Fill All to repair the big hole.
The surface optimization
The quantity and distribution of the triangular facets will affect the surface quality of the printed model. Hence, we use tools in the “Polygons” menu to improve the model () and the result is shown in .
Figure 8. Improve the quality of the model. We select Polygons > Repair > Remesh to retriangulate a polygon mesh to produce a more uniform tessellation. Then we select Polygons > Smooth > Relax to smooth a polygon mesh by minimizing angles between individual polygons, selected Polygons > Repair > Decimate to reduce the number of triangles without reducing surface detail or changing color.
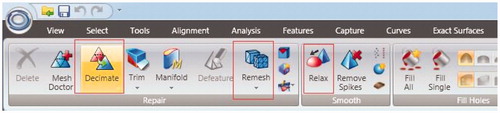
Figure 9. The model with a better quality and smooth surface.
Detail carving
Then we export the file in the OBJ (OBJect) format and upload it into Autodesk Mudbox (2012), an easily-handling digital carving 3 D manipulation tool, further to carve some significant portion features and make the feature more obvious ().
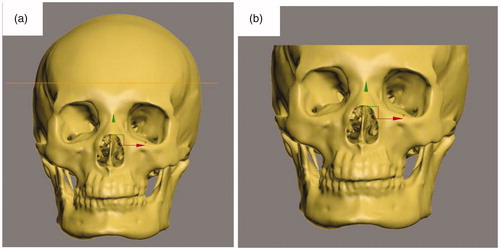
Figure 10. Make the features more obvious. a) The original digital model before manipulation in the Mudbox; b) We deepen the holes, such as supra-orbital foramen and infra-orbital foramen and the cheek part, which are not obvious before the operation; c) We repair the anterior clinoid and make them more obvious; d) We create two mastoid processes. (The size of anterior clinoid in the digital model is too small to show and to print accurately).
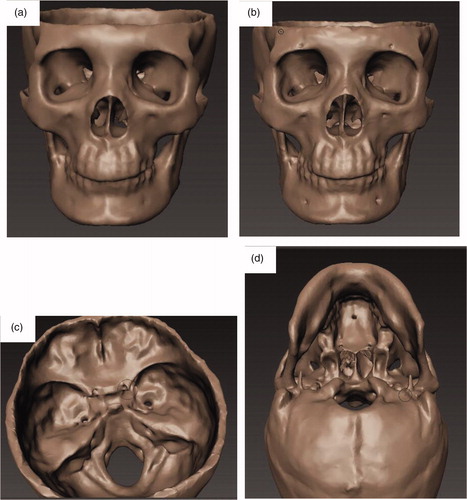
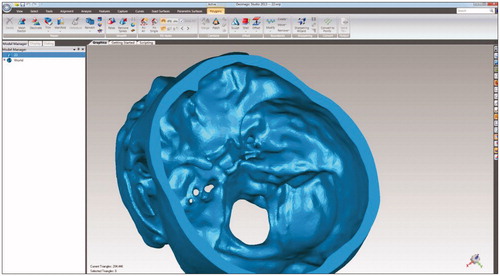
Figure 11. Review the digital model in Meshmixer and make sure that we can print it. If there are some defects remaining, we have to go back to the previous steps to repair them.
Checking
Since the original data is not accurate enough, there may be some damaged parts in the model. In this step, we check the digital model through Meshmixer carefully before the printing procedure ().
3D Printing
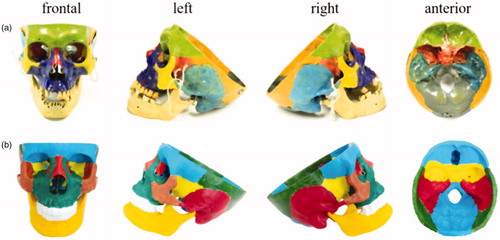
We chose the FDM (Fused Deposition Modeling) technology 3 D printer, Ultimaker2 (China, 2016, $500) to print the model in the same proportion as the other one, using white polylactic acid (PLA) materials with a diameter of 1.75 mm, and a layer thickness of 0.1 mm. We paint the model with the propylene in twelve different colors to distinguish different parts based on the atlas, which can help the students learn the structures better. The printed model, as well as the cadaveric skull, is shown in . The printing process took 28 hours and painting took 2.5 hours. Raw materials for each skull cost approximately $14. The 3 D printed skull has the same structure as the cadaveric skull. Also, it is easy to reproduce the 3 D printed skull since the accurate digital 3 D model has already been constructed.
Figure 12. Photos of the cadaveric skull and 3D printed skull. a) Cadaveric skull is shown in frontal, left, right and anterior views, respectively. b) The 3D printed skull is shown in frontal, left, right and anterior views, respectively.
Results
The printed model has already been used in a randomized controlled trial (RCT), which was to compare the learning efficiency of 3 D printed skulls with that of cadaveric skulls and the atlas. The results showed that the 3 D printed skull model improves study efficiency, especially in structure recognition, compared with traditional learning materials. Please refer to [Citation12] for the work. Specifically, 79 students in Peking Union Medical College were randomized into three groups with different learning materials: cadaveric skulls (n = 27), 3 D printed skulls (n = 26) and atlas (n = 26). All the students completed a pre-test before the class and a post-test after the class. As a result, students in the group with 3 D printed skull achieved the best score. Besides, most of students can hardly distinguish the printed model from cadaveric skull. Also, cadaveric skull might bring the psychological disorder to the user, while using printed model will not cause this problem. Hence, there is no doubt that the printed skull model can meet the requirement of teaching and this model is popular among the students.
The entire process presented in the paper can be applied for the construction of other 3 D medical models. Although some information of the structures may be missing during CT scan and format transformation, or the digital structure may be too thin to print, the model can be modified following steps shown in this paper, by combining computer-assisted image processing with the knowledge of the anatomy structures. In the part of the data processing, we have shown the detailed steps. The whole procedure is summarized in .
Figure 13. Summary of the workflow. We use five 3D manipulation tools to complete this procedure. We use Mimics to read the data and repair the model by adding the missing parts, use 3ds Max to cut off the top part of the skull, use Geomagic Studio to fix holes in the surface and automatically repair the imperfections in a polygon mesh, use Mudbox to make the features more obvious, and use Meshmixer to check the model. After these operations, the model is ready for printing.
Firstly, Mimics can read the DICOM files directly and output the STL file and meanwhile help edit the 3 D digital data. Many tools in Mimics, such as setting thresholding value and editing mask in 3 D, are useful in repairing the structure as we have shown. Secondly, the 3ds Max is a professional 3 D data processing tool and the “slice” tool is useful in removing the skull cap and we can quickly select some holes to delete or repair. Thirdly, Geomagic Studio is used to repair the surface holes. We can repair the data depending on the distribution of the meshes and also improve the distribution to make the surface of the model better. Then, Mudbox is used in digital carving. We use it to make some features more obvious. Before printing, Meshmixer is used to check the digital model. Since the anatomical structures are complicated, we have to use different tools to check and repair the digital model to assure the best outcome of printing.
Discussion
Performing a surgery requires surgeons with good spatial imagination as well as the understanding of patients’ condition [Citation13]. Anatomy is considered as the basis of medicine and surgery. The most common way to learn anatomy is using the cadaver. However, cadavers are not easily obtained or preserved. Besides, as the related ethics issues are attracting increasing attention, the number of cadavers is limited. In this situation, if we are able to obtain models showing the sophisticated anatomy structures, the surgery can be practiced repeatedly, which helps to increase the success probability of the real surgery [Citation14].
The 3 D printing technology is useful in the medical area. Medical models made by traditional method are costly and inaccurate. With the assistance of the medical image processing, the 3 D printing technology shows good usage in the medical science. We can obtain the model in a relative cheap, quick and convenient way by the 3 D printing technology [Citation15]. With the medical image processing, we can also customize medical models. Medical students, surgeons, and educational experts can do their research or studies on these 3 D printed models.
The procedures shown in the paper can be applied for other samples. Further, according to the doctors’ or lecturers’ requirements, the model can be correspondingly designed or changed during the digital 3 D model processing. For instance, the tumor model can be made and integrated into the skull model for the specific case. Since the 3 D printing technology becomes more and more developed, and the building volume of the printer is various and the procedure is efficient, not only the skull model but also other parts or organ models of the body can be 3 D printed and applied in the medical education.
However, the procedure presented in this study requires the combination of medical knowledge and computer skills. It needs a surgeon and an engineer to understand each other’s knowledge and skills.
Apart from the medical education, the application of the 3 D printing technology and computer-assisted medical image processing can also be used in the clinical medicine. The surgeries, especially endoscopic ones, require the surgeons to have excellent surgery skills and adequate knowledge about the body structures. However, the endoscopic checking is a complicated procedure and it takes much time for a comprehensive inspection. In this case, we can scan the patient’s sick part and 3D-print it. This can be helpful in the research and analysis of the disease, and the surgery simulation.
Conclusion
The 3 D printed models can help surgeons and lecturers in anatomy education. We solve the problems of inaccuracy errors of the model caused by the limited accuracy of the machine when directly obtaining data from the CT scanner. The user can complete the procedure individually. The model can be customized and designed repeatedly with a low cost and high efficiency. The procedures can be applied in the manufacturing of other medical models. The application of the 3 D printing technology is worth developing in the field of medical education.
Acknowledgement
We would like to acknowledge support in part from the National Natural Science Foundation of China under grants 61773382, 61773381, 61533019, 61872365; Chinese Guangdong’s S&T projects 2017B090912001, 2016B090910001, Dongguan’s Innovation Talents Project (Gang Xiong), Capital Characteristic Clinic Project [No. Z141107002514051], Young Teacher Training Program [No, X103852], Education Reform Program [No. X103851], Peking Union Medical College Hospital Young Teacher Training Program [2015zlgc0714], Beijing's S&T project [z141107002514051].
Disclosure statement
No potential conflict of interest was reported by the authors.
Reference
- Kumar S, Hofmann M, Steinmann B, et al. Reinforcement of stereolithographic resins for rapid prototyping with cellulose nanocrystals. ACS Appl Mater Interfaces. 2012;4(10):5399–5407.
- Friedman T, Michalski M, Goodman TR, et al. 3D printing from diagnostic images: a radiologist’s primer with an emphasis on musculoskeletal imaging—putting the 3D printing of pathology into the hands of every physician. Skeletal Radiol. 2016;45(3):307–321.
- Waran V, Menon R, Pancharatnam D, et al. The creation and verification of cranial models using three-dimensional rapid prototyping technology in field of transnasal sphenoid endoscopy. Am J Rhinol Allergy. 2012;26(5):132–136.
- Lee SJ, Lee HP, Tse KM, et al. Computer-aided design and rapid prototyping-assisted contouring of costal cartilage graft for facial reconstructive surgery. Craniomaxillofacial Trauma Recons. 2012;5(2):75–82.
- Matthew DT, Stephen D, Duncan B. 3-D printout of a DICOM file to aid surgical planning in a 6 year old patient with a large scapular osteochondroma complicating congenital diaphyseal aclasia. J Radiol Case Rep. 2012;6(1):31–37.
- Debarre E, Hivart P, Baranski D, et al. Speedy skeletal prototype production to help diagnosis in orthopaedic and trauma surgery. Methodology and examples of clinical applications. Orthop Traumatol Surg Res. 2012;98(5):597.
- Sectra Inc. 2017, Imaging IT solutions that lead the way in customer satisfaction. https://www.sectra.com/medical/orthopaedics/solutions/planning_tools_3d/ [cited 2017 Nov 15].
- Schmitt B, Wacker C, Ikemoto L, et al. A transparent oversight policy for human anatomical specimen management: the University of California, Davis experience. Acad Med. 2014;89(3):410–414.
- Gunderman RB. Giving ourselves: the ethics of anatomical donation. Anat Sci Ed. 2008;1(5):217–219.
- Tabinda H. Is dissection humane? J Med Ethics Hist Med. 2011;4:4.
- FUJIFILM. SYNAPSE 3D Advanced Visualization Software for Radiology. http://3dimaging.fujimed.com/. [cited 2018 Jun 10].
- Chen S, Pan Z, Wu Y, et al. The role of three-dimensional printed models of skull in anatomy education: a randomized controlled trail. Sci Rep. 2017;7(1):575.
- Shui W, Zhou M, Chen S, et al. The production of digital and printed resources from multiple modalities using visualization and three-dimensional printing techniques. Int J Cars. 2017;12(1):13–23.
- Wagner JD, Baack B, Brown GA, et al. Rapid 3-dimensional prototyping for surgical repair of maxillofacial fractures: a technical note. J Oral Maxillofac Surg. 2004;62(7):898–901.
- Li Z, Li Z, Xu R, et al. Three-dimensional printing models improve understanding of spinal fracture–A randomized controlled study in China. Sci Rep. 2015;5:11570.