
Abstract
A worldwide shortage of personal protective equipment during the COVID-19 pandemic has led to the development of new alternatives. We introduce two new disposable box-like head-and-face shields constructed using Japanese origami-style folding. The design comprises a single sheet of thick paper and a shield made of a thin, transparent plastic sheet. The first design, Model 1, is a head-and-face shield designed to cover the wearer’s head and neck. Model 2 was designed to solve the problem of heat and moisture buildup inside the shield. This version can be used as face shields for patients, and it allows clinicians to collect swabs from the nasopharynx for virus detection via polymerase chain reaction through pre-cut incisions near the nasal orifices. These two new box-like face shields are excellent alternatives to traditional face shields because of the low cost, compatibility with mass production, lightweight, and disposability.
A severe worldwide shortage of personal protective equipment (PPE) during the COVID-19 pandemic has forced healthcare workers to minimize their usageCitation1 and has led to the development of new alternatives.Citation2 World Health Organization reported that face shields could be used as alternative items in the absence of medical masks, which could be protective for a mouth, a nose, or eyes of a medical staff against direct exposure to droplets, though depending on the design of them or on the positional relationship between a health care worker and a patient.Citation1 We recently developed a novel Japanese origami-style face shield made of paper, which is almost same shape as a normal face shield and has been used in clinical settings, mainly in Saga Prefecture, Japan.Citation3 Here, we introduce two new disposable box-like head-and-face shields constructed using Japanese origami-style folding. The design, developed in conjunction with SAGASIKI Co. Ltd. (Saga, Japan), comprises a single sheet of thick paper and a shield made of a thin, transparent plastic sheet.
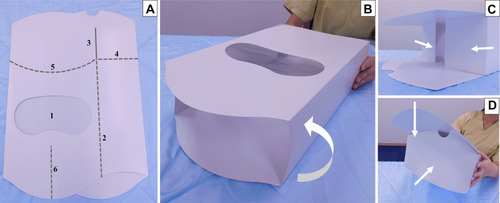
The first design, Model 1, is a head-and-face shield designed to cover the wearer’s head and neck. Before folding the box-like shield, its flattened form is a two-layer flat sheet with openings at both the top and bottom (). A face opening is cut out with a thin plastic sheet attached from the inside to protect the face from contamination (–). The head-and-face shield is prepared as follows: (1) The sheet is folded along the four straight dotted lines (only one of them is shown in ) into a three-dimensional box-like shape (). (2) Four pre-cut incisions are made consecutively along the lines above the top of line 2 (only one of them is shown as ); these cuts separate the top part of the box into flaps, front, back, and two sides. These flaps are then folded along the four dotted lines (along the lateral sides, one of which is shown as a straight dotted line in , and on the front and back, one of which is shown as a curved line bent toward the bottom in ). As a result, the front and back flaps overlap each other to form the head covering, and the box holds its square shape ( and ). (3) Finally, the front of the box is bent into an obtuse angle along the dotted line in the middle under the chin area () to provide extra space inside the box for the user to breathe more easily.
Figure 1 Model 1 of the box-like head-and-face shield and its assembly. (A) Front oblique view of the head-and-face shield before preparation and (B–D) the folding process used to prepare the shield for use. A box that is open at the top and bottom is flattened into a two-layer sheet. A face opening is cut and sealed with a thin plastic sheet (A-1) attached from the inside before folding. The dotted lines (A-2, 4, 5, 6) indicate where the paper is bent, and the straight line (A-3) denotes a pre-cut incision. The sheet is bent along the four straight dotted lines (one of them is shown as A-2) to form a three-dimensional box-like shape (arrow) (B). The four flaps separated by pre-cut incisions in the front, back, and sides at the top of the box (only one of which is shown as A-3) are then bent along the four dotted lines at the top part of the box (along both lateral sides, one of which is shown as straight dotted line A-4, and on the front and back, one of which is a line curved downward, A-5). Thus, the front and back flaps overlap each other (arrows) to form the head covering, and the box can hold its square shape (C, D). The front of the box is then bent in the middle under the chin along the dotted line (A-6) to form an obtuse angle, providing extra breathing space for the wearer.
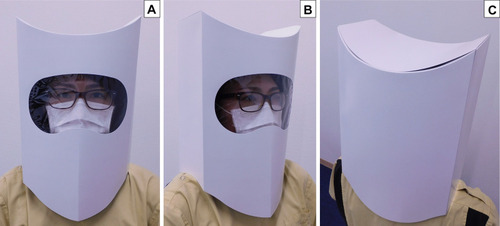
This box-like head-and-face shield covers the wearer from the top of the head to the neck (–). However, the visual field is wide enough to allow the user to readily provide medical care in any hospital setting ( and ). This head-and-face shield simultaneously plays the roles of a hair covering, goggles, and face shield, replacing each of these pieces of PPE, at least short time period in which the wearer could perform some medical procedures including harvesting specimens for polymerase chain reaction (PCR). In addition, it is large enough to accommodate a person wearing glasses or a mask. The only potential issue is the buildup of heat and moisture inside it.
Figure 2 Images of a person wearing Model 1 of the proposed head-and-face shield. (A) Front, (B) front oblique, and (C) back oblique views. The visual field is wide enough to allow the wearer to administer medical care (A, B) while completely covering the wearer’s head and neck (A, C). This shield can play the roles of a hair covering, goggles, and face shield, and the user can also wear glasses or a mask under the shield (A, B).
Model 2 was designed to solve the problem of heat and moisture buildup inside the shield. Although the front is similar to the previous one (), the lower part of the back is truncated (). The top part of the back is glued to the top part of the front in the center (, arrowheads), which makes it possible to return the face shield to its original three-dimensional box-like shape simply by pushing on both sides toward the center (, black and white arrows). The marked differences compared with the previous product are wide openings on the lower half of the back () and the tops of both sides (), solving the problems of heat and moisture build-up by allowing air ventilation through the openings, while the shield still completely covers the front of the head, face, and neck like Model 1 ( and ). This version can be used as PPE for patients, and it allows clinicians to collect swabs from the nasopharynx for virus detection via PCR through pre-cut incisions near the nasal orifices (, black arrows and , black arrow). The openings are usually closed but can be opened to insert a cotton applicator. This design is expected to reduce the clinician’s exposure to droplets if a patient coughs or sneezes.
Figure 3 Model 2 of the box-like face shield and its preparation. (A) Front and (B) back oblique views of the face shield before folding. Although the front is similar to Model 1 (A), the lower part of the back is cut off (B-1). Pre-cut incisions, which are usually closed, are positioned near the nasal orifices, to make it possible to collect a nasal swab for viral testing while the patient is wearing the shield (A, black arrows). The sheet is bent along the dotted lines (A, B) upon preparation. (C) Folding process. This model is easily prepared by pushing on both sides toward the center (black and white arrows), which is made possible by gluing the top part of the back to the top part of the front in the center (arrowheads).
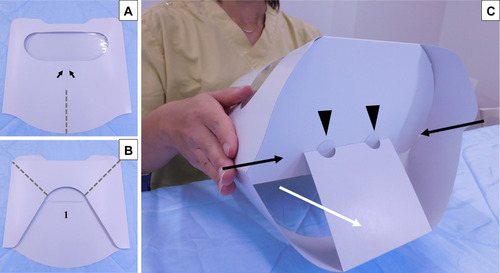
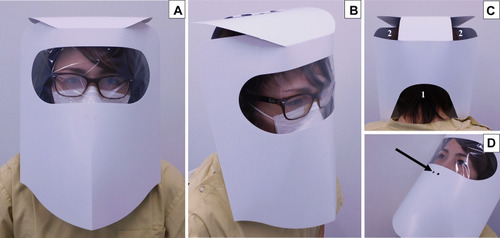
Figure 4 Images of a person wearing Model 2 of the proposed face shield. (A) Front, (B) front oblique, (C) back oblique views. This model completely covers the front part of the head, face, and neck like Model 1 (A, B). However, there are wide openings on the lower half of the back (C-1) and on both sides at the top (C-2), which prevents heat and moisture build-up by allowing air ventilation through the openings. (D) Image of collecting a swab from the nasopharynx of a person wearing Model 2 of the face shield. Nasal swabbing for viral testing (such as polymerase chain reaction testing) can be conducted on a patient wearing the Model 2 shield through pre-cut incisions near the nasal orifices (black arrow). The cotton applicator is inserted through one of these incisions, which are otherwise closed but can be opened easily by applying pressure with a finger to remove the covering. This shield could reduce the clinician’s exposure to droplets from the patient (such as if he or she coughs or sneezes) when collecting the samples.
These two new box-like head-and-face shields are excellent alternatives to traditional PPE and can mitigate the transfer of potentially contaminated droplets from a patient to the clinician as swabs are being collected for testing (such as PCR testing). The merits of the proposed design include low cost and compatibility with mass production; furthermore, it is lightweight and disposable and can be stored in a small space before folding. Although our models could be extremely useful and cheaply available in destitute of PPEs, complete safety of using them on relatively long-term basis such as in major surgical operations remains to be verified.
Ethical Statement
The person in the images had provided informed consent for the images to be published.
Author Contributions
All authors made substantial contributions to conception and design, acquisition of data, or analysis and interpretation of data; took part in drafting the article or revising it critically for important intellectual content; agreed to submit to the current journal; gave final approval of the version to be published; and agree to be accountable for all aspects of the work.
Acknowledgments
We thank SAGASIKI Co. Ltd, Saga, Japan for their cooperation and support in the development of the head-and-face shields. We thank Toru Miike, M.D., Ph.D., and Ms. Miho Hayashida from Saga University Hospital, Saga, Japan, for their support in this project. We thank Stephanie Knowlton, Ph.D., from Edanz Group for editing a draft of this manuscript.
Disclosure
The authors report no conflicts of interest in this work.
References
- World Health Organization. Rational use of personal protective equipment for coronavirus disease ( COVID-19) and considerations during severe shortages: interim guidance. (No. WHO/2019-nCov/IPC_PPE_use/2020.3). 4 6, 2020 Available from: https://www.who.int/publications/i/item/rational-use-of-personal-protective-equipment-for-coronavirus-disease-(covid-19)-and-considerations-during-severe-shortages. Accessed 1218, 2020.
- Senthilkumaran S, Arathisenthil SV, Meenakshisundaram R, Thirumalaikolundusubramanian P, Chandrasekaran VP. Plastic bag with holes as an alternative to face shield: our experiences. J Emerg Med. 2020;59(3):444–445. doi:10.1016/j.jemermed.2020.06.04632814677
- Tago M, Anzai K, Yamashita S. A new Japanese origami-style face shield made of waterproof paper and a transparent plastic sheet for use during the COVID-19 pandemic. QJM. 2020. doi:10.1093/qjmed/hcaa277