Abstract:
This article is a personal essay on the use of images in the teaching of biology. Topics covered include the use of 35 mm slides in lectures and the development of ‘image centred’ teaching materials in the form of computer assisted learning (CAL) packages and an interactive resource of biological images for school children and teachers. The most effective ways of digitizing images are discussed and some of the ways in which images are then used in lecture presentation packages is described. Finally, some of the imaginative uses of the Web as a teaching resource are discussed, and a brief guide to Web-based sources of biological images is presented.
Keywords:
Image conscious.
As biologists we have the great advantage of being in the business of describing and explaining the great diversity of living organisms and biological systems that have evolved on this planet. One only has to have watched David Attenborough’s epic ‘Life on (or of) ….’ television series and flip through the lavishly illustrated books that accompany them (e.g. CitationAttenborough, 2002) to be aware how visually stunning and appealing living organisms are, or at least those examples selected by the film producers! It is also difficult not to be impressed by the high quality of the graphic diagrams and photographic illustrations that grace modern biological science textbooks these days and which serve both to explain and inspire. The publishers of some of these textbooks also make a selection of the illustrative material available, often in an interactive form, on the Web (for examples, see CitationPurves et al 2001 www.thelifewire.com or CitationMadigan et al 2002 http://www.prenhall.com/brock/). It is often said that a picture is worth a thousand words and the following is a personal account of the ways in which I have used images to enhance my teaching.
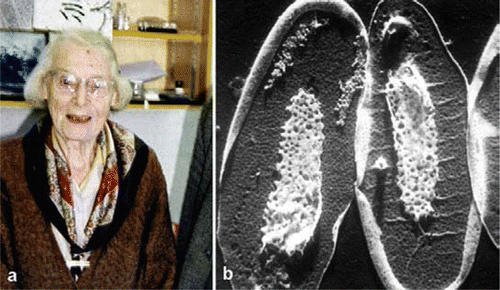
I did not become a fluent reader until I was nearly 10 years old. I fear the most influential formative influence on my early educational development was the Eagle Comic with its stunning visual cartoon strip ‘Dan Dare’ and elaborate 3D cut away drawings illustrating all that was best in cutting edge 1950’s technology. When it comes to learning styles, I was visually oriented from the outset. Whilst at secondary school, I was introduced to the local Natural History Society and soon became a keen birder and, later, fungus forayer. I soon transferred my academic allegiance from art to biology but still spent a lot of time drawing and painting, mostly of birds and mushrooms. These days my paint box has been swapped for ‘Paint Shop Pro’ (JASC Associates, Eden Prairie MN, USA). It was also fortuitous that my period as an undergraduate and postgraduate student in the late 1960’s and early 1970’s coincided with the time when scanning and transmission electron-microscopy were the ascendant tools then available to biologists. Whilst an undergraduate at Imperial College I had the good fortune to attend a number of stimulating lectures given by the late Professor Irene Manton (). I still vividly remember a seminar in which she described the exquisite microscopic scales produced by chrysophyte algae (). Irene Manton was an eloquent and enthusiastic promoter of the wonders of microscopy (CitationManton, 1975) and was also an expert and avid art collector (see Peter Scott Gallery web page). Irene Manton undoubtedly inspired me to become an electron-microscopist and throughout my research career I have used microscopy (both electron and light) to study aquatic fungi and algae. In the mid nineteen-eighties, I started a fruitful collaboration with Hilda Canter who worked at the Freshwater Biological Association, Windermere laboratory. Hilda’s photographs of freshwater algae and their parasites are not only technically brilliant but are also stunningly composed, artistic compositions (CitationCanter-Lund and Lund, 1995). So collecting and working with images have been my stock in trade.
Fig. 1 a) The late Professor Irene Manton (a) was a pioneer electron-microscopist and an eloquent proponent of the art of microscopy. She studied many things including the way chrysophyte algae produced their elaborately sculptured scales. b) Whole mount shadowed transmission electron microscope preparation of the chrysophyte alga, Synura).
A career on the slide.
Traditionally, I suspect the way most of us used our images in teaching was by showing slides using a standard 35mm-slide projector. When I joined Newcastle University as the mycology demonstrator in the mid 1970’s, I was greatly influenced by my colleague Colin Dickinson. He made extensive use of images of fungi in his teaching and had a large collection of teaching slides that he freely shared with me. A decade later, in the mid 1980s, I was appointed to a lectureship where I had the responsibility for teaching ‘cryptogamic botany’ and so had to start acquiring images of lichens, seaweeds and microscopic algae to supplement my mycological portfolio.
Fig. 2 Two examples of the preparations of fixed specimens of the red alga Chylocladia and the jellyfish Aurelia, prepared by H.C. Sorby for direct viewing in an early slide projector.
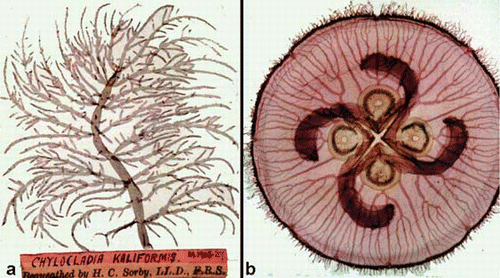
Probably the most curious source of illustrative material of algae that I use in my teaching came from ‘slides’ prepared by the eminent Victorian geologist and biologist H.C. Sorby, who had devised a way of preserving carefully mounted specimens, mostly of small rhodophyte algae and other marine organisms, between 2 × 2 inch glass plates (). He could directly project them using the bulky predecessor of our modern slide projector. There is something strangely compelling about viewing the actual corpse rather than an image of it.
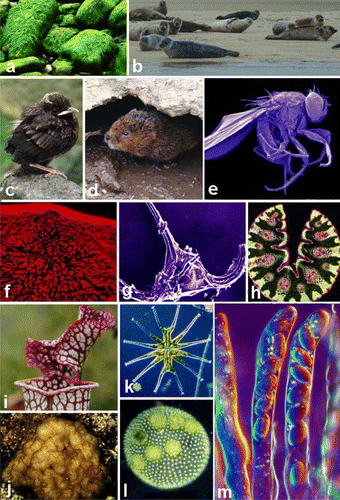
Whenever possible, I like to use my own images rather than copy the illustrations of others. I was also a keen photographer of natural history subjects in general and quickly built up a large but not always well-identified collection of natural history images (a-j). I have two filing cabinets groaning with slides and most of my study at home seems to be taken up with files packed with slides. Sadly, my enthusiasm for collecting images was not matched by an equal one for organizing my collection! As the term would go by the entropic disorder of my slide collection would become greater. This was not helped by my habit of hurriedly offloading the slides from my slide carousel onto the top of my filing cabinet where they would sit in precarious piles until the end of each term. When it came to using this resource to illuminate my lectures, the other problem I had was deciding the best time to present slides within the traditional lecture format. Giving research seminars and general talks to local natural history groups etc. was no problem since the entire talk would be based around slides. However, in an average undergraduate lecture, typically there would be a period of ‘chalk and talk’ or ‘place and discourse’ if overhead projector (OHP) acetates were being used, and the lecture would conclude with me showing a set of appropriate pictures. I did, however, find that once the students had got used to this pattern, then the dimming of the lights and the switching on of the projector would be the signal for the hurried closing of notebooks and packing of bags ready for a quick exit! To counter this, I would often opt for showing at least some of the slides both at the beginning and in the middle of the fifty-minute slot. This at least broke up the talk and enabled students to allow their pens to cool down and give their writing-hands time to recover!
Fig 3 A selection of images from my eclectic collection of teaching slides and micrographs. a) Rocky shore boulders covered in Enteromorpha; .b) Common seals on Sandbank, Morston, Norfolk; c) Fledgling blackbird, Jedburgh.; g) Scanning electron micrograph of the planktonic alga, Ceratium; h) Section of Ligustrum grass leaf; i) Hood of the pitcher plant Sarracenia, University Botanic Garden; j) Brown seaweed Leathesia, Llanes, Spain; k) Green desmid, Micrasterias, Canberra, Australia; l) Green coenobial alga Volvox, Malham, Yorkshire; m) Differential interference contrast micrograph of asci and ascospores of Morchella esculenta. images b, c, i and m and were digitised using the Nikon Coolscan film scanner. All remaining photographs were captured from slides using an Olympus Camedia 3040 digital camera with slides placed on light box as shown in f.
The next logiCAL step?
Another development in my use of images in teaching was initiated quite by chance. A colleague who was the link person for the TLTP-funded ‘Biodiversity Consortium’ project ( and see the Biodiversity Consortium home page) couldn’t attend a consortium meeting in Nottingham and deputized me to take his place. This project was conceived and funded in response to the perception that the resource base of expertise and knowledge to teach biological diversity within British universities was being seriously eroded. The aim was to produce computer assisted learning (CAL) material that would be suitable for teaching first year undergraduates about the full spectrum of biological diversity. The aim was to encourage ‘experts’ within the academic community to co-author units on their specialist groups. The institutions that signed up to the consortium had to promise nothing more at that time than to use the teaching resource that was developed. At that time (1994), the development of the teaching interface, the ‘Scholars Desktop’, had just been completed together with some of the teaching units, such as Carnivore Diversity (b) and a ‘virtual field trip’ to the Sonoran Desert. These teaching units made extensive use of still images, supplemented with video clips and animations (b-g). I was hooked by the concept! Before being released, all Consortium teaching units were sent out for peer review. Downloadable outlines of the available courseware units can be accessed from either the Biodiversity Consortium or Virtual School of Biodiversity web pages. I immediately thought that the ‘virtual fieldtrip’ concept could be applied to a ‘fungus foray’. Over the next 18 months, my best toadstool images were copied onto compact disk, using the commercial Kodak PhotoCD scanning service. I was introduced to the black art of doctoring pictures in image manipulation programmes such as Adobe Photoshop (Adobe Systems Inc., San Jose, CA, USA), so that the toadstools appeared where and when you wanted them rather than where and when nature decreed! The second phase of TLTP funding to the Consortium was at a reduced level and it was, therefore, decided to put development of the virtual foray on hold. It is still one project that I would like to take up again some time.
Fig. 4 a) Screenshot of the Biodiversity Consortium homepage http://ibis.nott.ac.uk/biodiv/. In the 1990’s the Consortium produced a range of CAL teaching material on subjects ranging from Carnivore (b) to Fungal Diversity (c), as shown in the screen shots that illustrate the common Scholars Desktop Interface and ‘image oriented’ teaching material. The other screen shots show a typical ascomycote life cycle (d) which, when explored, reveals details of ascus formation (e) and structure (f). As well as making extensive use of images many of the units also contain short video clips — such as the expanding mushroom fruiting bodies (g).
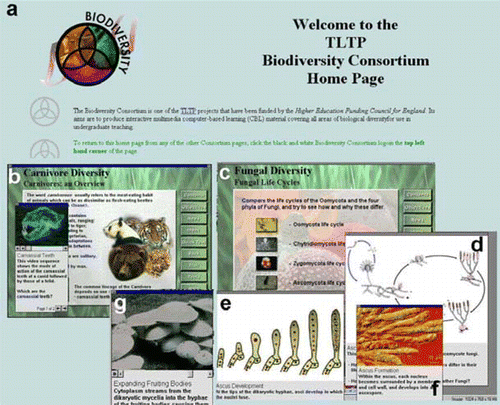
However, not allowing ourselves to be discouraged, we did manage to get hold of some additional funds to enable us to develop two generic ‘units’ on Fungal and Plant Diversity. We had already gone some way to developing the former as part of an introductory briefing which fronted the aborted virtual foray. The Fungal Diversity unit () was developed during a frenetic 6 weeks period at the beginning of 1997. I supplied the rough text and most of the images for the Fungal Diversity unit and Will Trewhella expertly translated them into a pedagogically challenging CAL-based teaching unit. This material is deliberately not textbook-like or encyclopaedic in the way information is presented. Students are frequently posed questions, some of which are answered within the unit whilst others require follow-up reading. The section on the importance of fungi to humans was tackled by means of a stand-alone multiple-choice Quiz. The first version was previewed at the spring meeting of the British Mycological Society held in Nottingham in April 1997. Part of the feedback we received from that meeting led us to add the Oomycota life history to the unit. Subsequently, the Fungal Diversity unit was further developed in conjunction with Kevin Hyde and Welcome Ho at the University of Hong Kong as part of the Virtual School of Biodiversity (VSB) project. The latter organization has largely provided the funding for the ongoing development of this teaching material since the late nineties.
This CAL courseware material was used in Nottingham as part of a completely self-taught second year module on Biodiversity. At Newcastle, we have used the units on Fungal, Prokaryotic and Plant Diversity to supplement our general botany and microbiology courses. We give students worksheets based on the CAL material that they complete and submit in their own time. It has enabled us to introduce the relatively unpopular plant and microbial systematics to undergraduates in a more enjoyable way. However, the distribution, support and use of this excellent resource of teaching material is still the cause of much frustration and must be one of the best kept secrets in British higher education. The Scholars Desktop is currently being adapted for delivery over the Web. It is also hoped that we will soon be able to distribute the ‘Microbial Diversity’ elements (Fungal Diversity, Prokaryote Diversity and Kingdoms and Domains) that were developed in conjunction with the VSB, as a standalone compact disk (CD). Adobe Acrobat (pdf) files outlining the information in these units can be downloaded from the resources section of the VSB website. Details as to pricing and release date can be obtained from Dr Will Trewhella directly (whose details are also available from the same website).
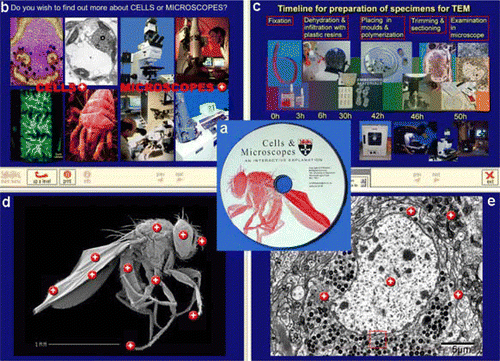
I have also been involved in another project that was initiated at Newcastle as part of a focus group with local teachers. Many of them wanted photographs that they could use in their teaching, particularly electron-micrographs of cells and organelles. The electron microscope unit at Newcastle had already assembled a good selection of images that it would print out and distribute to visiting school parties. We considered putting the material onto the Web but several teachers indicated that access to ‘external websites’ from their schools was often slow and they preferred something that could be sent to them on a CD so they could load it onto their own school server. It was finally decided to produce a CD with the images on since this could be distributed easily and cheaply. This led to the development of the CAL compact disk ‘Cells and Microscopes — an interactive explanation ’ (). I was able to put my experience developing CAL units to good use preparation and montage production myself. Teachers or pupils can print out a relatively low-resolution hard copy of any pictures they want together with the associated explanatory text. Again this project has enabled us to exploit in a different way the images that my colleagues and I use in our teaching. We have also made the material available to our students on the Newcastle intranet and it forms a useful resource for first year cell biology courses. Some of the images on this CD have been made available to the LTSN ‘ImageBank’ discussed later. However, if you are interested in the CD version where the images can be explored interactively and printed out, then contact the author at Newcastle for further details.
Fig. 5 Screen shots taken from my ‘Cells and Microscopes’ CD (a) which was produced to explain modern microscopes and give access to a range of micrographs that can printed off for use as a teaching resource material. The top left panel shows the root screen where students can choose to either explore cells or microscopes. On the right (c) is shown a timeline diagram summarising the preparation procedures required for transmission and did all of the image electron microscopy. The bottom two panels show images of a fruit fly (d) and earthworm brain cell (e). Clicking on the red buttons reveals much higher magnification views of organs or organelles. Individual images can be printed out with explanatory text.
The Digital Revolution — PowerPoint to the people!
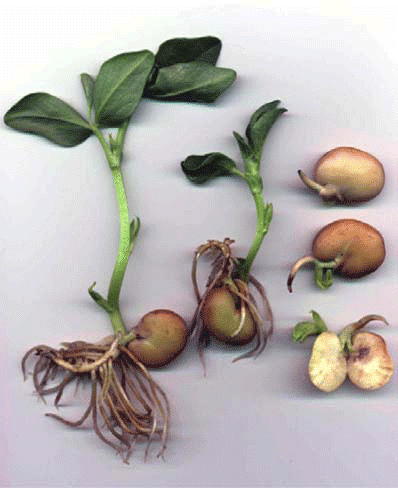
Developing web-based and CAL teaching resources or simply preparing computer- based lecture presentations does require getting images (prints, slides etc.) into digital format. For individuals like myself with a large slide collection, this may be the main factor that inhibits the adoption of the new digital technology. Since photographs form a major part of my research data, I was fortunate enough to have assembled a fairly comprehensive collection of devices for digitizing images (). However, the time this all takes is still a major constraint. I know of colleagues who delegate this to secretaries or technicians, but like so many hardcore ‘image freaks,’ I like to have direct control over the processing of my pictures. Using a dedicated slide/35mm negative scanning device such as the Nikon Coolscan II (Nikon Corp., Tokyo, Japan) it takes two to three minutes to scan each image. Many modern flatbed scanners such as the Epson Perfection 1240U (Seiko Epson Corp., Nagano, Japan) also offer film scanning (so-called transparency) adaptors. These do not produce quite such good quality slide scans as their dedicated counterparts but can produce images that are more than acceptable for use on Web sites and for digital projection. These devices are, however, even slower at delivering the relatively high resolution scans needed for slides. However, I have found that flatbed scanners can be used as an effective way to record specimens such as toadstool fruit bodies or small plants (). This method gives images of surprisingly good quality with high depth of field and without the strong shadows produced when using a copy-stand with halogen lamp illumination for similar purposes.
Fig 6 An illustration of equipment I routinely use for digitising images. a) Computer workstation (Dell Precision Workstation with 1GHz Pentium II processor 512K RAM, 40 and 60gb hard drives, Matrox Millenium Marvel video capture card and 17 inch monitor. b) Nikon Coolscan II slide scanner. c) Epson Perfection flatbed document scanner. d) JVC SVHS Video recorder and e) associated TV monitor for viewing videotapes. Video clips and still images are captured from video tape via the Matrox graphics card. f) My routine slide copying set-up using Olympus Camedia 5040 digital camera and light box.

However, I now use a digital camera as my preferred option for copying slides. I originally used a 3 megapixel Olympus Camedia 3040 (Olympus Optical Co., Tokyo, Japan), and have recently upgraded to the 5 megapixel, 5040 model (f). I attach the camera to an inverted tripod mount above a standard light box. Using such as system I have managed to copy around three to four hundred slides an hour! The quality of images produced this way is fine, at least for digital projection, although sometimes the images do require a little tweaking of contrast, brightness and sharpening in Photoshop. As you can see from , it is almost impossible to tell the images captured using the dedicated slide scanner from those captured by means of digital camera. I now use this method for digitizing my large format electron micrograph negatives and it produces images of acceptable quality for publication (see CitationGlockling and Beakes, 2002).
Fig. 7 Germinating broad bean (Vicia faba) seeds and seedlings. This image was made by placing plants directly onto the Epson Scanner flatbed scanner. A piece of white card was held behind the specimens about 4 cm above them. Note overall sharpness of image and general lack of strong shadows.
Once images have been digitized, the next problem is to store and catalog them. I routinely archive my images using a compact disk writer using the standard CDR (write once, read only) format, which is probably the most cost-effective and readily transferable format currently available. I have been doing this for 4 years now and have already amassed around 300 disks of images! Fortunately, there are ways of electronically cataloging digital images which at least permits fairly rapid visual searching. Whilst many image manipulation programmes such as Paint Shop Pro will produce thumbnail displays of all images on a hard disk or CD, I have found the program I use most for image archiving has been Thumbsplus (Cerious Software Inc., Charlotte, NC, USA). One can access thumbnail views of all offline CDs which I find useful for quickly scanning through my collection for locating that elusive image. If I was a more ordered database-oriented person, I could also use this programme to annotate my collection of images so that they could be assessed via keyword rather than visual searches.
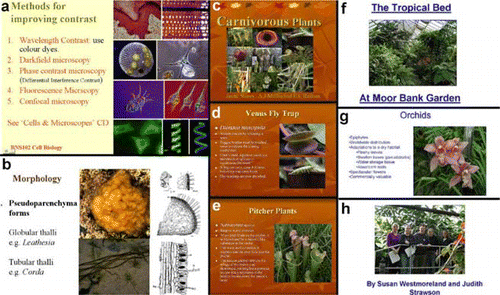
At Newcastle, the use of computer presentation packages such as PowerPoint (Microsoft Corp., Santa Rosa CA, USA) in conjunction with video data projectors has almost completely usurped the good old 35mm slide projectors. Presentations can be uploaded directly from your office computer via the campus network, although I personally still prefer to run all my lectures from my personal laptop computer. Different types of media (text, and pictures) can be seamlessly integrated into presentations (). The provided templates, love or hate them, also mean that information has to be delivered in more or less readable font sizes and in acceptable amounts This certainly makes for flashier presentations, although whether they represent a significant pedagogical advance could be debated. Style is no substitute for substance. However, for an image person like myself, I feel wonderfully freed from the constraints imposed by the old 80-slide carousel and the necessity of switching backwards and forwards, and from blackboard or OHP to slide projector and/or video player. This move to computerized presentations was further speeded up by the adoption of the Blackboard Learning Management system (Blackboard Inc., Washington, MD, USA) by Newcastle University. PowerPoint presentations are easily uploaded onto the Blackboard server and then can be accessed by students across campus. Increasingly our students expect us to do this. On the flip side, this has resulted in complaints from the students if the presentations are too complex because this increases the cost for them of producing printed hard copies (inadvertently this arrangement has shifted the cost of producing real, viz. paper, handouts from the University to the student). So, reluctantly, I have bowed to pressure and made, at least my uploaded presentations somewhat simpler in style ( a,b). We now introduce first year undergraduate students both to the delights of our botanic gardens and to using PowerPoint as a communication tool in a single exercise. Students work in teams of four to six and are given the paper guidebook to the greenhouses. Their brief is to produce a PowerPoint presentation describing one allocated section of the garden in as imaginative and exciting way as possible. They are let loose with the departmental digital camera for 30 minutes to acquire the necessary illustrative material that they will use. Illustrations of what the students have presented are shown in c-e and 8f-g. This approach has proved to be a fun way to introduce the botanic garden and has provided a useful introduction to using images in presentation packages and developing Web material.
Fig. 8 Screenshots of PowerPoint teaching slides showing how text diagrams, video photographs and diagrams can be integrated together to highlight and illustrate text points. a) Slide summarizing different types of light microscopy (from first year cell biology lecture). b) Slide summarizing brown algal morphology — showing how one of the images shown in has been used in a teaching context. Six slides produced by two groups of first year undergraduates who were set the objective of producing an attractive presentation describing some of the collection’s insectivorous plants (c-e) and the tropical beds (f-g) at the university’s botanical gardens.
Caught in a web of delights
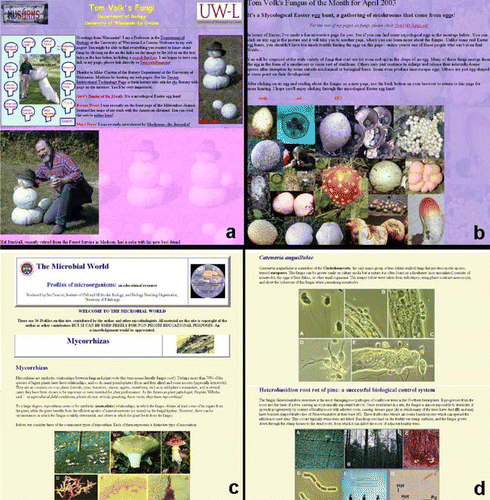
In addition to using digital images to prepare CAL tutorials and PowerPoint presentations, the other major way in which digital images are now being used in teaching is in the development of Web sites and Web-based teaching material. This is something I have yet to do myself but find myself impressed (and also dismayed) by what is now available. The listed sites are just some of those that I have used in the teaching of mycology and microbiology and illustrate the diversity of what is on offer. Like so much associated with the Web, these sites reflect the idiosyncrasies, interests and efforts of some of the more ‘image conscious’ academics. Two very individualistic sites immediately come to mind, originating from two highly respected North American mycologists, Tom Volk (Citation Volk, 2003 ) and George Barron (Citation Barron, 2003 ). Both have lively descriptions of fungi and both make extensive use of their own superb images (a). Both authors constantly update their site and each month add new information. Tom Volk, for instance, has a ‘Fungus of the Month’ feature. Both reflect a clear enthusiasm for their subject and provide a resource of images and scientific information in equal measure. The third ‘individual’ website that I would like to highlight is that written by Jim Deacon (b The Microbial World website ) from Edinburgh. Jim has drawn on his extensive teaching experience, which includes writing an introductory mycology text book (CitationDeacon, 1997), to produce a site that is very much the equivalent of a structured on-line textbook. A similarly informative and richly illustrated site has been developed at the University of California Museum of Paleontology, which covers the whole spectrum of living organisms in a lively and informative manner. The problem, of course, with the Web is that virtually none of the information is peer-reviewed in the way that papers and textbooks are and the resource provided can be of variable quality and reliability, to put it kindly.
Fig. 9 Screenshots showing two very different ‘personal’ sites which are an excellent source of information and are well illustrated. Tom Volk’s Fungi (http://botit.botany.wisc.edu/toms_fungi/) is a highly personal site that gives access to lots of nice images of higher fungi, together with information presented in a lively and amusing way (a-b). The Microbial World web pages (http://helios.bto.ed.ac.uk/bto/microbes/microbes.html.) provide an informative view of microbial ecology (c-d).
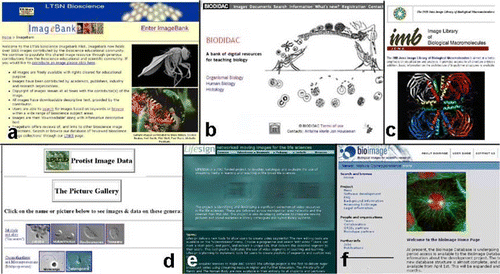
I have concentrated a great deal in this article about acquiring, managing and digitizing images that I have personally taken. However, if you are not an image freak like myself then you can always access images taken by other people, bearing in mind any issues of copyright. The Web has suddenly opened up easy access to a huge resource of pictorial material. Fortunately there are now a number of sites worldwide dedicated to making images freely accessible to the biological sciences teaching community (). The Learning and Teaching Support Network (LTSN) BioScience group has recently established its own pilot resource of biological images called ImageBank. At the moment it appears as though a relatively small group of individuals have contributed to this site and the images that are available very much reflect the specialist interests of the contributors. The success of this site will ultimately be dependent both upon the quality and diversity of images that are made available through it. One question that may have to be addressed in the future is whether editorial control will be required for such a resource. In an ideal world, there really needs to be a strategy for both selecting and soliciting images in such a way that the whole of the biological spectrum is covered. Another site dedicated to the provision of teaching images is the Biodidac initiative hosted by the University of Ottawa and which contains nearly 6000 resource items, grouped under three categories: organismal biology, human biology and histology. This site appears to have commissioned a whole series of clear line-drawings from a biological artist of a diverse range of biological material. I particularly like the simple display interface provided by this site and certainly found it easier to browse than the comparable ImageBank material, although this probably reflects the fact that it is closer to the way I normally search my image collections visually (see above). Both ImageBank and Biodidac have been set up to provide a wide spectrum of biological images, but there are a number of sites that provide a more specialized range of material. Examples include sites dedicated to images of biological macromolecules (IMB Jena Image Library website; protists (Protist Image Data website) and video clips of biological subjects (Lifesign networked moving images for the life sciences website). As an aside, anyone looking for a resource of moving images of microorganisms, Nick Read and Patrick Hickey have recently launched a CD, sponsored by the British Mycological Society, containing a superb selection of time-lapse movies of living fungal hyphae, generated using cutting-edge confocal microscopy (see the Fungal Cell Biology Group website). Quite a number of commercial firms involved with selling microscope equipment also list image resources on their websites (e.g. Biological Images on the WWW website). Finally, another UK based resource site dedicated to biological images, but this time for use primarily in research rather than teaching, is also being established (Bioimage website). Although aimed at research, it does look as though this site will be a useful resource of images for cell biology teaching. Most of the above sites have links to other image resources. This brief review represents the tip of a very, very large image iceberg that can provide endless hours of net surfing fun, or time wasting, depending upon your point of view.
Fig 10 Screenshots of a selection of Web sites which are resources for biological images.
LTSN Bioscience Imagebank website is a pilot project providing image resources for the biological sciences. (http://bio.ltsn.ac.uk/imagebank/)
BIODIDAC image resource hosted by the University of Ottawa. The line drawing of the malaria parasite shown is one of many specially commissioned illustrations that can be downloaded from this site. (http://biodidac.bio.uottawa.ca)
IMB Jena Image Library of Biological Macromolecules is a source of some, often striking, computer-generated images of biological molecules. (http://www.imb-jena.de/IMAGE.html.)
Protist Image Data site hosted by the University of Montreal is a useful source of both images and information on protists. (http://megasun.bch.umontreal.ca/protists/gallery.html.)
Lifesign, hosted by the University of Portsmouth, is a useful catalogue of moving images (http://www.lifesign.ac.uk/default.asp.)
Bioimage, hosted by the University of Oxford, unlike the other sites listed, is a site dedicated to providing an image resource for biological research. (http://www.bioimage.org/partners.jsp.)
Summary
I hope this article will have given you some impression of the rich and varied uses that images of biological specimens can be put to in the teaching of biology. We are indeed fortunate in working with subjects that offer so many beautiful visual images. The increasing use of computers in our teaching now gives us even more scope than ever to access and make use of all kinds of visual material in our presentations. Students can also be encouraged to take pictures for themselves and produce their own lively and interesting presentations and web pages. Finally, all that I need to do now is persuade someone to grant me a sabbatical so I can go away and properly catalogue my exponentially growing collection of still and moving images properly.
Acknowledgements.
I would like to dedicate this article to Dr Hilda Canter, who has set a standard for photographing microscopic specimens for us to aspire to. I would also like to thank Will Trewhella who introduced me to the delights of developing computer aided learning packages and whose skill and patience translated my images and hurried words into something of educational worth. Finally, I would like to thank Trish Walker of LTSN BioScience for giving me this opportunity write this essay.
References
- AttenboroughD. (2002). The Life of Mammals. St Helier, Jersey: BBC Publications (Domino Books).
- BarronG.L. (2003). George Barron’s Website on Fungi — home page.: http://www.uoguelph.ca/~gbarron/index.htm. Accessed 07/04/03.
- Biodidac — A bank of digital resources for teaching biology: http://biodidac.bio.uottawa.ca. Accessed 07/04/03.
- Biodiversity Consortium: http://ibis.nott.ac.uk/biodiv/ Accessed 07/04/03
- Bioimage — biological images for scientific research home page: http://www.bioimage.org/partners.jsp. Accessed 07/04/03.
- Biological Images on the WWW — Light Microscope and Electron Microscopy: http://www.mwrn.com/guide/electron_microscopy/biology.htm Accessed 07/04/03.
- Canter-LundH. and LundJ.W.G. (1995). Freshwater Algae. Their microscopic world explored. Bristol: Biopress Ltd.
- DeaconJ. (1997). Modern Mycology 3rd Edition. Oxford, UK: Blackwell Science.
- Fungal Cell Biology Group: http://www.fungalcell.org. Accessed 07/04/03.
- GlocklingS.L. and BeakesG.W. (2002). Ultrastructural morphogenesis of dimorphic infection (gun) cells of Haptoglossa erumpens an obligate parasite of Bunonema nematodes. Fungal Genetics and Biology, 37, 250-262. available at www.sciencedirect.com. Accessed 07/04/03.
- IMB Jena Image Library of Biological Macromolecules: http://www.imbjena.de/IMAGE.html. Accessed 07/04/03
- Lifesign networked moving images for the life sciences: http://www.lifesign.ac.uk/default.asp. Accessed 07/04/03
- LTSN bioscience Imagebank Pilot: http://bio.ltsn.ac.uk/imagebank/ Accessed 07/04/03.
- MadiganM.T., MartinkoJ.M. and ParkerJ. (2001). Brock — Biology of Microorganisms. 10th Edition. Upper Saddle River NJ, USA: Prentice Hall. Website: http://www.prenhall.com/brock/ Accessed 07/04/03.
- MantonI. (1975). Microscopy for Fun. Journal of Experimental Botany, 26, 645-655.
- Peter Scott Gallery — Irene Manton Room: http://www.lancs.ac.uk/users/peterscott/manton.htm Accessed 07/04/03.
- PurvesW.K., SadavaD., OrlansG.H. and HellerH.C. (2001). Life the Science of Biology. 6th Edition. Sunderland MA, USA: Sinuaer Associates. Website: www.thelifewire.com. Accessed 07/04/03
- Protist Image Data — The picture gallery: http://megasun.bch.umontreal.ca/protists/gallery.html. Accessed 07/04/03.
- The Microbial World — Profiles of microorganisms: an educational resource: http://helios.bto.ed.ac.uk/bto/microbes/microbes.html. Accessed 07/04/03
- University of California Berkeley Museum of Paleontology: http://www.ucmp.berkeley.edu. Accessed 07/04/03.
- Virtual School of Biodiversity: http://horus.cs.nott.ac.uk/vsb/ Accessed 7/04/03
- VolkT. (2003). Tom Volk’s Fungi: http://botit.botany.wisc.edu/toms_fungi/ Accessed 07/04/03