1,199
Views
11
CrossRef citations to date
0
Altmetric
Research articles

Excavation of buried Dun Mountain–Maitai terrane ophiolite by volcanoes of the Auckland Volcanic field, New Zealand

, &
Pages 229-243 | Received 12 Nov 2014, Accepted 16 Feb 2015, Published online: 28 May 2015

Figures & data

Figure 1 Tectonic setting. A, The Auckland Volcanic Field within northern New Zealand. Intraplate volcanic fields labelled in pink. Inset shows relationship to New Zealand tectonic setting. Green line: Dun Mountain–Maitai terrane (M) with the Dun Mountain Belt that generates the Junction Magnetic Anomaly. B, Gravity and magnetic anomalies of the Auckland area, dominated by the effects of the Dun Mountain Belt. Magnetic anomalies after Eccles et al. (Citation2005). Takapuna gravity anomaly after Williams et al. (Citation2006). C, Schematic block diagram of basement structure and terrane subdivision under the Auckland region (not to scale) after Williams et al. (Citation2006). Blue line marks postulated position of in situ Maitai Group sediments. AVF: Auckland Volcanic Field.
Figure 2 The St Heliers Volcanoes. A, Location of the volcanoes (red triangles) within the Auckland Volcanic Field (blue triangles). Yellow rectangles: basement depths after Kenny et al. (Citation2011, 2012) and Edbrooke et al. (Citation1998). MRD: Mount Roskill drill hole, EP: Eden Park drill hole (E Shalev, IESE, University of Auckland, pers. comm. 2013). Green rectangles: basement depths after Davy (Citation2008). t.c.: volcano with xenoliths of terrigenous clastics (greywacke). B, Map of the St Heliers volcanoes, based on figure 6.6 in Searle (Citation1981).

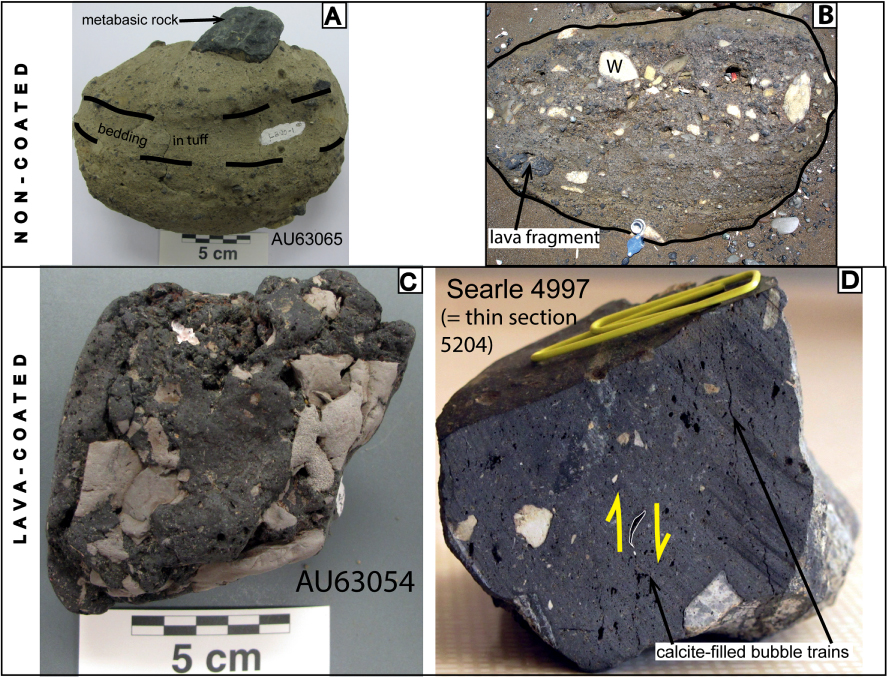
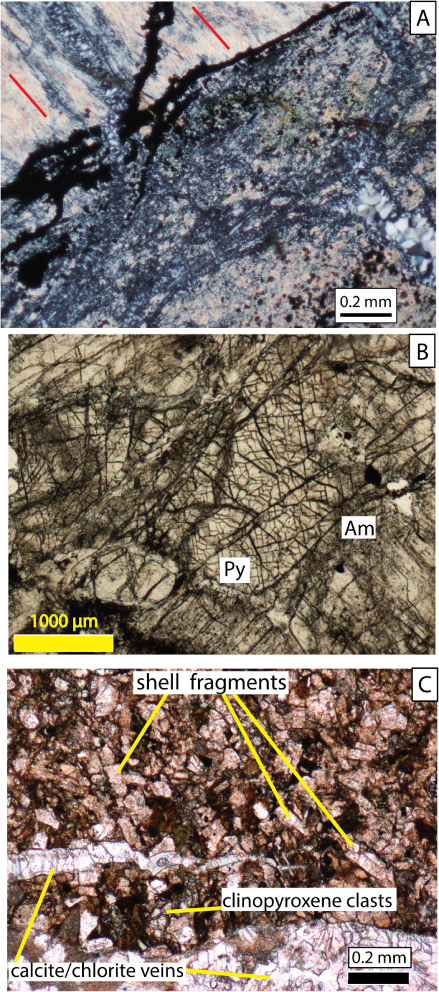
Table 1 Brief summary of lithology and mineralogy of the country rock-derived lithic clasts ejected with phreatomagmatic tuff at Glover Park and Taylors Hill volcanoes. For more detailed descriptions see Spörli & Black (Citation2013).

Figure 3 Modes of occurrence of the inclusions; all examples are from the main sampling area below Glover Park volcano (). A, Fallen block of bedded tuff with dark metabasic rock clasts of two different sizes. B, Fallen block of coarser tuff on the beach. Light-coloured fragments are Waitemata Group sandstones (W); note rounding of some clasts. Dark fragment on lower left is juvenile lava. Hand lens for scale. C, Lava clast with angular fragments of Waitemata Group rocks making a jigsaw pattern. D, Very small lithic clasts associated with bubble trains (arrowed) in a recycled composite lava fragment. Paired yellow arrows show sense of lava flow-shearing along bubble/fracture surfaces. Paper clip is 28 mm long.
Figure 3 Modes of occurrence of the inclusions; all examples are from the main sampling area below Glover Park volcano (Fig. 2B). A, Fallen block of bedded tuff with dark metabasic rock clasts of two different sizes. B, Fallen block of coarser tuff on the beach. Light-coloured fragments are Waitemata Group sandstones (W); note rounding of some clasts. Dark fragment on lower left is juvenile lava. Hand lens for scale. C, Lava clast with angular fragments of Waitemata Group rocks making a jigsaw pattern. D, Very small lithic clasts associated with bubble trains (arrowed) in a recycled composite lava fragment. Paired yellow arrows show sense of lava flow-shearing along bubble/fracture surfaces. Paper clip is 28 mm long.
Figure 4 Finely foliated metabasite. A, Tracing of a whole thin-section scan. The sequence of structural features is indicated in red. An albite vein cross-cutting cataclasite is shown at a/c. Letter in rectangle locates the micro-photo. B, Micro-photo (plane-polarised light) showing the S1/S2 foliation and an F2 fold. Fsp: feldspar; CC: cataclasite. Green lines and ‘amph’ indicate fanning S2 amphiboles. C, Photograph of the specimen. ep: epidote; FR?: possible fault repetition of the thick epidote vein. The thin-section face is on the opposite side of the specimen.
Figure 5 Garnet-bearing, coarser metabasite with polygonised feldspar, sample AU58784. The sequence of structural features is indexed in red. A, Tracing of a whole thin-section scan. Location (1) shows reactivation of D4 top-to-the-left ductile shear by D7 top-to-the-right cataclastic faulting. B, Micro-photo, plane-polarised light. G: andradite garnet. Note contrast between dusty (saussuritised?) metamorphic feldspars (Fsp) and clear, polygonised (metasomatic?) feldspars (pFsp).
Figure 6 Photomicrographs of various rock types. A, Rodingite: seam of garnets (black) cross-cut by quartz veins. Thin section Searle 5253, crossed polarisers. Note talc/quartz material with schistosity-like fabric (red lines), paralleled by quartz veins, in the upper left-hand corner. The rest of the section is more quartz-rich. B, Pyroxenite: thin section Searle 5233 from Glover Park volcano. Photomicrograph (plane -polarised light) showing transverse section of clinopyroxene crystal (Py) disturbed by cataclastic seams. Am: amphibole-rich interstitial material. The location of this photograph is shown in SF . Note that the photograph is rotated c. 90° counter-clockwise relative to SF . C, Portion of thin section (Searle 5275a) of a fossil-bearing basement sandstone from Glover Park volcano in plane-polarised light, showing shell fragments, clinopyroxene heavy minerals and calcitic veins. See the discussion for the important significance of this specimen.
Figure 6 Photomicrographs of various rock types. A, Rodingite: seam of garnets (black) cross-cut by quartz veins. Thin section Searle 5253, crossed polarisers. Note talc/quartz material with schistosity-like fabric (red lines), paralleled by quartz veins, in the upper left-hand corner. The rest of the section is more quartz-rich. B, Pyroxenite: thin section Searle 5233 from Glover Park volcano. Photomicrograph (plane -polarised light) showing transverse section of clinopyroxene crystal (Py) disturbed by cataclastic seams. Am: amphibole-rich interstitial material. The location of this photograph is shown in SF Fig. 3. Note that the photograph is rotated c. 90° counter-clockwise relative to SF Fig. 3. C, Portion of thin section (Searle 5275a) of a fossil-bearing basement sandstone from Glover Park volcano in plane-polarised light, showing shell fragments, clinopyroxene heavy minerals and calcitic veins. See the discussion for the important significance of this specimen.
Figure 7 Schematic cross-section of Glover Park volcano illustrating the lithic-bearing tuff ring and underlying diatreme and country rock. Small angular shapes represent lithic clasts. Not to scale.
Supplemental material

Excavation of buried Dun Mountain–Maitai Terrane ophiolite by volcanoes of the Auckland Volcanic field, New Zealand: additional structural analysis.

Download MS Word (1.7 MB)

Reprints and Corporate Permissions

Please note: Selecting permissions does not provide access to the full text of the article, please see our help page How do I view content?

To request a reprint or corporate permissions for this article, please click on the relevant link below:

Academic Permissions

Please note: Selecting permissions does not provide access to the full text of the article, please see our help page How do I view content?

Obtain permissions instantly via Rightslink by clicking on the button below:

If you are unable to obtain permissions via Rightslink, please complete and submit this Permissions form. For more information, please visit our Permissions help page.