2,987
Views
3
CrossRef citations to date
0
Altmetric
Article

Ultrasound-guided suprazygomatic maxillary nerve block in cleft palate surgery: The efficacy of adding dexmedetomidine to bupivacaine

&
Pages 329-336 | Received 21 May 2021, Accepted 04 Jul 2021, Published online: 20 Jul 2021

Figures & data

Figure 1. (A) Anatomical landmark of suprazygomatic maxillary nerve block. (B) The entry point of the needle is located at the frontozygomatic angle bounded by superior edge of the zygomatic arch below and posterior orbital edge forward. (C) Ultrasound images describe suprazygomatic maxillary nerve block; anatomy of PPF (pterygopalatine fossa) and TMM (tempromaxillary muscle) with guidance of Doppler flow (red color) to localize neurovascular bundle. (D) Local anesthetic (LA) spread in PPF

Figure 1. (A) Anatomical landmark of suprazygomatic maxillary nerve block. (B) The entry point of the needle is located at the frontozygomatic angle bounded by superior edge of the zygomatic arch below and posterior orbital edge forward. (C) Ultrasound images describe suprazygomatic maxillary nerve block; anatomy of PPF (pterygopalatine fossa) and TMM (tempromaxillary muscle) with guidance of Doppler flow (red color) to localize neurovascular bundle. (D) Local anesthetic (LA) spread in PPF

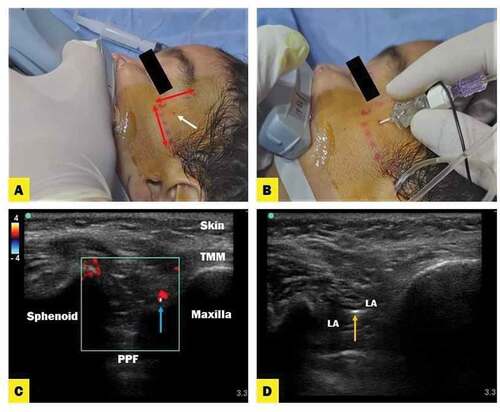
Table 1. Demographic characteristics and duration of surgery of both studied groups

Figure 2. CONSORT flow diagram of the participants through each stage of the randomized trial. Group B = bupivacaine only; group BD = bupivacaine plus dexmedetomidine

Figure 2. CONSORT flow diagram of the participants through each stage of the randomized trial. Group B = bupivacaine only; group BD = bupivacaine plus dexmedetomidine

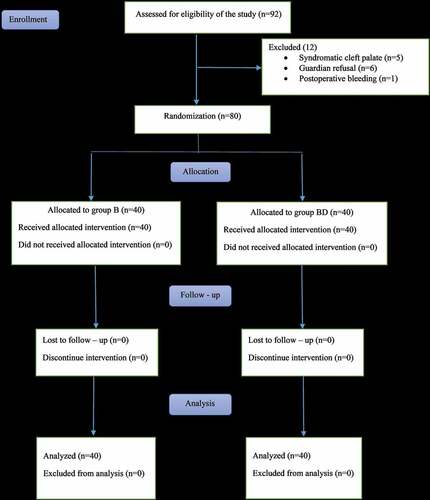
Table 2. Perioperative rescue of analgesia and time to feed of both studied group

Figure 3. Box plots of CHHIPS score during first 24 h postoperatively in the two studied groups. Group B = bupivacaine only; group BD = bupivacaine plus dexmedetomidine

Figure 3. Box plots of CHHIPS score during first 24 h postoperatively in the two studied groups. Group B = bupivacaine only; group BD = bupivacaine plus dexmedetomidine

Figure 4. Kaplan-Meier survival curve represents the first time of rescue analgesia in the two studied groups. Group B = bupivacaine only; group BD = bupivacaine plus dexmedetomidine

Figure 4. Kaplan-Meier survival curve represents the first time of rescue analgesia in the two studied groups. Group B = bupivacaine only; group BD = bupivacaine plus dexmedetomidine

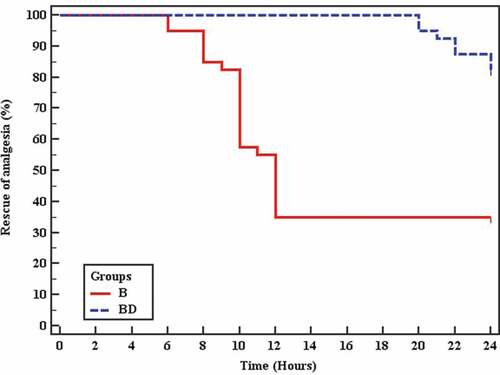
Table 3. Sedation and complications of both studied group